

Prepared by: Adam Sandahl, William Schober, Seth Carpenter, Liam Kane, Chase East
About our Project:
The Chocolate Bar Fabrication Assembly, or ChocoFab, is a powered chocolate bar processor that takes pure chocolate substances and melts it through a heated tank for extrusion into custom made molds that can be made to user design. The purpose of this project is to allow for open-source custom chocolate bar production for personal and small project use.
The CocoFab Chocolate Assembly Line was created to make ingesting chocolate even more fun. By melting the chocolate using our hot water tank and extruding the melted chocolate into custom molds, we create a more uniquely Michigan Tech piece of candy..
Functional Requirements:
- Use only open source software and tools.
Status: COMPLETE
Slicers: https://lulzbot.com/support/cura & https://ultimaker.com/software/ultimaker-cura/
3D printed part files: https://osf.io/9ajs6/files/osfstorage
- Develop custom mold for chocolate bar production.
Status: COMPLETE
Custom molds developed with OSHE logo and MTU husky emblem, Both molds are mirrored before printing for correct text and logo orientation, screenshots are reversed for ease of viewing. Made to be 90mm by 90mm and range from 10-15mm deep for small 2-3 bit bars. - Conduct thorough research of existing technologies to gain insights, inspiration, and a comprehensive understanding of the current state of relevant technology solutions available in the field.
Status: COMPLETE
Through personal questioning of subject matter experts it was found that boiling almond bark chocolate flavored candy coating was an ideal substance and method to heat and move. The bark would not come into contact with the water to prevent curdling of the bark and blockages in the tube. With a larger stable melted temperature range it is ideal for moving through the tubing to the mold. Existing hardware that creates custom chocolates was a chocolate 3d printer. This hardware was used as inspiration for melting control, but overall not our solution as it would be a slow process for making chocolate. The found solution was to create a sort of chocolate foundry. The chocolate would be heated and casted/ injected into a mold. - Devise a production plan from start to finish for bar production
Status: COMPLETE
Iterations were cycled through before settling on the current prototype process with a syringe design and isolated heating tanks for multiple stages of chocolate processing. This in turn allows for more bars to be produced and cycled to avoid long downtimes for melting and processing. WIth this design, more chocolate can be added to the syringe while the process is running by pulling out the syringe plunger and dropping in more diced chocolate pieces. Preventing cross contamination between the heating tank water and the chocolate. - Develop a process for heating chocolate to be processed by device
Status: COMPLETE
Through the use of a prebuilt and readily available heating element bent into shape at the base of the heating tank allows for ample heating. This is sufficient to melt the chocolate in the syringe for extrusion. - Develop a process of moving melted chocolate through the device to the extruder
Status: COMPLETE
With the use of silicon tubing, the end of the syringe nozzle can be secured from leaks and be moved through the heated water to the exit point on the top of the tank, which was done to prevent seepage from the melted chocolate. With the suction from the syringe this is an ideal transportation method. - Develop a process for maintaining temperature of chocolate melting medium
Status: COMPLETE
The chocolate melting medium is heated using a 12v heating element. The heater is controlled with a relay module to disable the heater when the desired temperature is reached. - Develop a process of extruding the correct amount of chocolate for the current mold
Status: COMPLETE
With manual control on the syringe the extrusion hose at the bend acts as an ideal gate for dispensing the correct amounts of chocolate. This is made to be expanded upon for automation in the following semesters. - Develop project parts and materials list for order to accomplish the above processes
Status: COMPLETE
A project bill of materials (BOM) was made involving the necessary parts to construct the current model of ChocoFab. BOM is attached to the report in the appropriate table. - Assemble heating method for initial prototype
Status: COMPLETE
First the cigarette lighter barrel plug was cut off of the end of the 12 volt car water heater. Next, the plastic shell was opened and filled with JB weld epoxy. After that, we used a 3d printed bracket to glue the heater to the inside wall of the tank and bent the heater into a “C” shape so it fit inside the tank. The wires are then run out of the tank through the top to our temperature controller and power supply. - Assemble chocolate moving method for initial prototype
Status: COMPLETE
The silicon tubing being food grade and capable of handling the increased temperatures of the heating tank is secured to the syringe nozzle and routed through the tank to the exit hole and over to the mold. - Assemble temperature sensor and heating control for initial prototype
Status: COMPLETE
To avoid the need for a custom circuit design we chose to buy a pre built temperature sensor off of amazon to save time and money. To assemble we connect one wire from the heater to ground and the other to relay of the temperature controller. Then we connect our 12 volt power supply to the temperature controller and its relay. Finally, we connect the temperature controller to the power supply’s ground. The 12 volt power supply is then just run off 3 phase AC power from the wall outlet. To provide feedback to the temperature controller a small thermometer node is attached inside the tank and the wire is run back to the temperature controller to get an accurate temperature reading. - Assemble extruding method for initial prototype
Status: COMPLETE
Our initial extruder method is to use a syringe to both hold the chocolate in the warm water, and to pump the chocolate through the tube. This is done by 3d printing a bracket to hold the syringe in the tank, then it is filled with chocolate by pulling out the plunger and dropping in broken up chunks. For this semester the plunger is pushed by hand, but next semester we hope to automate it with an electric motor and a rack and pinion, or buy a heavy duty pump that can handle viscous liquids.


Value-Added Goals:
- Develop a process of extracting the chocolate bar from the mold automatically.
Status: INCOMPLETE
Automatic mold extraction was forgone in favor of mold cycling to account for cooling times. - Ability to integrate custom molds into device for custom chocolate bar shapes.
Status: COMPLETE
Mounting bracket assembled to be placed on the side of the heating tank for mold placement. Molds will rest in the mounting bracket and be able to be removed and replaced. - Develop a mechanism to incorporate extra ingredients/mix-ins like sprinkles, rice krispies, peanuts, mint, cinnamon.
Status: INCOMPLETE
Additional ingredients and toppings were not incorporated due to time constraints and due to the current method of mold cycling. - Chocolate tube takes “fun” path to the extruder end.
Status: INCOMPLETE
The tubing does not follow a fun path, and we did not dye the water different colors either. The tube just loops back up through the top in a straight path. - Keep the heating medium within range of melting point.
Status: COMPLETE
The heater is within a feedback system that monitors the water temperature. The system has various variables to change how the system reacts. The simplest is the targeted temperature. This is where the system maintains the water temperature too. The other variables change when the system enables the heater when near the targeted temperature. These variables act similar to PID heater systems. - Conduct in-depth research on the entire process involved in transforming cocoa materials, which may be either raw cocoa materials or pre-made chocolate, into finished chocolate bars.
Status: COMPLETE
Cacao beans are harvested and fermented for up to eight days. After fermentation, the cacao beans are now known as cocoa beans. Cocoa beans must now be stored and dried for an extended period of time. Once dried, the beans are ready to be sent to chocolate manufacturers. The beans are now cleaned and roasted at a low temperature to develop flavor. The cocoa bean shells are now separated from the “nibs,” the meat of the bean, in a process called winnowing.


Nibs are finely ground into cocoa mass and separated under high pressure into cocoa powder and cocoa butter. Cocoa mass/butter/powder is now mixed with other ingredients to make chocolate. Cocoa mass and cocoa butter are mixed with other ingredients/sweeteners, such as sugar, milk, milk powder, salt, soy lecithin, and vanillin. These ingredients are mixed, ground, and kneaded into a paste. In a process called “conching,” a large agitator rolls, kneads, aerates, and stirs the mixture under heat. This creates a consistent, smooth chocolate mixture, where the final aroma and flavor of the chocolate are defined. The chocolate is tempered and molded into bulk bars, or “wafers”, or is sent into another production process to be made into specialized consumer products like chocolate bars.
Assembly Instructions:
Tank and Mold Holder Assembly
- Queue up all 3d printed parts so they are ready for later. Everything but the molds can be printed with PLA or ABS, the molds should be TPU.
- Unscrew the rod in the camber you would like to use and drill out the opening with a ⅜ drill bit to make room for the new tube. Discard the crappy small orange tube that comes with the tank.
- Bend the 12 volt water heater in a “C” shape so that it does not touch any of the walls and adhere the plastic portion to the heater mount with double sided tape. Adhere the heater mount to the bottom of the camber with double sided tape. (Be careful while bending the heater to not cause any holes or breaks.)
- Take the 3d printed adapter ring for the syringe and slide over the body. Discard the original tank lid.
- Put the 3d printed temperature sensor holder on the syringe, then push the metal node into the plastic so it sticks out the bottom.
- Attach one end of the tube to the end of the syringe and run the other from the inside of the tank to the outside through the hole we drilled larger.
- Assemble the mold bracket center, left, and right to make a square, then adhere the right and left brackets to the side of the tank in line with the top on the front edge with double sided tape.
Electronic Assembly
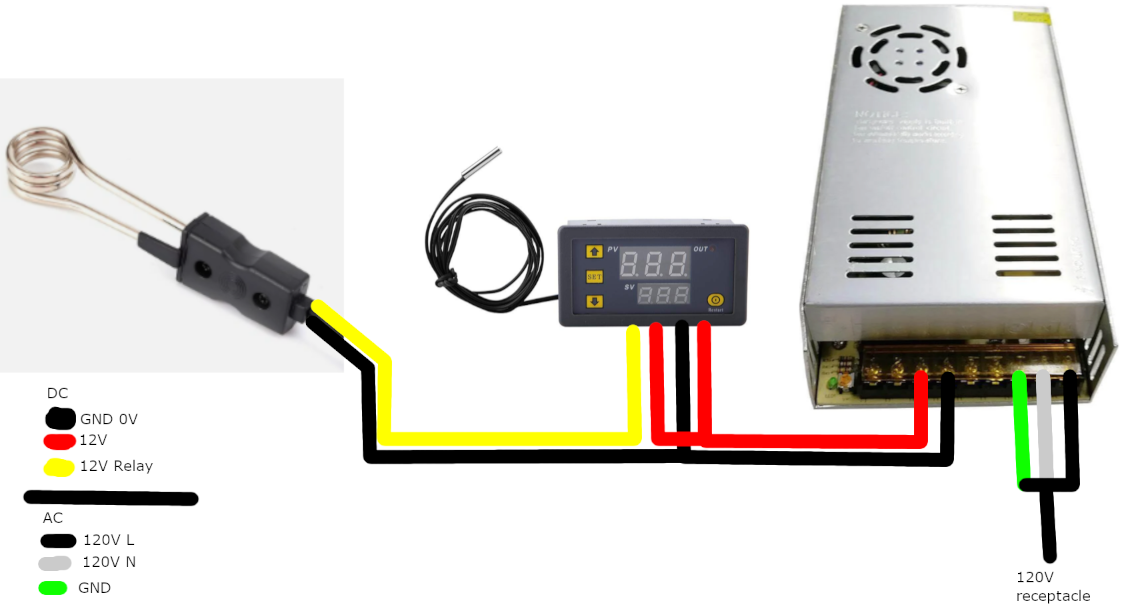
- Cut the cigarette lighter plug off the 12 volt car water heater and strip ¼ inch of the plastic of the positive and ground wires.
- Open heating element. Fill the heating element with JB weld epoxy. Close the element while epoxy is setting. This makes the heater waterproof.
- Connect one wire from the heater to ground, the other to the relay on the temperature controller. (Either wire works, this is a non-directional part.)
- Connect the 12v to both Vcc and the other relay connection on the temperature controller with 14 gauge wire. Connect the temperature controller to ground with 14 gauge wire.
Resource And Reference Link Table:
| Link | Description | Use |
| https://ultimaker.com/software/ultimaker-cura/ | Slicer used for non-lulzbot printers | 3D printer slicer used for printing with lab and personal printers. |
| https://lulzbot.com/support/cura | Cura slicer for lulzbots | 3D printer slicer used for printing with lab printers via USB or SD card. |
| https://www.autodesk.com/products/inventor | Autodesk Inventor 2023 | CAD software used to make both mold CAD files and brackets. |
| https://www.autodesk.com/products/fusion-360/personal | Fusion 360 Hobbyist (Free) | CAD software used to make sensor mount, heater mount, and syringe mount. |
| https://www.lakechamplainchocolates.com/making-chocolate/ | Article from Lake Champlain Chocolates on how to make chocolate from cacao beans | Good information if future plans lead to the creation of chocolate from raw cacao beans. |
| https://www.ecolechocolat.com/en/how-chocolate-is-made.html | Article from Ecole Chocolate on how chocolate is made from the bean to the bar. | Good resource if future plans lead to the creation of chocolate from raw cocoa beans. |
| https://www.whitakerschocolates.com/blog/what-are-the-food-additives-in-chocolate/ | Article from Whitakers Chocolates, elaborating about most of the common food additives, and their use in chocolate. | Good resource if future plans lead to the creation of chocolate using a custom recipe with different additives. |
Bill of Materials
| Component | Part/Identification Number | Price xQuantity |
| Husky Mold V1 | link | $0.00 x1 |
| OSHE Mold V1 | link | $0.00 x1 |
| Mold TPU filament estimation | Lab Filament | $4.00 x1 |
| Mold Bracket C | link | $0.00 x1 |
| Mold Bracket L | link | $0.00 x1 |
| Mold Bracket R | link | $0.00 x1 |
| Heater Mount V2 | link | $0.00 x1 |
| Syringe2Tank V1 | link | $0.00 x1 |
| Syring2TempSensor V1 | link | $0.00 x1 |
| Mounts PLA filament estimation | Lab and Personal Filament | $5.00 x1 |
| Double Sided Tape | link | $6.49 x1 |
| Acrylic Tank | link | $54.99 x1 |
| Plastic Syringe | link | $7.99 x1 |
| 1 Meter Tube | link | $8.99 x1 |
| Temperature Controller | link | $12.99 x1 |
| 12 Volt Heater | link | $13.51 x1 |
| JB Weld | link | $6.54 x1 |
| 12 Volt Power Supply | link (Used lab excess power supply, this is an available option) | $18.99 x1 |
| 14 Gauge Wire | link (Used lab supply, this is an available option) | $18.47 x1 |