
What is GrowBot?
GrowBot is a proposed device that will be able to assist consumers with creating and maintaining small-scale gardens. The long-term goals of this project are for GrowBot to be able to plant, water, provide health updates, and harvest plants. The reason we chose this project is that we wanted to have access to fresh, homegrown produce, even if you are a busy professional.
Spring of 2022 Semester Goals
This semester, we had quite a few goals we had set. We were able to meet most of them and we feel confident in the work we did.
- Create software model:
- This goal was to create a visualization of how the software on GrowBot works and is mainly meant to help new developers contribute to the source code of GrowBot. Currently, the model is up to date with what we have done right now and what we are working on.
- Use only open-source software/tools:
- We exclusively used open-source software and hardware which you can see in the table of open-source tools below.
- Full new wiring diagram:
- We created a new wiring diagram of the drive system using KiCad.
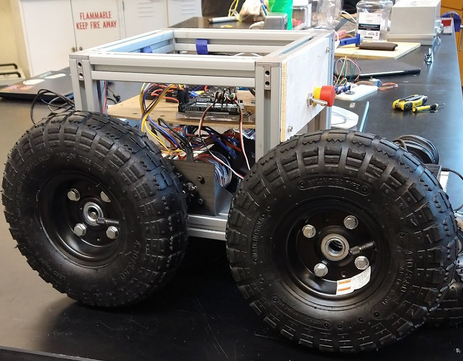
- Base drive chassis CAD model:
- While not fully assembled, we do have CAD models for the chassis, the motor mounts, and the new wheel hubs.
- Determine Navigation System:
- We have determined that by using a combination of NRF24l01 for communication and DS3231 AT24C32 RTC modules, we plan to use them to triangulate GrowBot’s position based on the onboard module and several other stationary modules.
- Basic Web interface:
- Using a combination of python3 for the backend and javascript for the front end, the dashboard for the bot has been fleshed out. While it is not the prettiest interface, it allowed us to set up and test more features of the backend.
- MVP Plant Classification:
- One of the long-term goals for GrowBot is to have it be able to identify various plants that may be found in a home garden. Along with identification, GrowBot should be able to report on the health and stage of growth of the plant based on its appearance. Since this is a pretty large goal, we set a smaller goal of creating an image classification model with the ability to identify tomatoes and bell peppers. Currently, a tomato classification model has been successfully trained. While the bell pepper classification model isn’t completed yet, the bulk of the work has been finished and the only remaining step is training the model. The models both have limited sets of data and were/will be trained for only a few hours meaning there is much room for improvement even though the tomato model proved to be relatively accurate.
- Create more in-depth documentation:
- The team drive has been organized and our git and OSF repositories are up to date.
- Create a standard ROS Image:
- We have the process for the robot’s current status greatly simplified. In order to prepare our standardized ROS image, you simply have to install Ubuntu 22.04 on a computer and clone our project repository. Once you have that, you can read the README file and see the instructions on running the setup script. Once that is done, you can begin developing your contributions to GrowBot.
Replicate Our Progress
Here are the general steps to replicate the work that we completed this semester.
Mechanical Build
- Assemble chassis
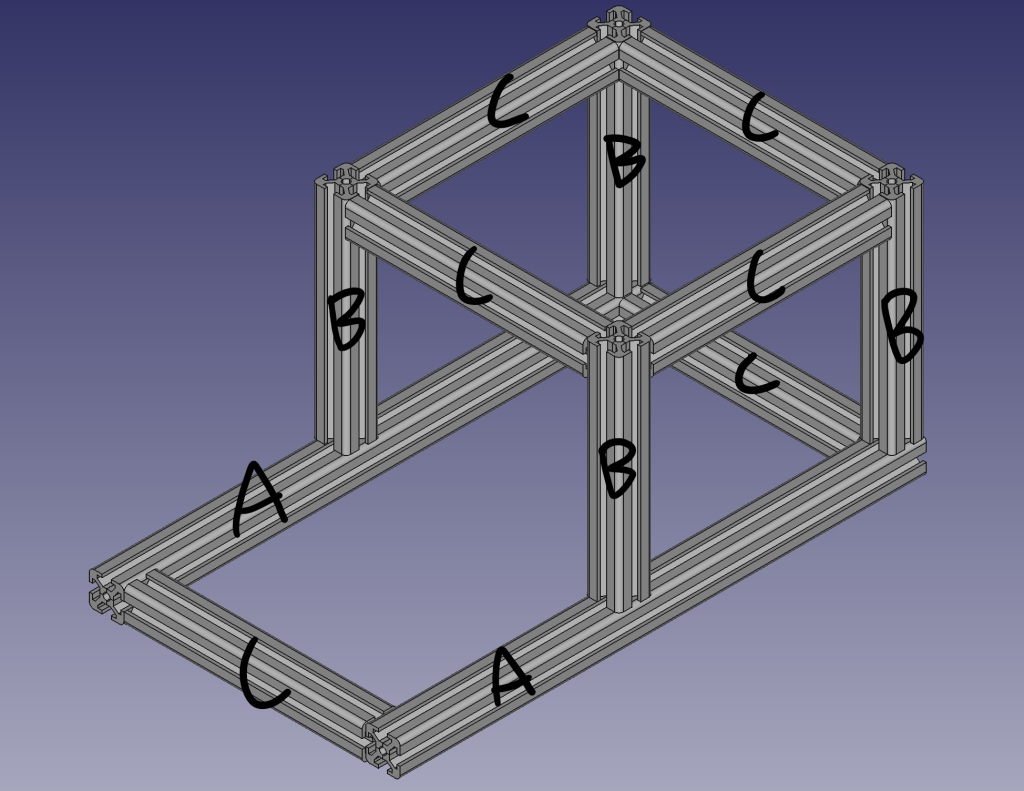
- Cut 30mm T Rails into correct sizes
- A – 2 x 18in
- B – 4 x 8in
- C – 6 x 9in
- Put rails together as shown using 90-degree T slot connectors
- Cut 30mm T Rails into correct sizes
- Print wheel mounts, wheel hubs and actuator gears
- Parts can be downloaded from the GitHub repository
- 4 x Wheel mounts (wheelMount_2.3.FCStd)
- 4 x Wheel hubs (wheelHub.FCStd)
- 4 x Actuator gears (N/A)
- Total print time ~35 hours
- Parts can be downloaded from the GitHub repository
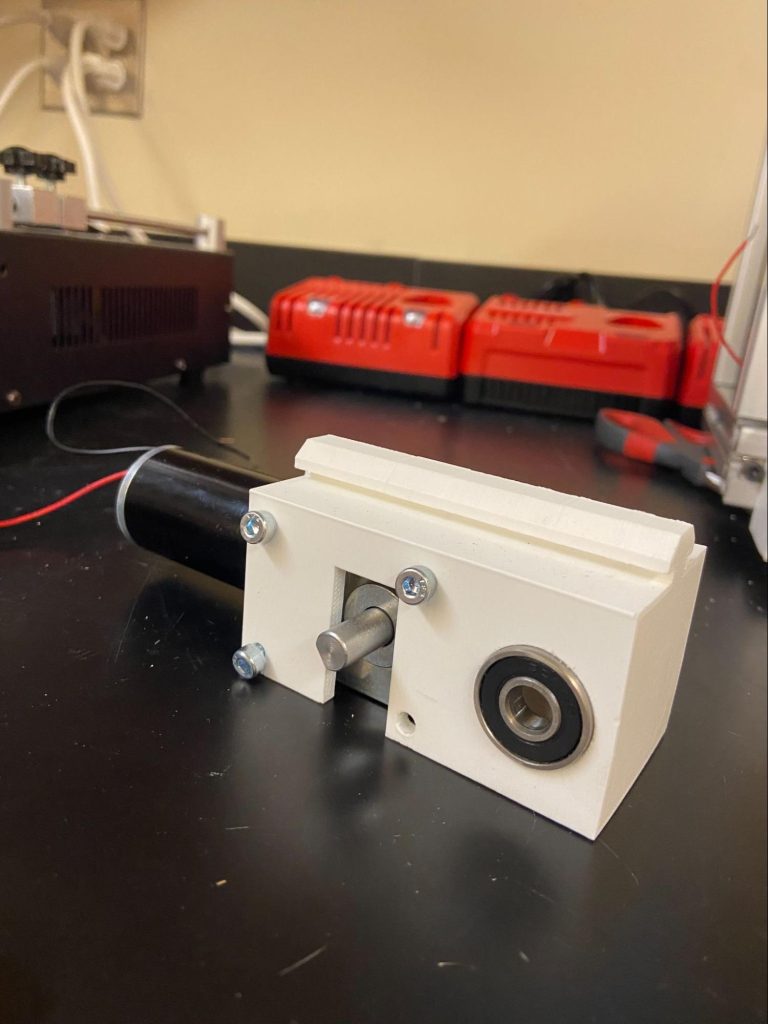
- Attach bearings to wheel mounts and mount motors
- Attach bearings to both sides of the wheel mounts
- May also require some persuasion
- Mount motors using M4 x 10 screws
- Slide wheel mounts on to T Slot rails and lock in place using T Slot locking hardware
- Attach bearings to both sides of the wheel mounts

- Replace wheel hubs
- Remove the screws holding the harbor freight wheels together
- Remove just the side with the bearing
- Insert axle rods into printed wheel hubs (May need some persuasion(A hammer))
- Make sure to do this before putting wheel hubs together
- Make sure to do this before putting wheel hubs together
- Use M6 screws and nuts to secure printed wheel hub to the remaining original hub
- Add wheels to mounts, add actuator gears
- Slide axle rods through skateboard bearings
- Add actuator gears to motor and axle rods
- After being wired according to the diagram, GrowBot should be able to drive!

Electrical
- Obtain Electronic components shown in the wiring diagram.
- Follow pin diagram in the wiring diagram.
- Use Arduino code from git to run
Web Interface/Control Software
- Install Ubuntu Desktop 22.04 onto the computer you intend to use for GrowBot.
- Once installed, you need to install git with the following command: “sudo apt install git”
- Once git is installed, clone our repo with the command “git clone https://github.com/OSHE-Github/GrowBot”
- Then run the command “cd GrowBot && sudo chmod +x setup.sh”
- Once that is done, you are now ready to run the installer script with the command: “./setup.sh”
Plant Classifier
Despite sounding like a heavily involved process, several open-source resources are available that make creating an image recognition model relatively easy. Personally, I followed a tutorial that can be found at this link. While the tutorial is sufficient some changes needed to be made during the process. The tutorial goes through five main steps that include creating a python environment, finding data, cleaning data, training the model, and then using the model. If you do not intend to train your own model, the data generated from training the tomato can be found in the OSF, then the instructions in step 5 on how to use the model can be followed to apply the model.
Step 1: Creating the python environment
In order to create the virtual environment that the classification model will be created in, Anaconda will need to be installed. Anaconda can be found here. After installing Anaconda, open up the Anaconda prompt and run the following command.
In this case, “test” is the name of the created environment and can be changed to whatever you would like it to be but for this I will be referring to the environment as “test” in all code. This prompt will install keras and tensorflow which will be used to do the computations needed to train the model. Jupyter is also installed which is where we will write the code. Next, go into the created environment by running the following prompt.
Lastly, we need to install ImageAI as well as OpenCV. ImageAI is an open source python library that takes the process of generating a image detection model and makes it achievable in only a few lines of code. OpenCV is another open source python library which is used in many computer vision projects. OpenCV and ImageAI can be installed via the prompt
Step 2: Find Data
There are several open source options available with large sources of data. The data that was used for this project was all found on kaggle. The data required includes the images that will be used to trail the model as well as annotation files which are files of code that identifies where the objects are within the images. More often than not, the images can be found but the annotations are most likely not with the images. In order to use the images to train the model, the annotations will need to be generated. Generating the annotations will be covered in the next step. There are forms these annotations typically come in, PASCAL VOC and COCO, we will focus on training out model with PASCAL VOC annotations.
Step 3: Clean Data
After the data is found, the images need to be separated into data that will be used to train the model and the data that will be used to validate the model. Opening a jupyter notebook within the environment and running the following code, after replacing the necessary components, will split the data. Anywhere in the code that says “path to …”, needs to be replaced with the respective path.

After the data is split, create a folder named annotations within the folder where the train data is stored as well as within the folder where the validation data is stored. If you already have the annotations, place the annotations for the images in the train folder into the respective annotations folder and place the rest of the annotations into the annotation folder within the validation folder. If you do not have the annotations, we will now generate them. To do so we will use tool known as LabelImg. LabelImg can be installed through your command line with the following command.
LabelImg can be opened by simply running the command “labelImg” within your command prompt. Within LabelImg, open the directory that contains the images being annotated and set the save directory to the respective validation folder. Next, create the labels you are going to use. If you are only identifying one object, you can create one label and set it as the default. Now, go through each of the images within the directory and draw bounding boxes around all of the objects which you are training your model to identify. This will need to be done for the train images as well as the validation images.
4. Train Model
After the data is properly prepared, we can start training the model. By running the following code, the model will start training.

Where the code says “object being identified”, insert a list of the names of the label you created when annotating the images. It will take several hours for this code to run. After the code has finished running, a few new folders will be created within the data directory which will contain the data necessary to use the model. By increasing the the number of experiments ran as well as the bath size, the model will be trained to be more accurate at the expense of time required to train the model.
5. Use the trained model
Now that the model is trained, it can be used in numerous applications. In order to make sure it works tho, it can be tested using the following code.

This code will set the model up to be ready to use. The JSON data as well as the models were generated during the training process and can be found within the data file. After the model is ready the following code can be ran to apply it.

Running this code will grab a random image from the chosen directory and use the model to detect the object it was trained to detect within that image. Running this code on a random image used to train the tomato detection model yielded the following output.

Tools We used
The following table is a list of all of the open source tools that we used for GrowBot as well as links in case you want more information on the tool.
| Tool | Link |
| Arduino | https://www.arduino.cc/ |
| KiCad | https://www.kicad.org/ |
| FreeCAD | https://www.freecadweb.org/ |
| Gaphor | https://gaphor.org/ |
| Neovim | https://neovim.io/ |
| Ultimaker Cura | https://ultimaker.com |
| Anaconda | https://www.anaconda.com/products/distribution |
| ImageAI | https://imageai.readthedocs.io/en/latest/ |
| OpenCV | https://opencv.org/ |
| LabelImg | https://github.com/heartexlabs/labelImg |
| Kaggle | https://www.kaggle.com/datasets/andrewmvd/tomato-detectionhttps://www.kaggle.com/datasets/muhriddinmuxiddinov/fruits-and-vegetables-dataset/discussion |
Bill of Materials
| Part | Price | Link |
| 30 x 30 mm T Slot Rails | $25.00 x 2 = $50 | Amazon.com |
| 10 in Pnuematic tires x 4 | $8.49 x 4 = $33.96 | harborfreight.com |
| Arduino Mega | $41.14 | Arduino.cc |
| L298N Motor Drive Controller 4pcs | $11.49 | Amazon.com |
| uxcell Double Shaft Worm Gear Motor DC | $31.99 x 4 = 127.96 | Amazon.com |
| RTC Modules | $17.99 | Amazon.com |
| 8mm Skateboard Bearings | $9.59 | Amazon.com |
| Axle Rods | $8.99 | Amazon.com |
| nRF24L01 | $2.34 x 3 = $7.02 | DigiKey.com |
| M6 x 25 mm bolts | $8.99 | Amazon.com |
| M6 Nuts | $9.02 | Amazon.com |
Links To Source Files
Github: https://github.com/OSHE-Github/GrowBot
OSF: https://osf.io/sczuj/
Required Arduino Libraries
- “RTClib” by Adafruit – Used to interface DS3231 RTC modules with arduino
Available: RTClib: Adafruit RTClib
- “L298N” by AndreaLombardo – Used to interface L298N motor drivers with arduino
Availible: GitHub – AutoJimmy/L298N_FromAndreaLombardo: An easy to use Arduino library to control DC motors with an L298N module
- “RF24” by 2bndy5 – Used to interface RF24 transmitters and receivers with arduino
Availible: GitHub – nRF24/RF24: OSI Layer 2 driver for nRF24L01 on Arduino & Raspberry Pi/Linux Devices