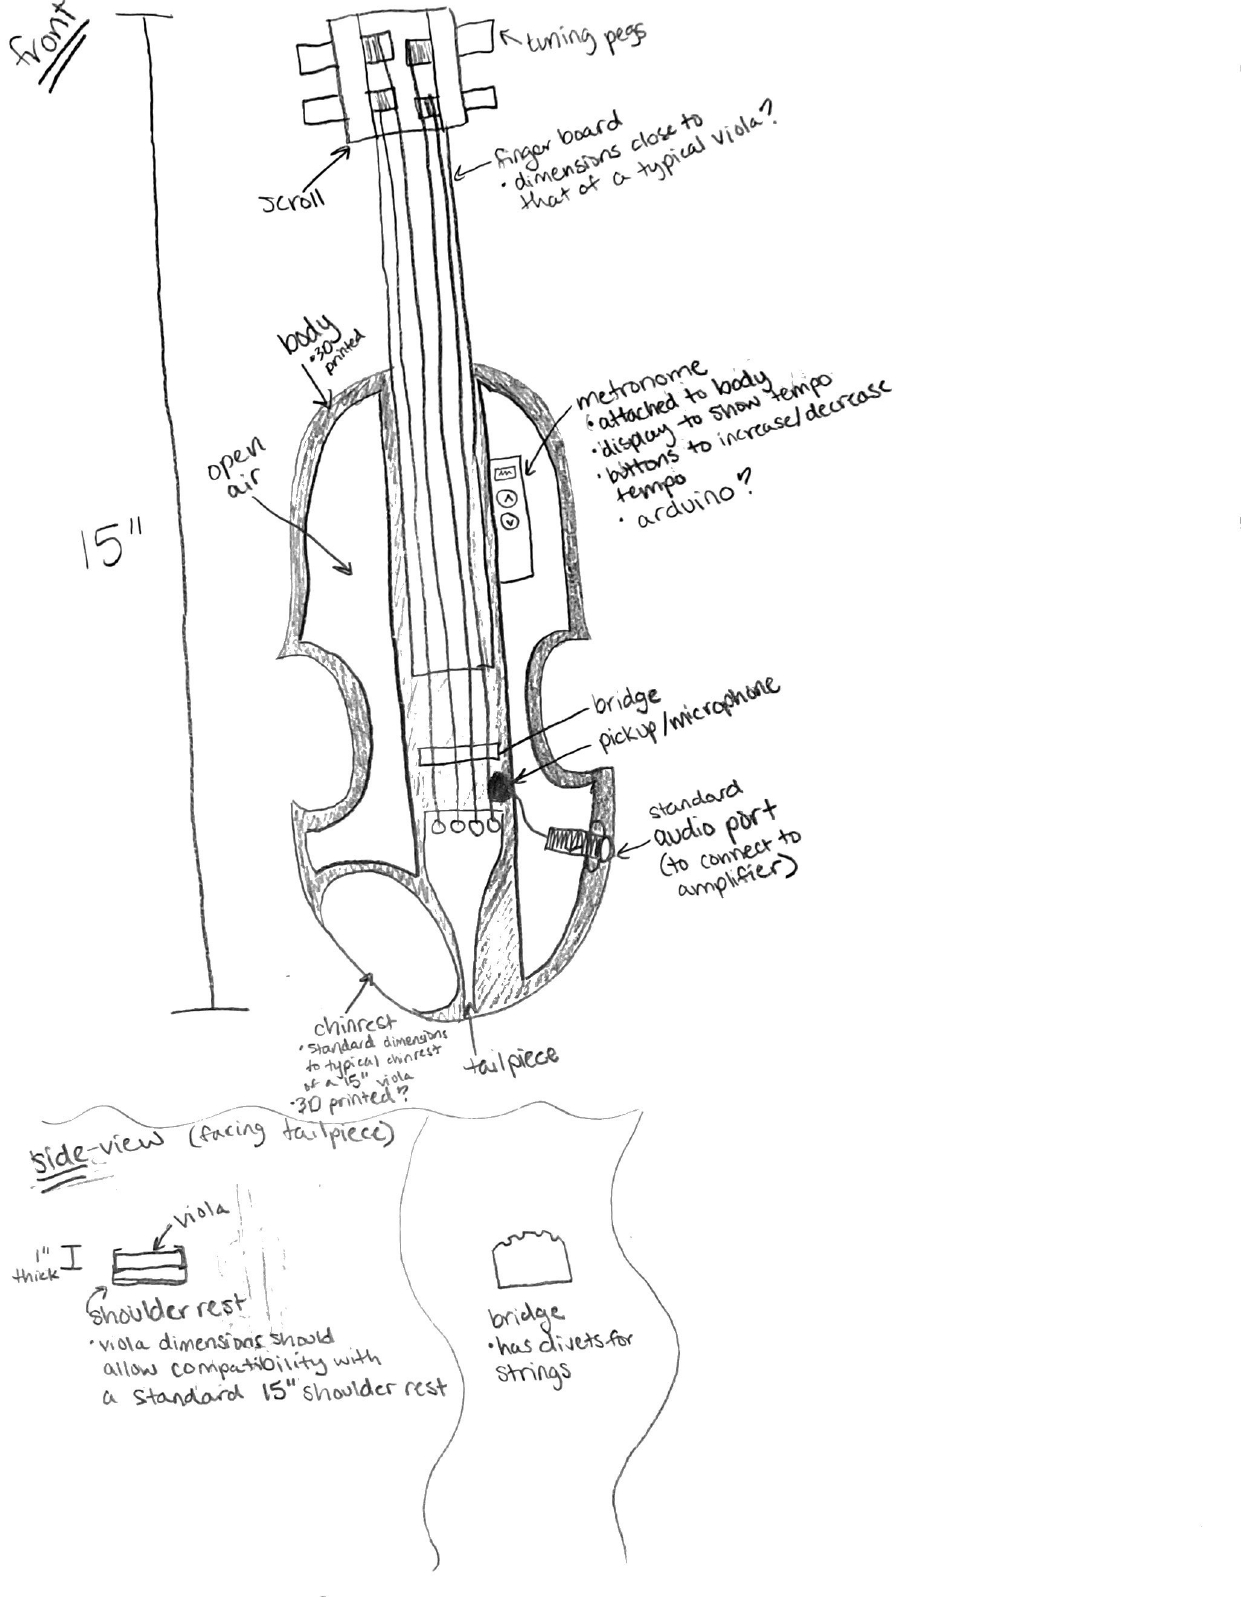
Electric Viola Pedalboard
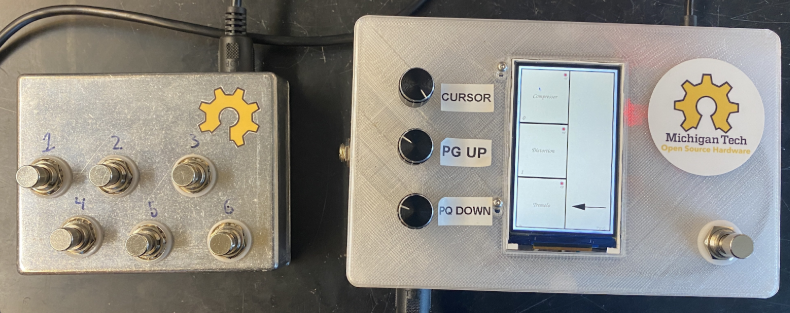
4/20/2025
Work Complete:
- I worked on the report sufficiently to complete my sections and format all sources in IEEE style.
To-Do List:
- Complete the report and see if there are any other sections the team wants me to do.
- Help assign numbers to sources and figures as everyone else nears completion.
4/13/2025
Work Complete:
- I worked with the team to ensure everything was ready for the presentation to Dr. Pinar. It went very well and he gave lots of good feedback of small things that would greatly improve user experience.
- I prepped and presented the capstone presentation during the weekly OSHE meeting.
- I completed my share on the report outline. We also met up on Saturday to program a new Raspberry Pi from scratch to ensure our directions in the report are as complete as possible. We ended up finding a few things to update in the JUCE installation instructions.
To-Do List:
- Complete the report.
- Potentially make some modifications to the plugin code.
4/5/2025
Work Complete:
- Successful group checkoff on Monday. I put all the latency scope images in a slideshow to make it easier to show. The plugins were all 4.3-4.4ms, which exceeds our 10ms goal.
- The pedal and footswitch boxes were easily able to withstand 20 lbs, so they passed the weight test.
- I revised the three JUCE distortion projects slightly to make them more intuitive to use on the pedal. I also made some refinements to regular distortion and saturation so that there aren’t as many modes. I did this by seeing which mode sounded best.
To-Do List:
- Help prepare for the meeting with Dr. Pinar on Wednesday. Modify the plugins if needed.
- Prepare the ENT4960 capstone slideshow.
- Start the report draft.
3/30/2025
Work Complete:
- Lots of plugin testing with Xavier and Georgia.
- I finished coding the distortion plugin, but it ended up having too many parameters because I implemented quite a few types of equations to give the user multiple options. I turned this into two different plugins—one has softer distortion modes, and the other implements unique types of distortion.
- I added in a low frequency oscillator to give the user to modulate the threshold value of compressor plugin. It’s not super noticeable (it probably shouldn’t be anyway), but it worked when testing it on the Pi.
- I tested latency on the plugins with Georgia and Xavier.
To-Do List:
- Put the latency scope images in a slideshow.
- Fix the distortion modes that aren’t functioning.
- Rename the distortion project to saturation and rename the variables to avoid confusing the user.
- Perform weight testing on the pedal.
3/23/2025
Work Complete:
- I finished coding the phaser plugin.
- I tested phaser and compression with Xavier and both sound good! The latency is pretty minimal too, which is great!
- I started tweaking the parameter bounds for both plugins to avoid errors and make the output sound better. All changes so far have been uploaded to GitHub.
To-Do List:
- Finish the first revision of distortion so that it can hopefully be tested on Monday.
- Finish changing parameter bounds and ensure JUCE and GitHub are up to date.
- Add some personal ideas to the compression/phaser code so that it brings something new to the table.
- Start thinking about latency measurements and weight testing.
3/16/2025

Work Complete:
- I created the JUCE project on the Raspberry Pi and added the compression code. It only needed minimal fixes to get it to the point of compiling.
- I updated all the JUCE projects on the Raspberry Pi to output LV2 plugins instead of VST3. This makes the plugins compatible with mod-host.
- I did some debugging with Xavier to ensure the plugins worked properly with mod-host. There was an issue with mod-host not being able to modify the JUCE parameters, so I worked on the JUCE end to see if the code needed to change at all. Luckily, Xavier found the problem, and it didn’t require any code changes.
- I started the phaser plugin code.
To-Do List:
- Have Xavier and Ava try out compression to see if the parameter boundaries should be changed at all.
- Upload the new compression code to GitHub.
- Finish the phaser plugin and test it.
- Start coding distortion.
- Start thinking about latency measurements.
3/9/2025
Work Complete:
- I believe I fixed the compression code but didn’t get a chance to test it on the Raspberry Pi. I commented the code quite a bit to make it the user understands what is going on in the process block.
- I started working on the distortion plugin research but didn’t get very far.
- I learned that JUCE has a phaser class in the DSP module, which should simplify several things. I’ve started looking into the types of parameters and their respective bounds that they should have.
To-Do List:
- Test compression and fix it if needed.
- Once compression works, try to implement a phaser plugin with the respective JUCE class. Test it once done.
- Start coding distortion.
3/2/2025
Work Complete:
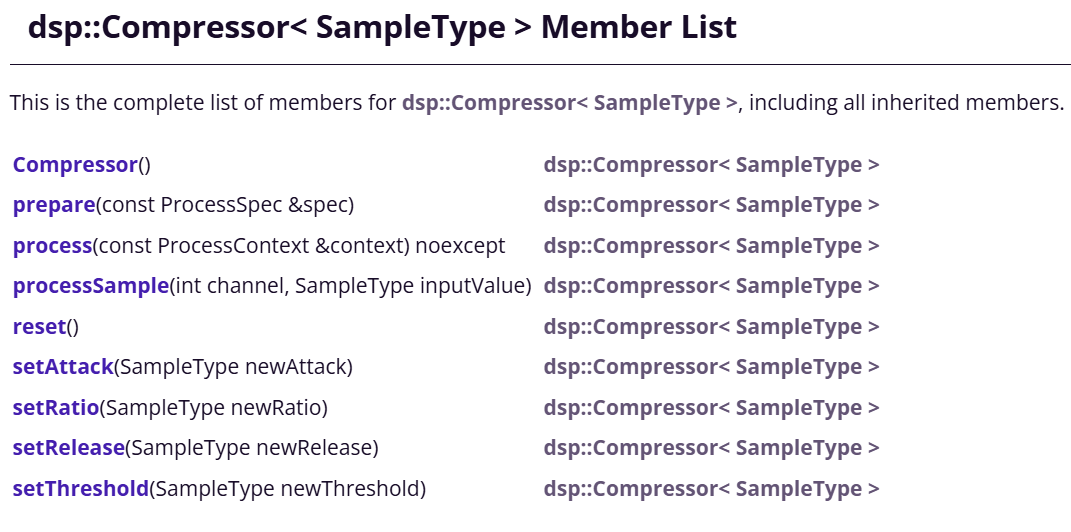
- I think I found a way to fix the compression plugin, but it involves rewriting pretty much all the code. JUCE has a compressor class template that allows you to use functions to create and modify a custom digital compressor. Going this route would make the code run faster and easier to debug, but it won’t be as easy for users to see what the code is doing to the audio signal on a low level.
- I found a lot of different process blocks and equations for ways to implement distortion.
To-Do List:
- Reimplement compression and test it.
- Try out a few different types of distortion.
- Look into auto-wah and phaser, especially with existing JUCE classes in mind.
2/16/2025
Work Complete:
- Our group prepared for and presented at CDR this week.
- I learned that the envelope follower isn’t really a plugin on its own – it is a preliminary step that is essential to other audio effects like auto-wah and compression.
- I looked into how to apply the envelope follower to compression and attempted coding the plugin, but I get a really weird “buzz” in addition to the audio signal when I tested it with a guitar and amp. Something definitely isn’t working right.
To-Do List:
- Try to fix compression.
- Look more into auto-wah to see if that would be easier to implement than compression. If so, maybe I’ll try to get that one working first.
- Start looking into distortion and/or phaser.
2/2/2025
Device operation diagram:
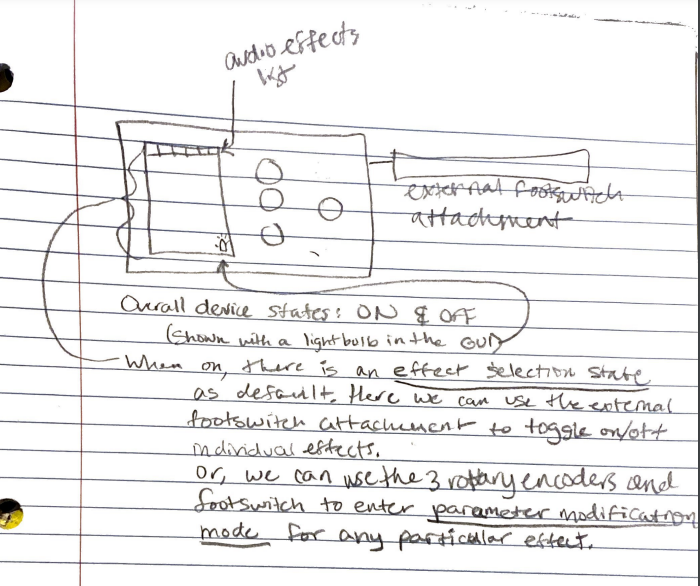
Work Complete:
- I found a couple really good sources that help visualize how to implement specific audio effects using process diagrams.
- I have draft code made for an envelope follower plugin with parameters for attack and release.
To-Do List:
- Upload the code to the raspberry pi and test it with a guitar/amp. Fix the code as needed.
- Potentially update the code to include more parameters.
- Start another plugin (Maybe phaser or distortion?)
1/26/2025
Work Complete:
- I updated the header comments on Git for the two working plugins.
- I looked at sources to see the digital signal processing involved with phaser plugins.
To-Do List:
- Start coding the new plugin.
- Test the plugin.
- Check in with Xavier and Ava to see where we are at for plugin hosts.
1/19/2025
Work Complete:
- I met up with Georgia to start transferring the plugin projects on the Raspberry Pi away from copies of JUCE plugin demos to being its own project following the format of the template files. We did this for the fuzz plugin during the meeting, and I finished it for the passthrough and tremolo plugins afterward.
- Georgia and I created an instruction document detailing how to make a new project with the template files and what all needs to be changed within the files.
- I condensed the fuzz plugin code to remove the unnecessary process block and make the audio processing code more efficient. I also updated the template header file to avoid the redundant process block. These changes have been pushed to GitHub.
- Lastly, I tested the fuzz, tremolo, and passthrough plugins with a guitar and amp to ensure everything was still working.
To-Do List:
- Fix the header comments for each plugin on GitHub.
- Start on a new plugin.
1/12/2025
Project Sketch:
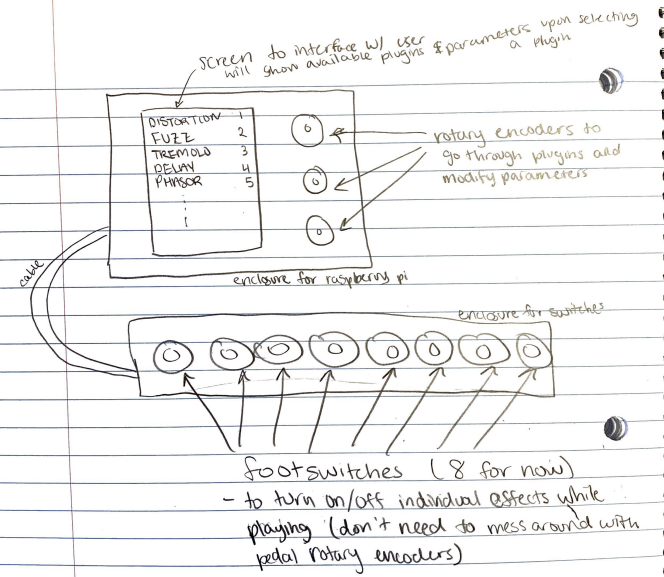
Work Complete:
- We had our introductory meeting to establish semester goals and deadlines for the project specification.
- I met up with Georgia to get delay measurements and update the template files, but we weren’t quite able to finish either of these.
To-Do List:
- Update the template file so that the files, once renamed, can be added into a new project space without causing PIP errors.
- Make an instruction set for how to create a new project using the template files.
- Optimize the fuzz plugin.
- Start on a new plugin.
10/13/2024
Work Complete:
- I helped research enclosures for the MultiFX pedal, but we decided in the meeting that we should wait until the pedal design is done before ordering anything. For the end-of-semester deliverable, a prototype will be 3D printed.
- We talked to Dr. Pinar and confirmed that he wanted stereo input and output, no touchscreen, and eight footswitches are plenty.
- We decided during our Thursday meeting that it would be better to have three of us working on different plug-in codes rather than pairs of us, so I started researching distortion.
To-Do List:
- Do more research on distortion plug-ins
- Make a .vst file draft for a distortion plug-in
- Make the corresponding config file that will run the plug-in on the Pi
- Test plug-in and config once they are written
10/6/2024
Work Complete:
- We met today to do our proof of concept test, which was successful. Using Xavier’s guitar and amplifier, we ran clean and reverb (called “freeverb”) plugins that were already on the Pi.
Setup: Guitar input -> pi/hat -> amplifier - I researched carrying cases more and created a list to compare the dimensions and cost of the different options. The table I made has 5 options, but I highlighted the 2 I think would work best. We will decide which one of these we’ll want to order when we know the size of the MultiFX pedal, considering that we’ll need room for more pedals.
- We discovered some aspects of the Pi OS were corrupted, so I reflashed the Pi with Elk.
- We also started to discuss how we want to wire the switches and bypass and updated BOM accordingly.
To-Do List:
- Research enclosures for the multiFX pedal.
- Start writing reverb plug-in code on Juce.
- Talk to Dr. Pinar (ask about mono/stereo input and output requirements, whether or not we should implement a touchscreen, and the number of foot switches we should set up)
9/29/2024
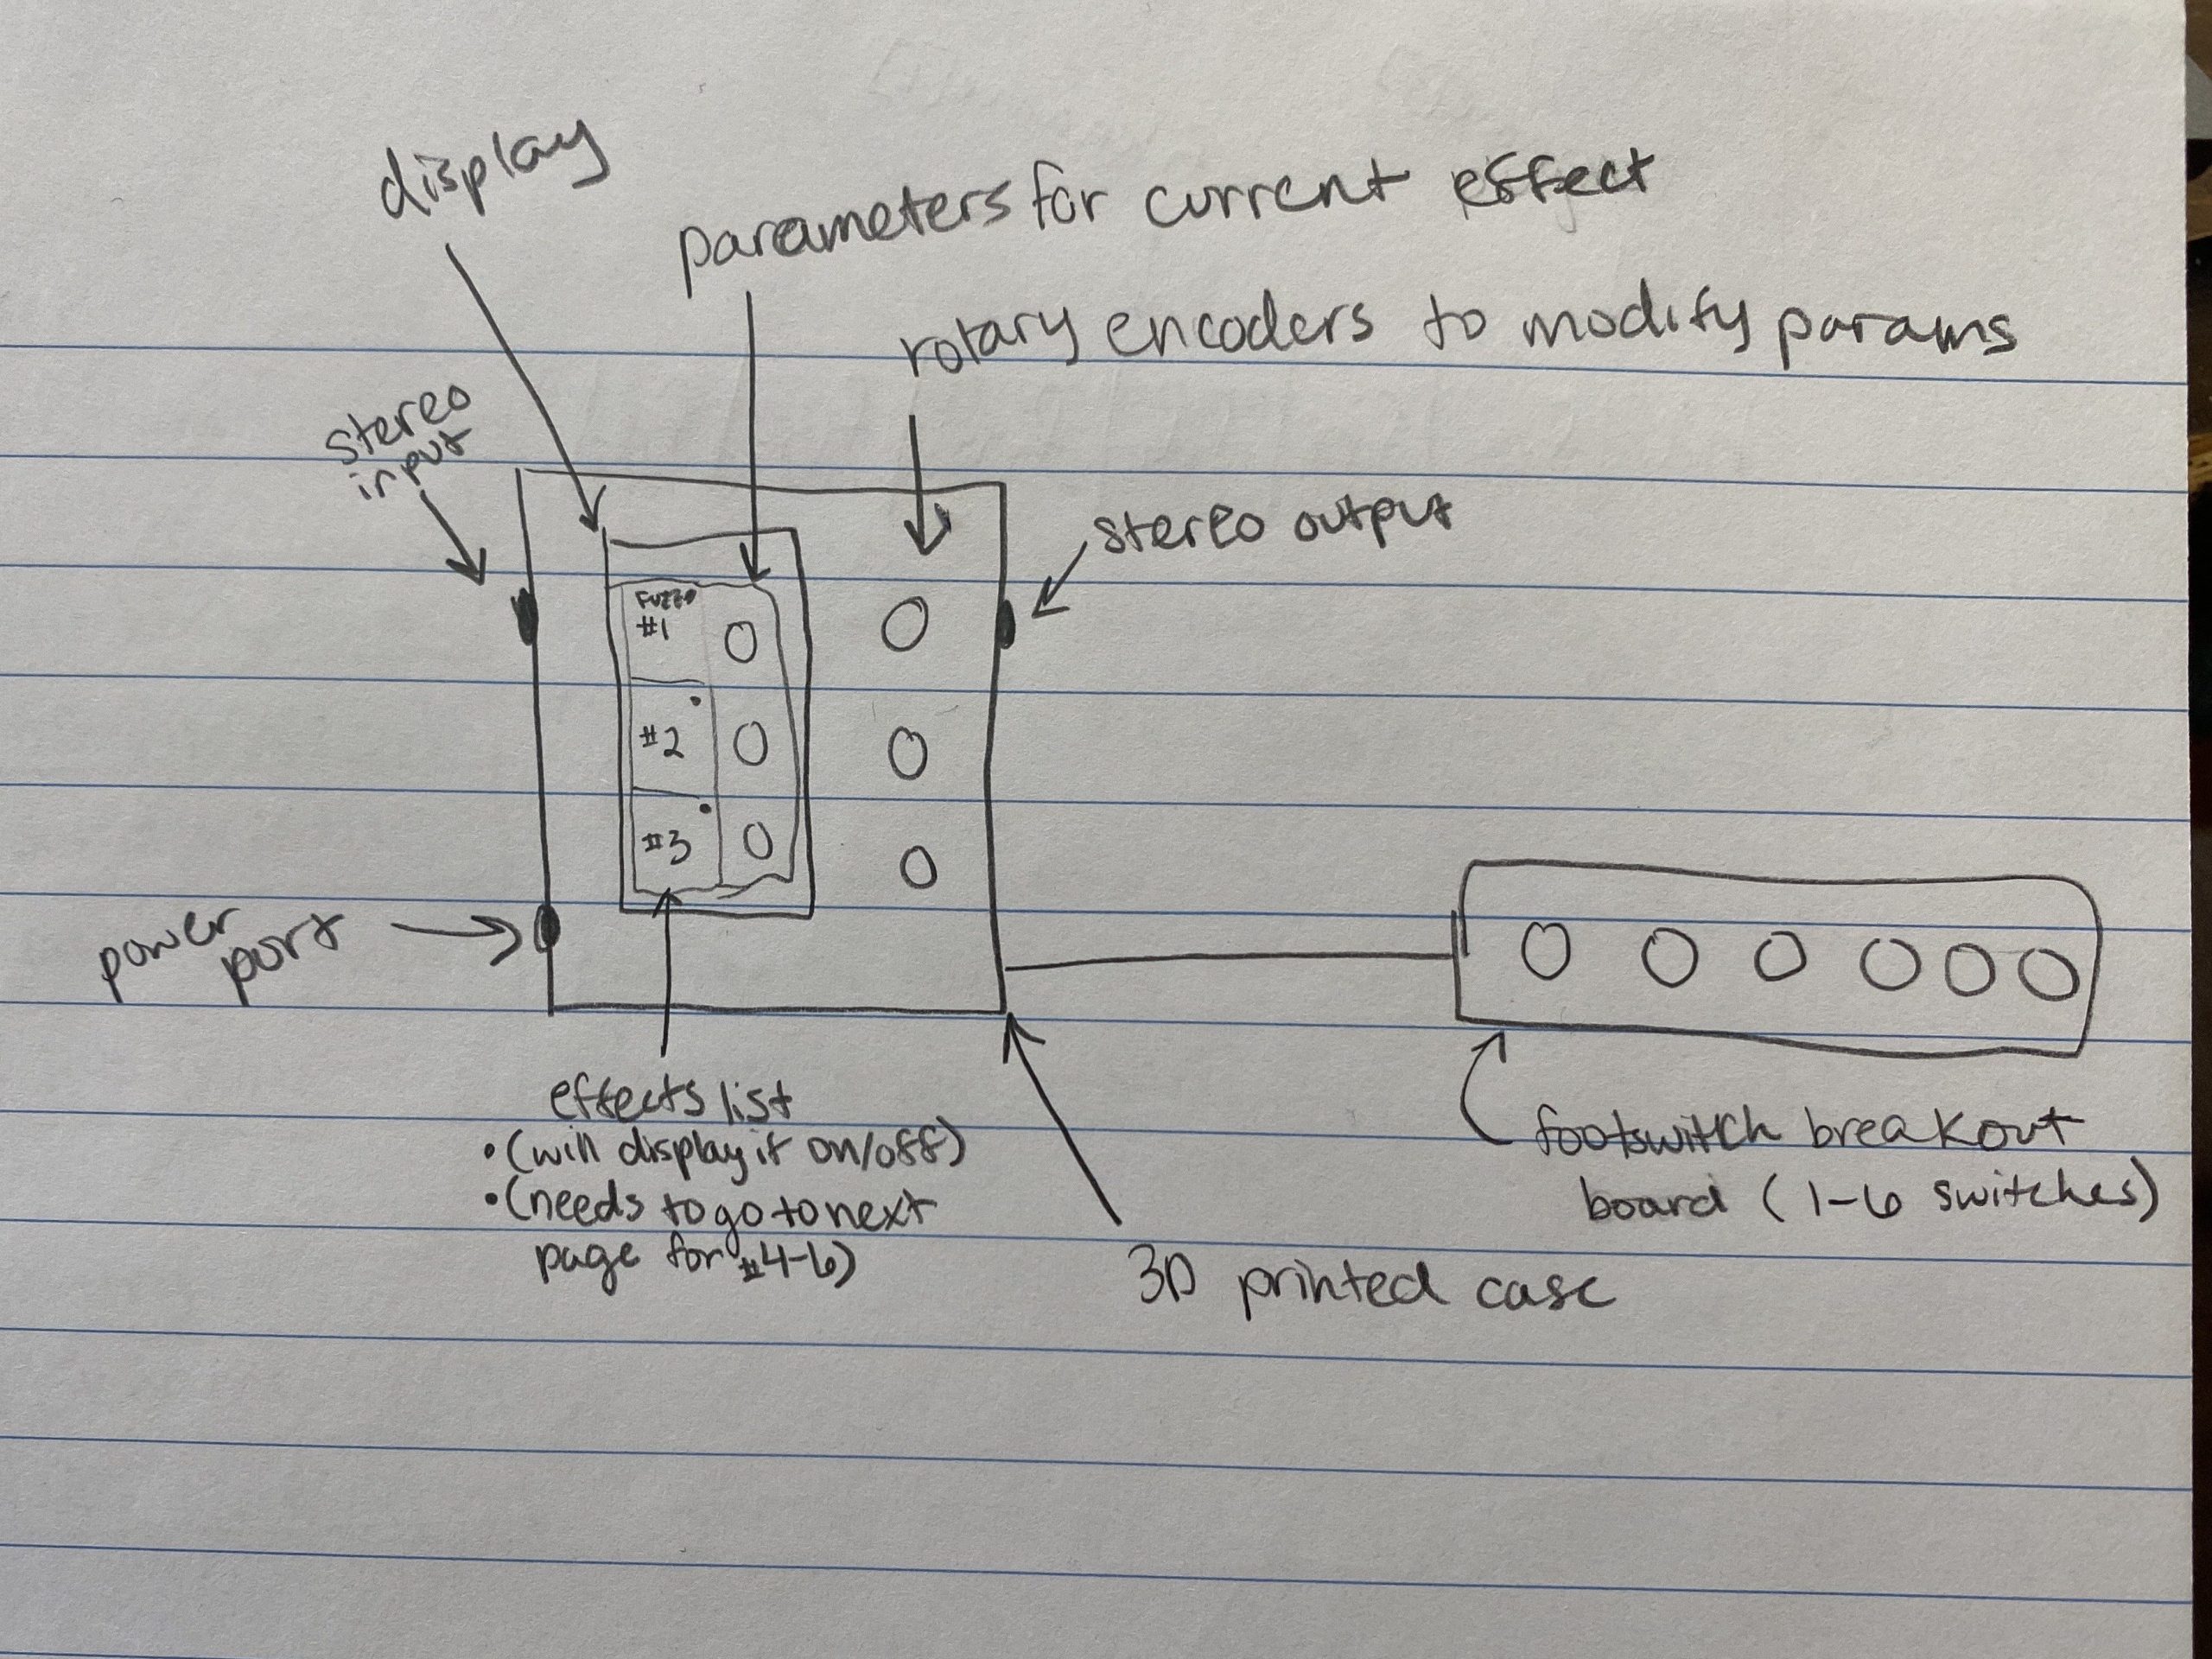
Device Operation Sketch:
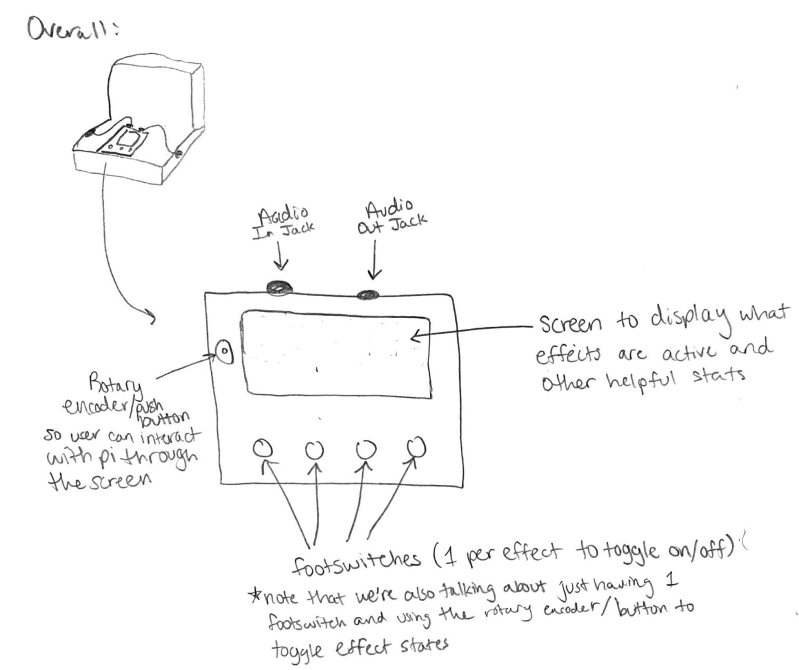
Work Complete:
- I researched briefly Juce vs other IDEs. I trust Dr. Pinar’s reasoning for why he chose Juce over alternatives but I wanted to learn more about it for myself.
- I looked a little more into user-interface components. Xavier did most of the heavy lifting for this but it was interesting to learn how difficult it is to find displays that actually work for the Pi.
- I worked with the team to create the CDR slides for tomorrow’s presentation.
- I started looking into what kind of carrier case we’ll want for the pedalboard. We decided that a larger case would be better since next semester will have some pedal additions other than just the MultiFX pedal.
- I got certified to 3D print with Georgia and Xavier.
To-Do List:
- Figure out how to run a plug-in on the Pi and test it on an instrument.
- Help the team come up with a list of what exactly needs to be bought and make sure everything is purchased very soon.
- Once the pre-made plug-in proves to work as intended, start making a plug-in template file and plug-in for reverb. (This will definitely take longer than just this week.)
- Continue to research carrier cases to use.
9/22/2024
Work Complete:
- We met with Dr. Pinar and decided to go the MultiFX pedal route with the Raspberry Pi. He gave us a Raspberry Pi 4 Model B, a HifiBerry ADC+DAC hat to improve audio signal quality, and some audio adapter cables.
- I worked with the team to make a presentation regarding our progress for the weekly OSHE meeting. We also revised our Project Specification document since this semester’s goals changed drastically this week.
- I researched different operating systems besides Elk Audio (the one Dr. Pinar recommended), though we just decided to go with Elk Audio.
- We met up on Saturday and successfully flashed the Pi with the Elk Audio OS and also started looking more in detail at some user-interface options to potentially include in the project. We also made a document that gives instructions on how to flash the Pi, which will be useful for the report at the end of the semester.
To-Do List:
- Research Juce and .vst versus other IDEs and file types.
- Figure out how to run a plug-in on the Pi and test it on an instrument.
- Look more into user-interface devices and components and list items we definitely want to order.
9/13/2024
Sketch:
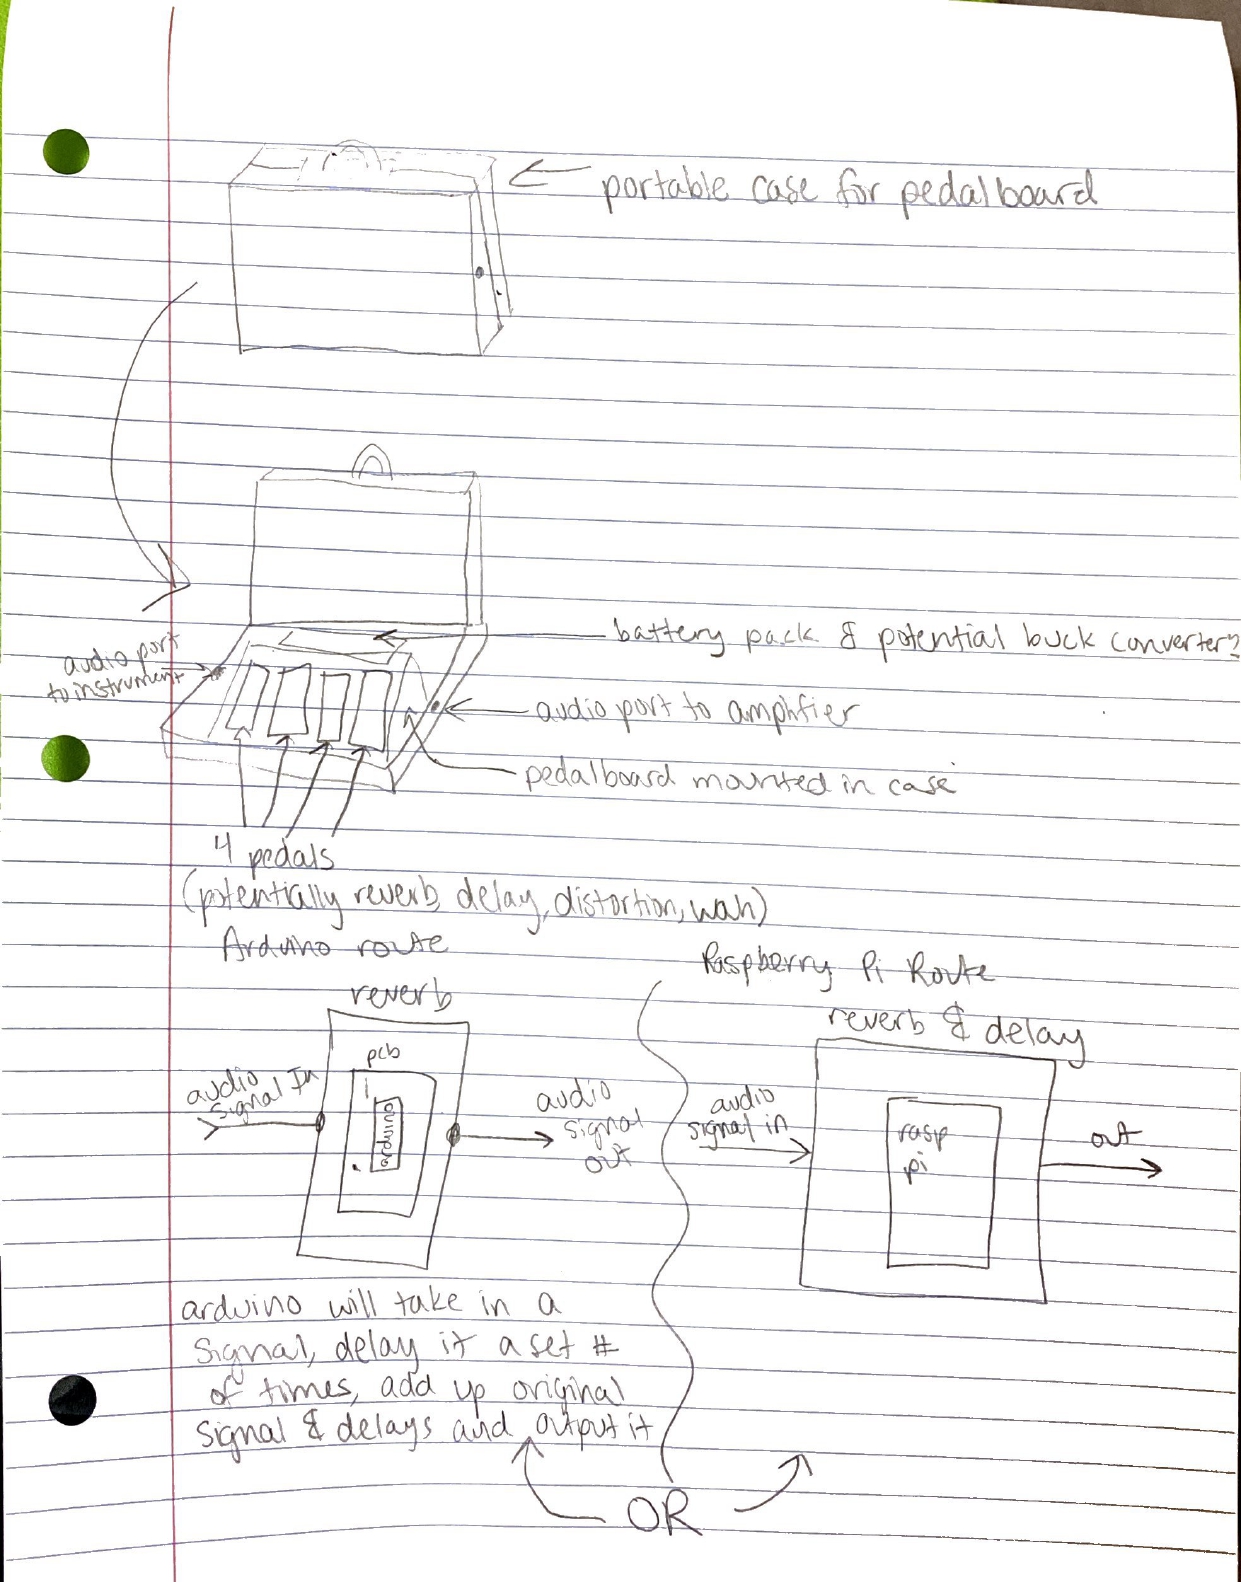
To-Do List:
- Make a circuit schematic draft for the reverb pedal with the intention of using an Arduino Zero.
- Start making a script for the Arduino in Arduino IDE.
- Meet with Dr. Pinar and the rest of the team to go over potentially using a Raspberry Pi instead and maybe having it be a MultiFX pedal.
- Research audio effects pedals made with a Raspberry Pi.
- Keep track of components that need to be ordered.
Concerns:
- I’m concerned about the complexity and cost of using a Raspberry Pi instead of Arduinos, but we’ll see if that changes after meeting with everyone on Monday.
Electric Viola

4/20/2024
Work Complete:
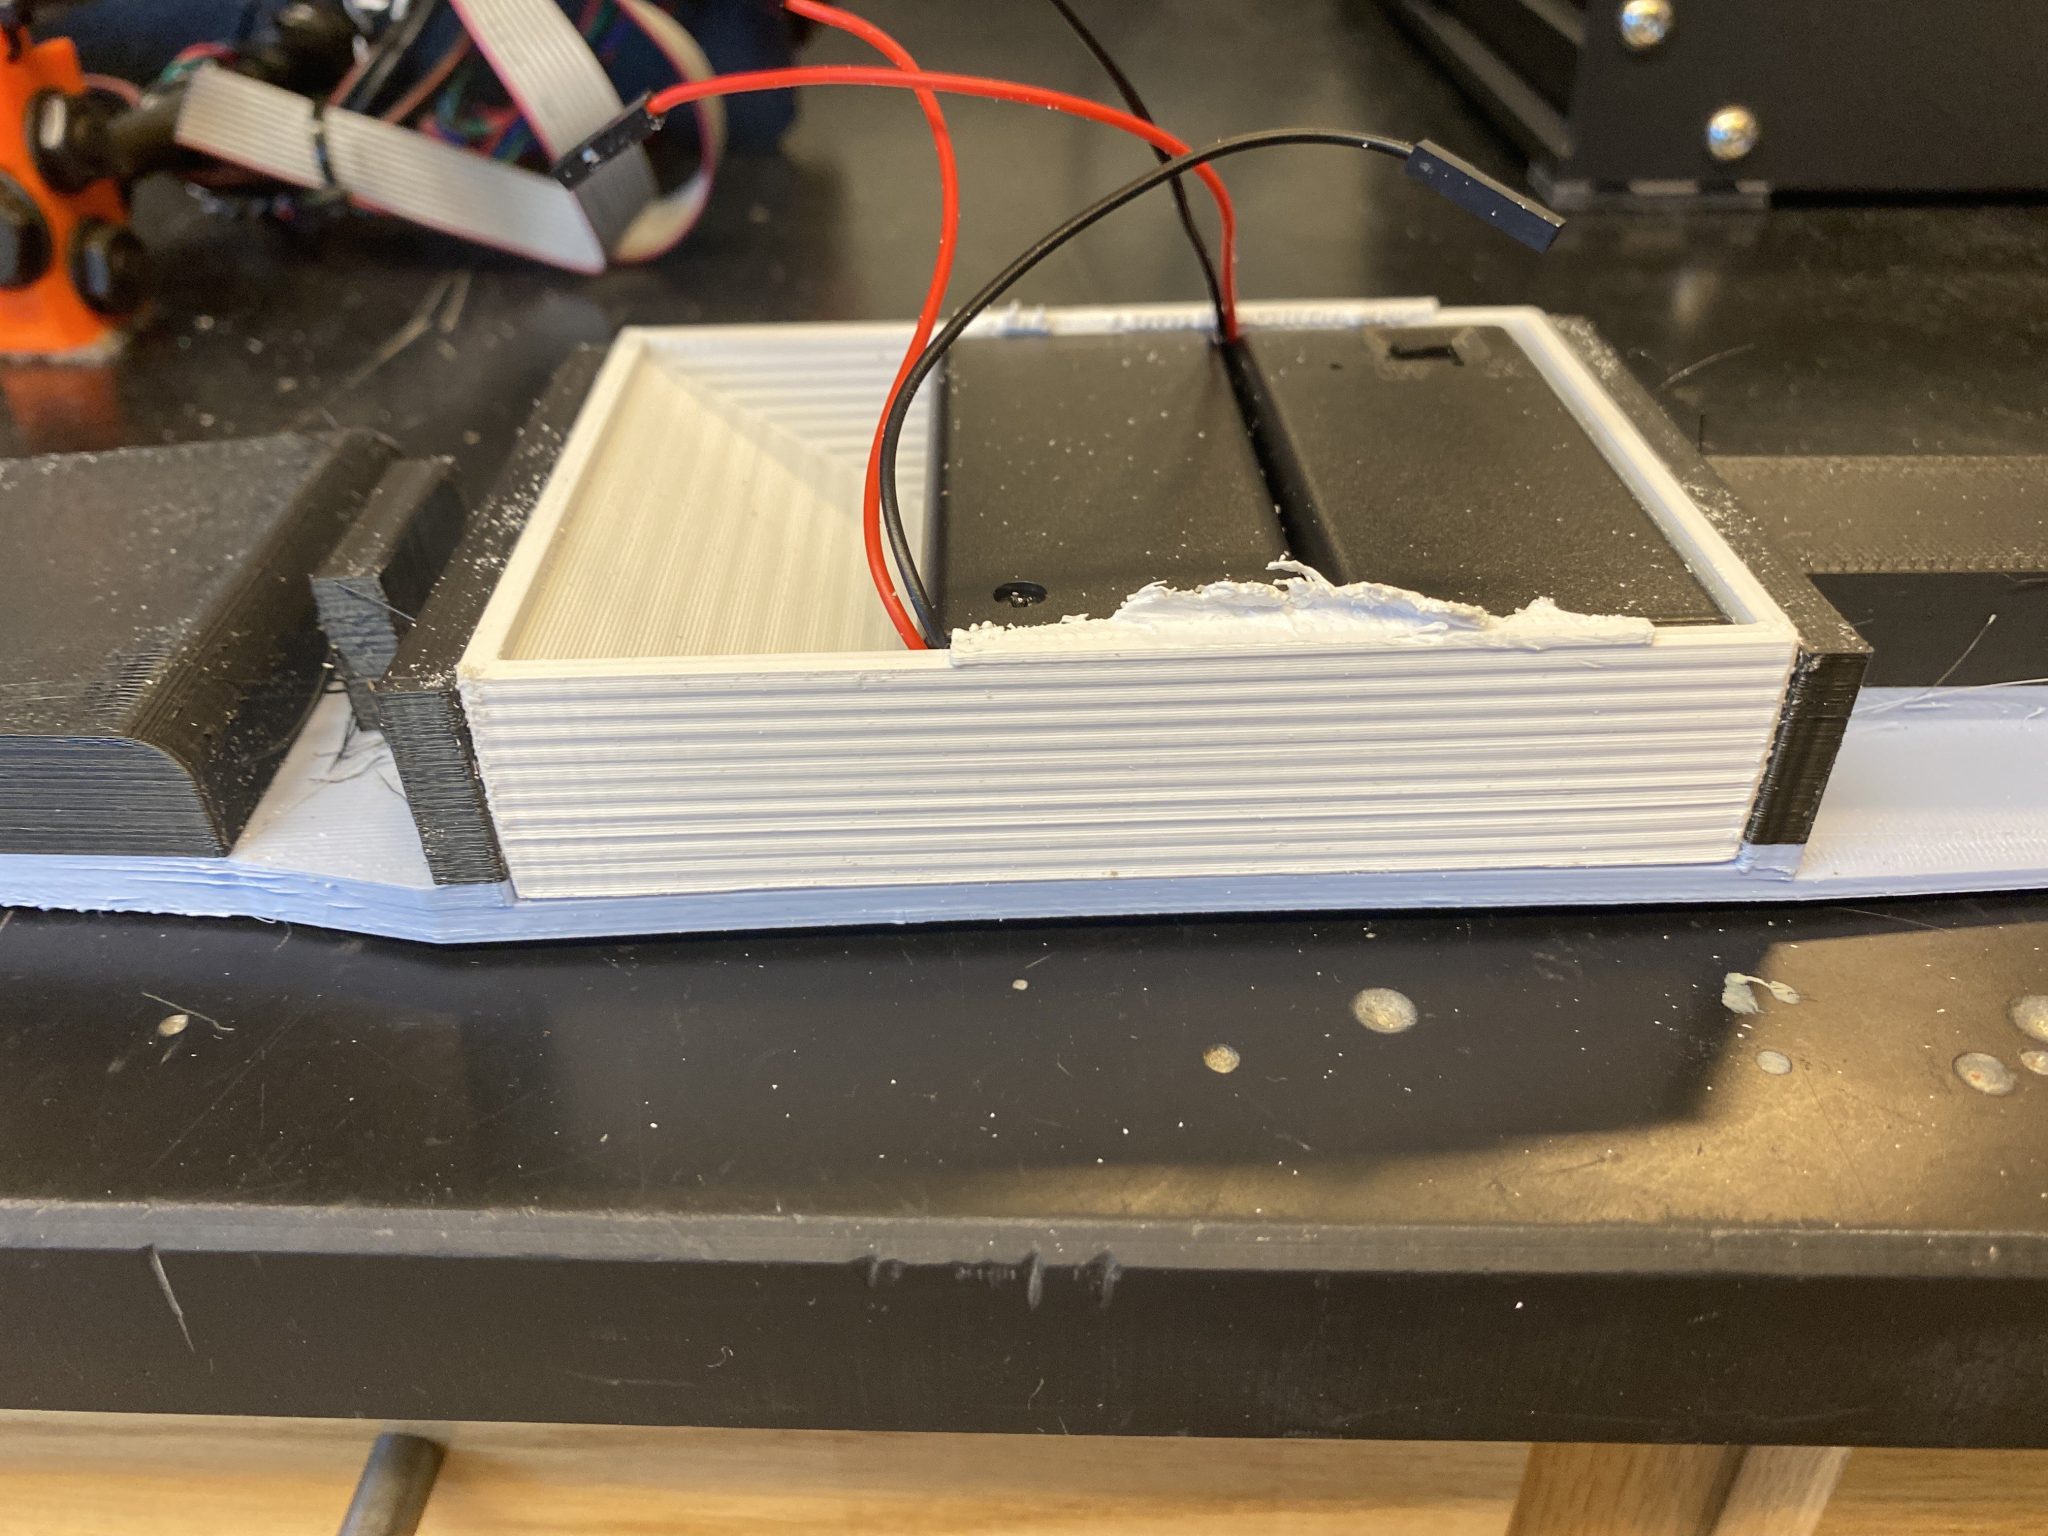
- I sanded the battery holder so that it could fit inside the viola’s body.
- Once the metronome case was printed, I started mapping out what holes need to be drilled where, as well as where the components should be soldered. Since it’s not done yet, I’ll wait before posting the final product on this log until it’s done)
To-Do List:
- Solder the circuit together on a perf board and mount the user-interface components to the case. (and post a picture of the final product here)
- Complete the project report
4/13/2024
Work Complete:
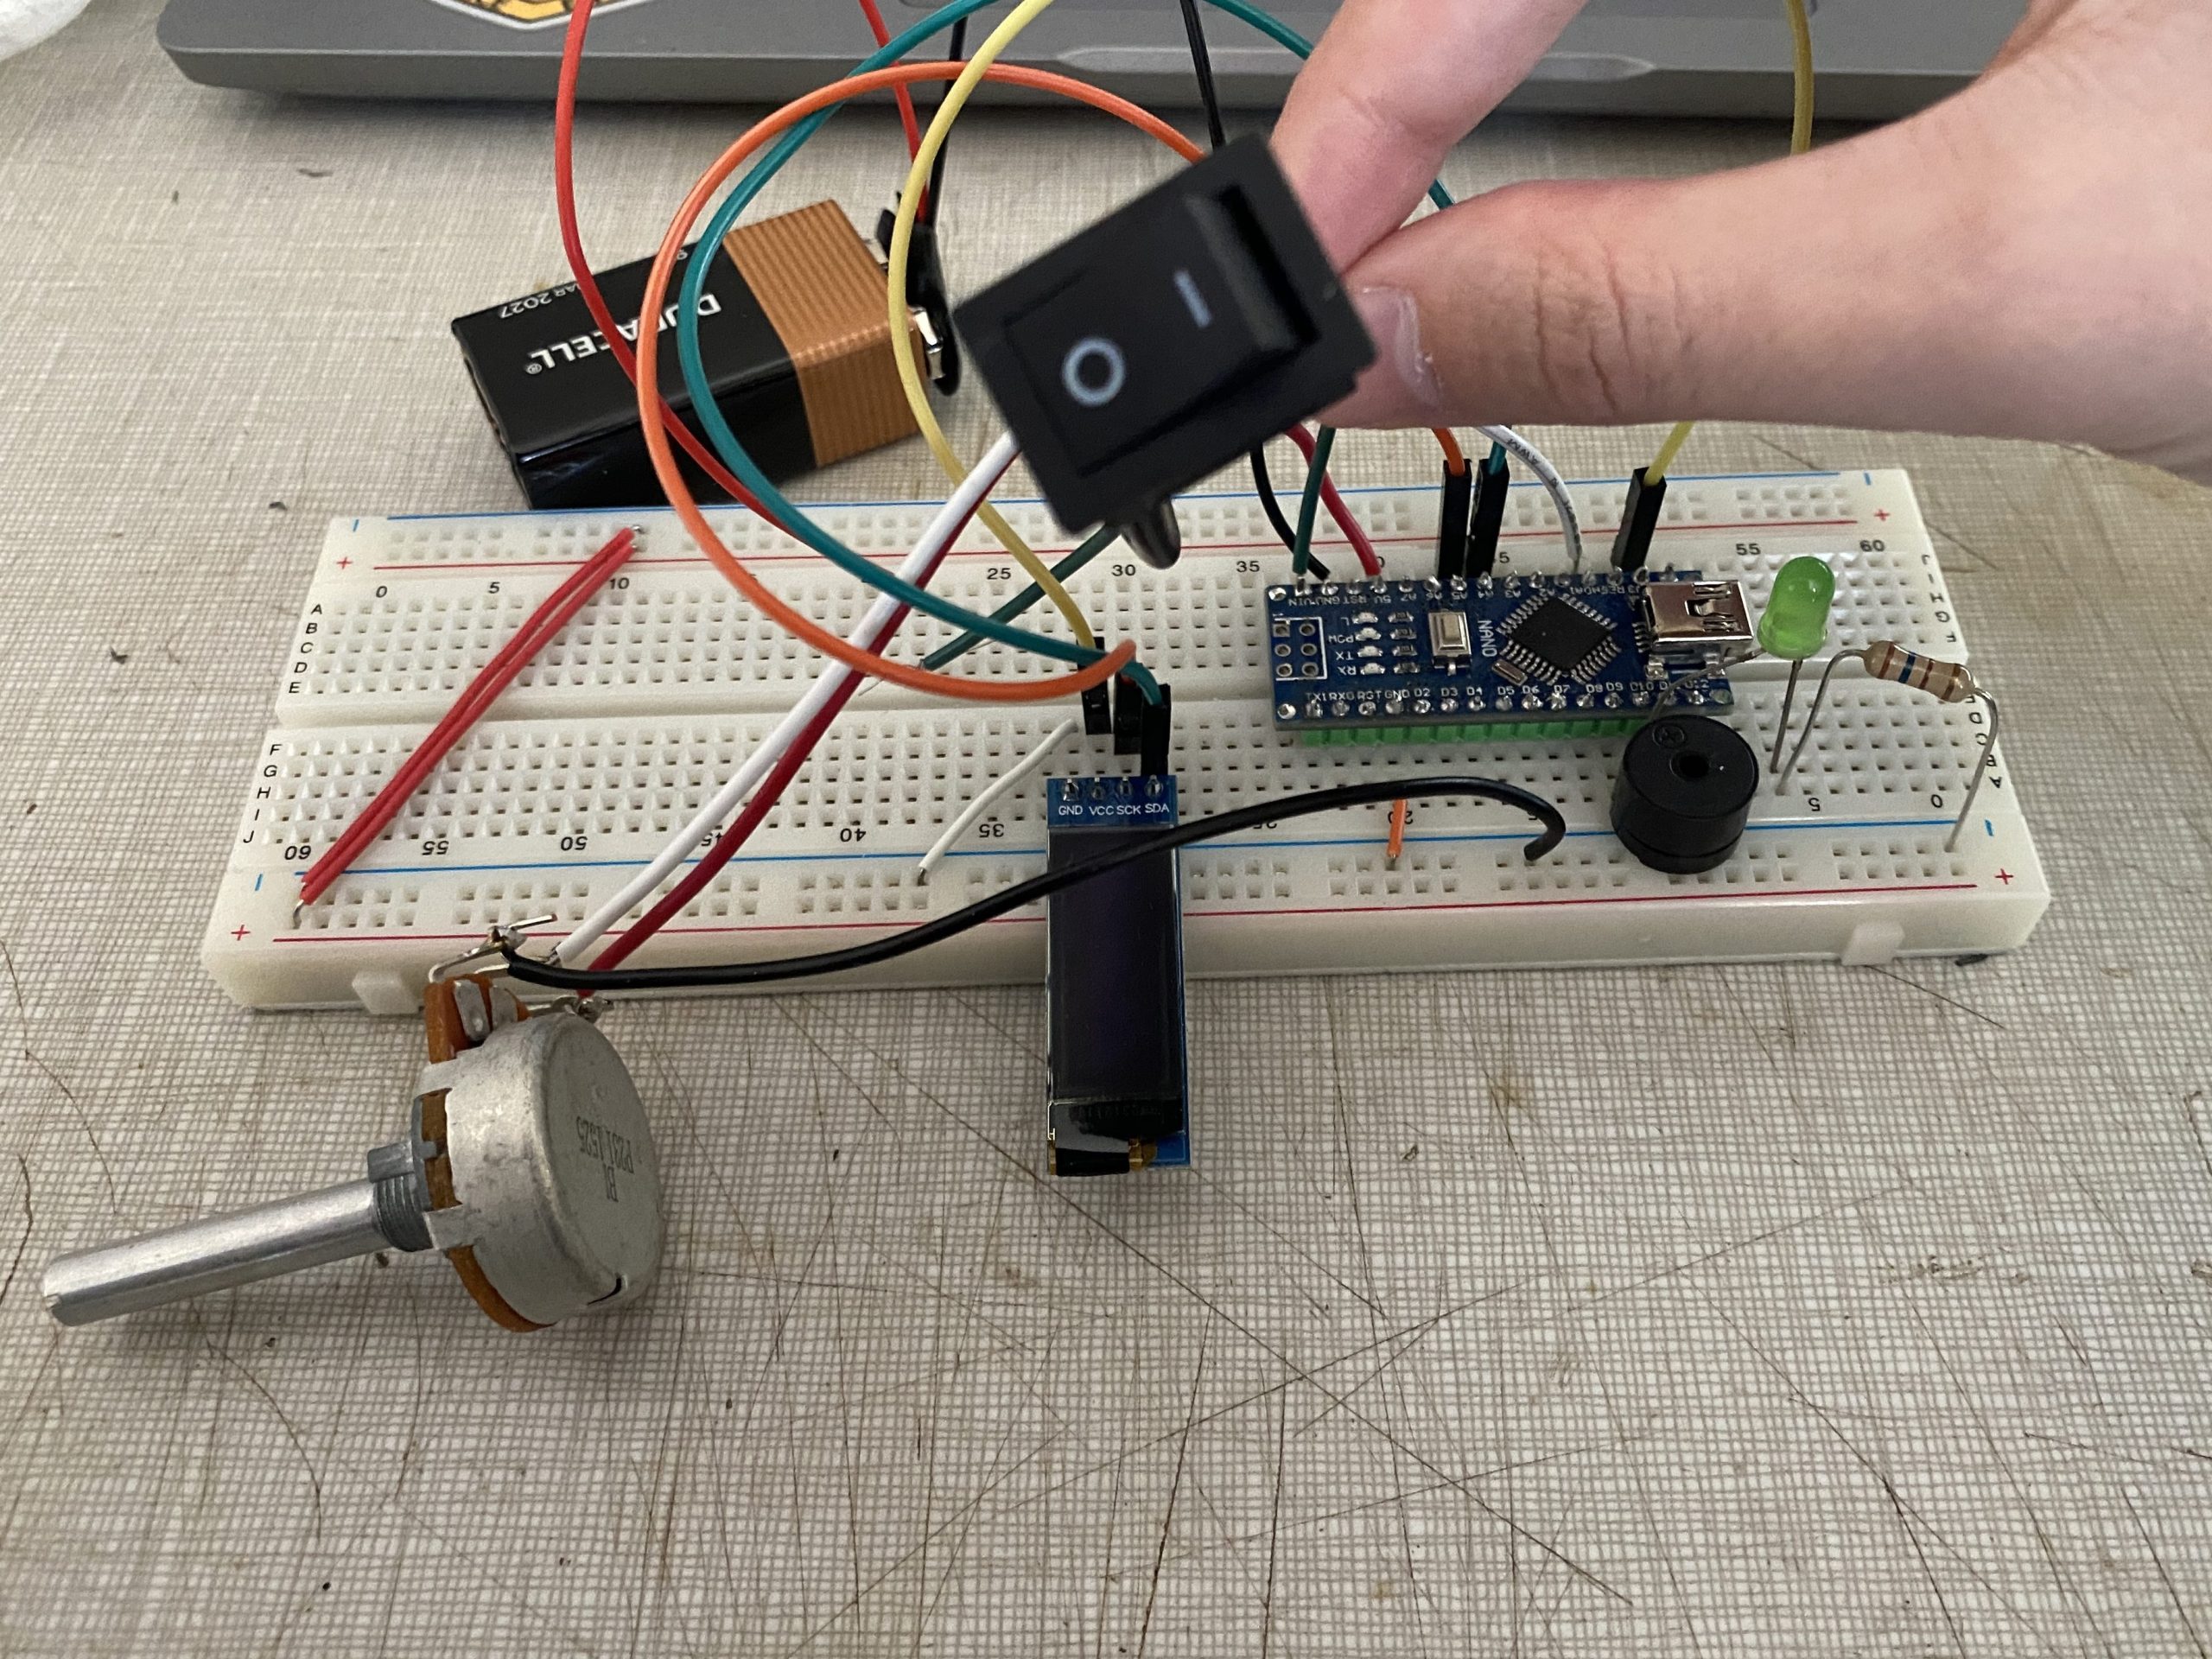
- I realized the metronome wasn’t outputting the intended tempo, so I fixed that problem.
- I also was able to figure out how to get the display working.
- I added a battery so the circuit doesn’t need to be connected to the laptop.
- I added a switch so that the circuit can be turned off or on.
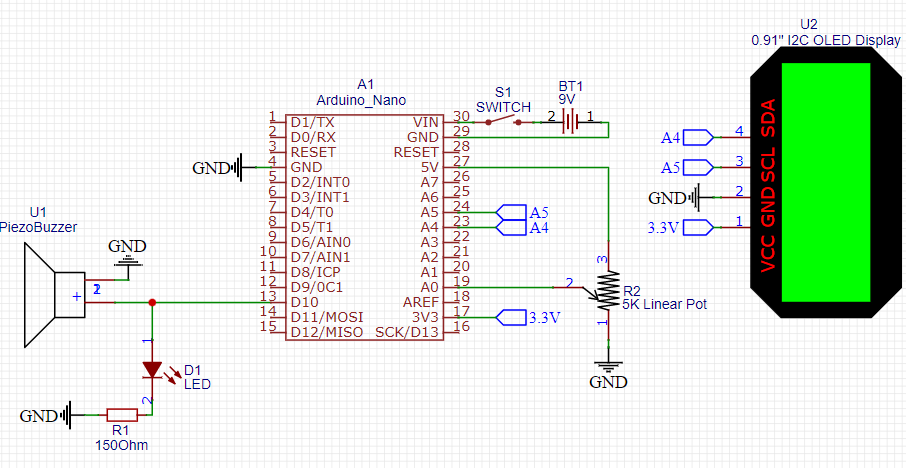
- I updated the schematic with the new components on EasyEDA.
To-Do List:
- Solder the circuit together on a perf board (not including the user-interface components like the display and potentiometer) while I’m waiting on the housing for the circuit.
- Drill the necessary holes in the housing and mount the user-interface components on it before soldering them to the board.

4/6/2024
Work Complete:
- I fixed the driver problem with Arduino IDE, so I can now upload code to the Nano
- I got the Arduino code to compile on the Arduino IDE, but something was wrong with the drivers or ports.
- I updated the schematic with the Arduino Nano instead of an Uno.
To-Do List:
- The metronome part of the circuit functions properly, but I need to figure out how to get the display to show the current tempo.
- Try to use a different type of display to see if there are any other results. (and update schematic as needed)
- Add in a switch to the circuit so the metronome isn’t constantly on.
- Solder the circuit together on a perf board and check functionality when the display works.
3/30/2024
Work Complete:
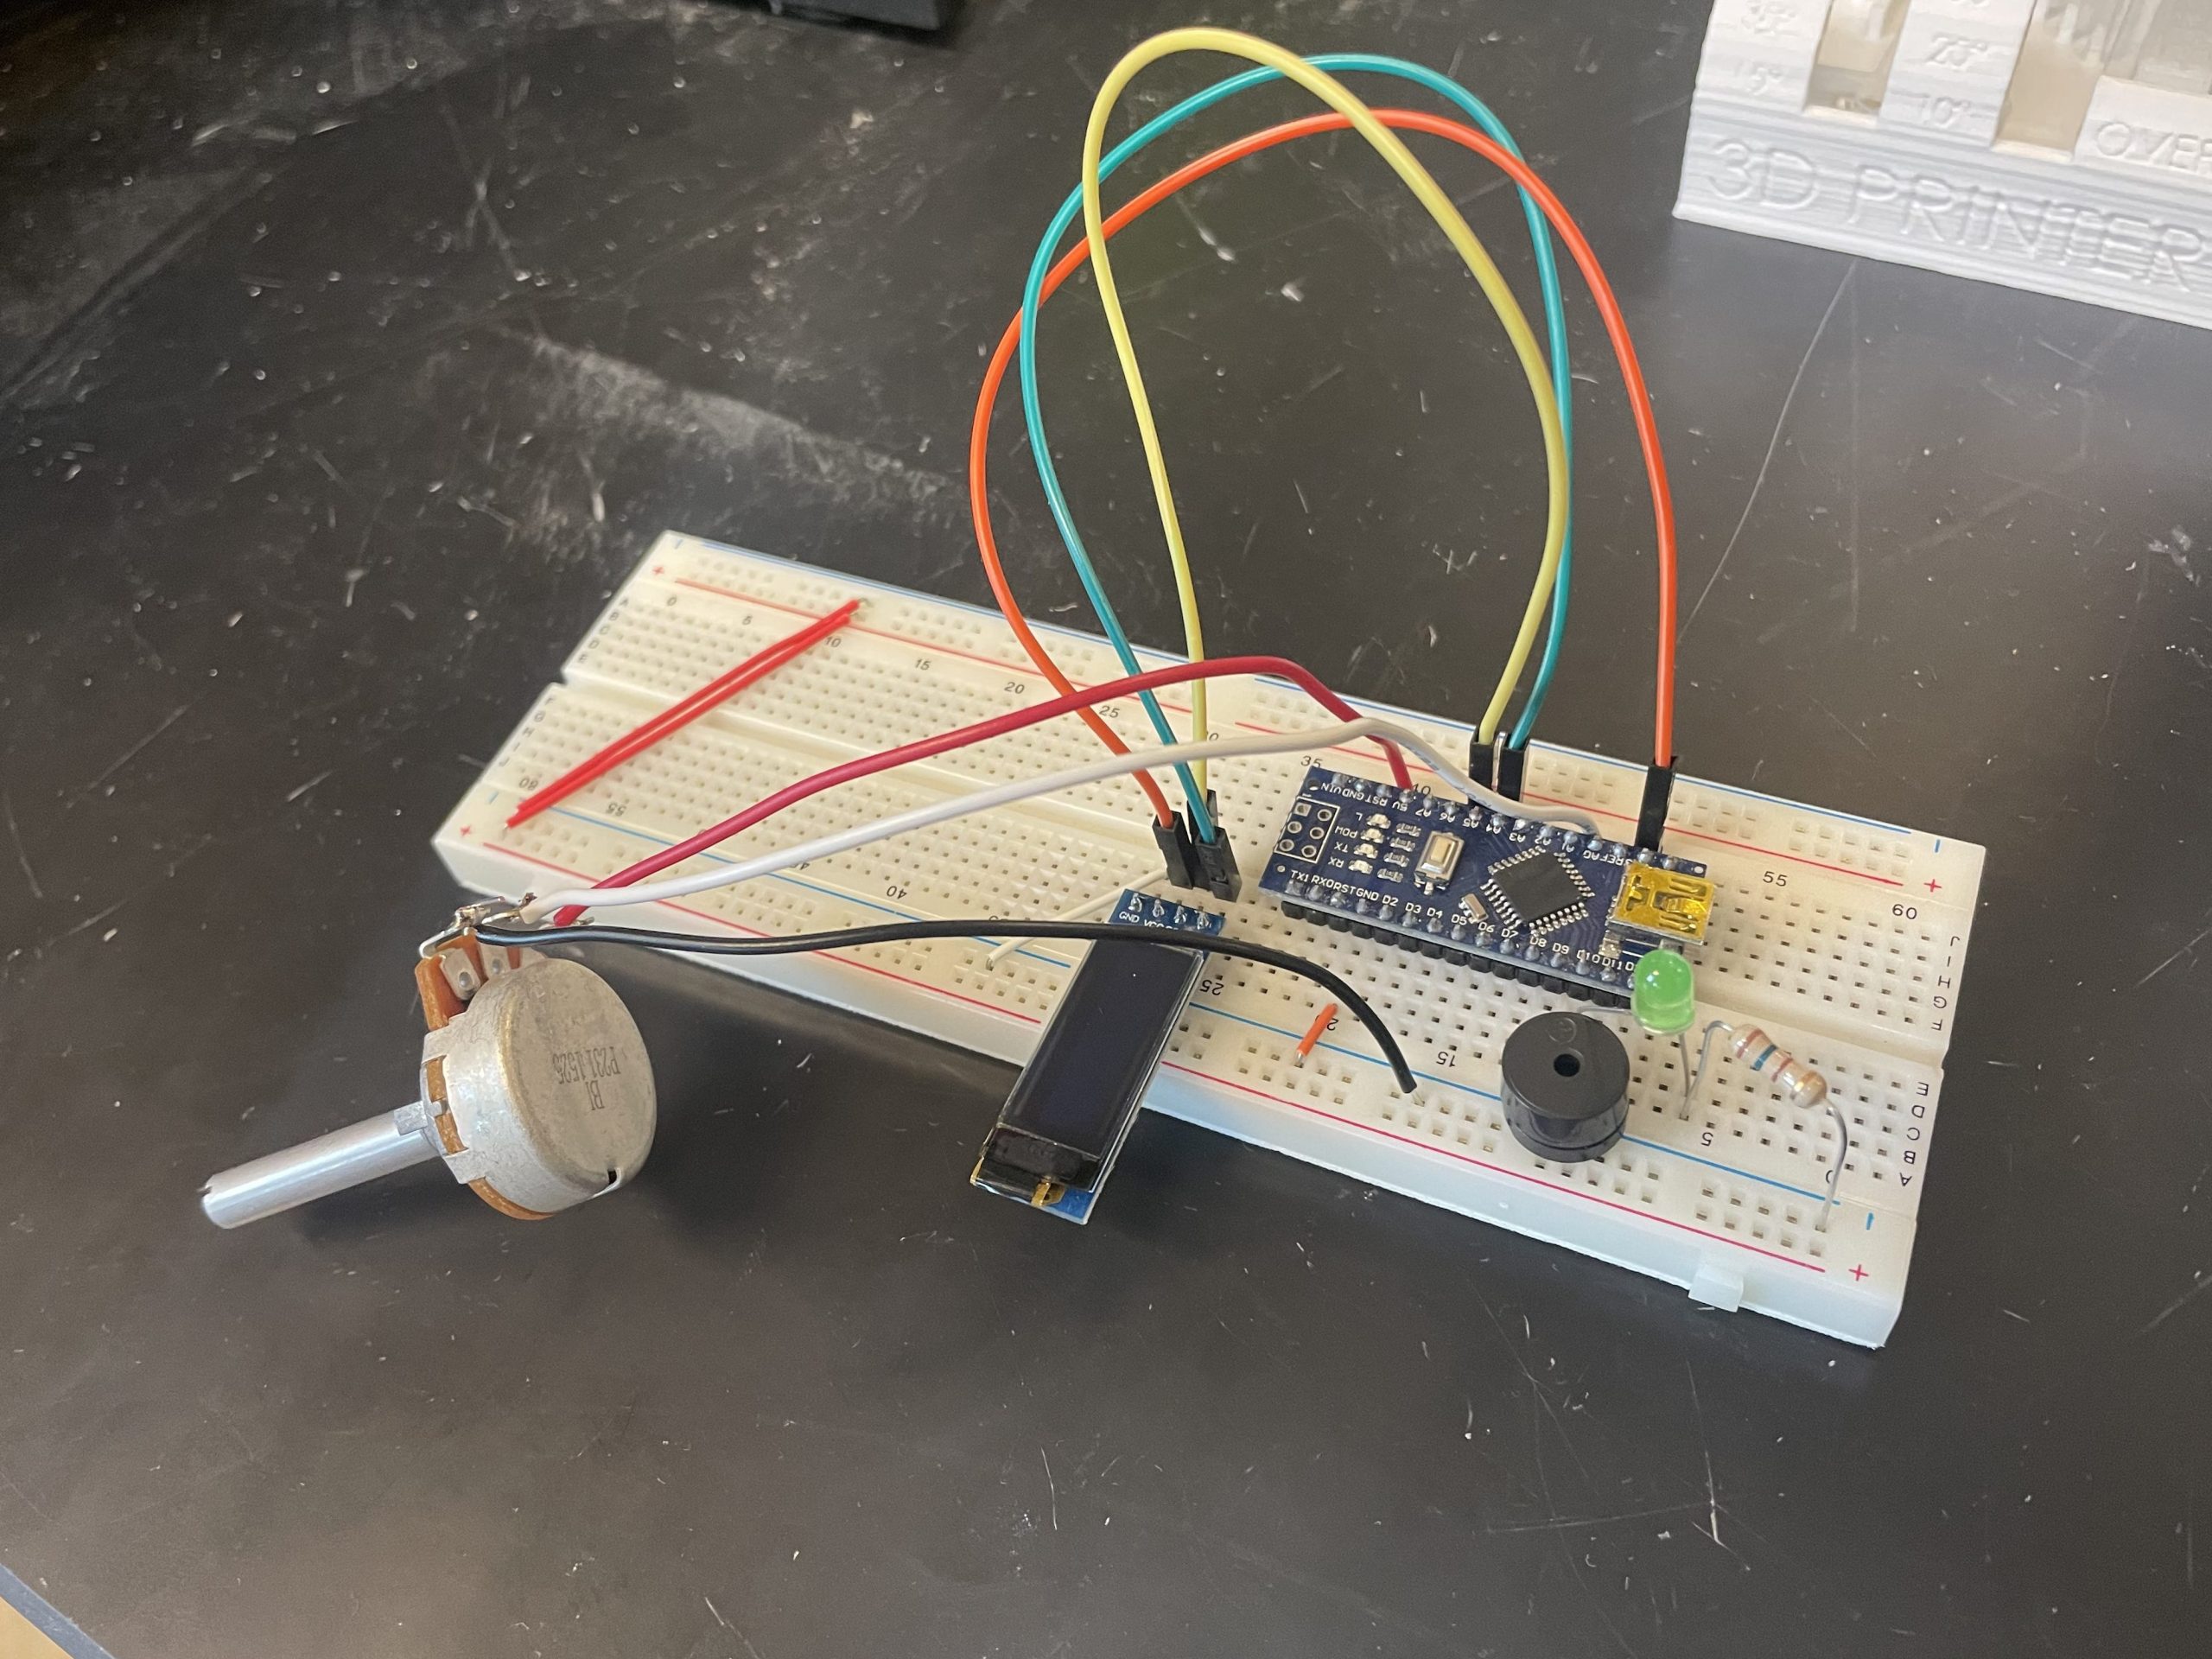
- I wired the circuit together on the breadboard.
- I got the Arduino code to compile on the Arduino IDE, but something was wrong with the drivers or ports.
To-Do List:
- Figure out the Arduino IDE driver problem.
- Code the Arduino on the breadboard and ensure the circuit functions properly.
- Solder the circuit together on a perf board and check functionality.
- Fix the schematic on EasyEDA so with the updated parts.

3/23/2024
Work Complete:
- I completed the bill of materials for the metronome and saw what exactly we had in the lab.
- I met with Georgia to talk about what needs to be ordered for the metronome as well as the tuner since we’ll order the parts together. The order is expected to arrive Tuesday.
To-Do List:
- Finish the first draft of the Arduino code while I wait for the parts to arrive.
- Breadboard the circuit as soon as it arrives and test it to see if the circuit and code work.

3/16/2024
Work Complete:
- I discussed with Georgia and Lauren what metronome option we should go with and decided together.
- I created a first draft for the metronome circuit using EasyEDA (pictured below).
To-Do List:
- Finish the Bill of Materials before the end of the weekend. This includes finding components already in the lab to find what we already have access to.
- Meet with the group early next week to discuss the Bill of Materials before making purchases.
- Start writing the Arduino code.

3/9/2024
Work Complete:
- I talked to Dr. Shane about options to create CAD models for the fingerboard and bridge.
- Georgia, Joey, and I presented the OSHE lab to girl scouts and discussed a couple of projects.
To-Do List:
- Make a 3D model for the bridge using Inkscape (or some other scanning software).
- Meet with Dr. Shane to use the 3D scanner to make a 3D model of the fingerboard.
- Compile a list of ideas to do for the metronome in a more organized fashion. Discuss with the group what ideas I come up with for the metronome.
Concerns:
- Shane brought up that the fingerboard’s color may absorb the light from the scanner so it may not work. I will brainstorm ideas to overcome this hurdle before I meet with him.
2/24/2024
Work Complete:
- I did a bit of preparation for CDR and I helped out with Enterprise Day setup.
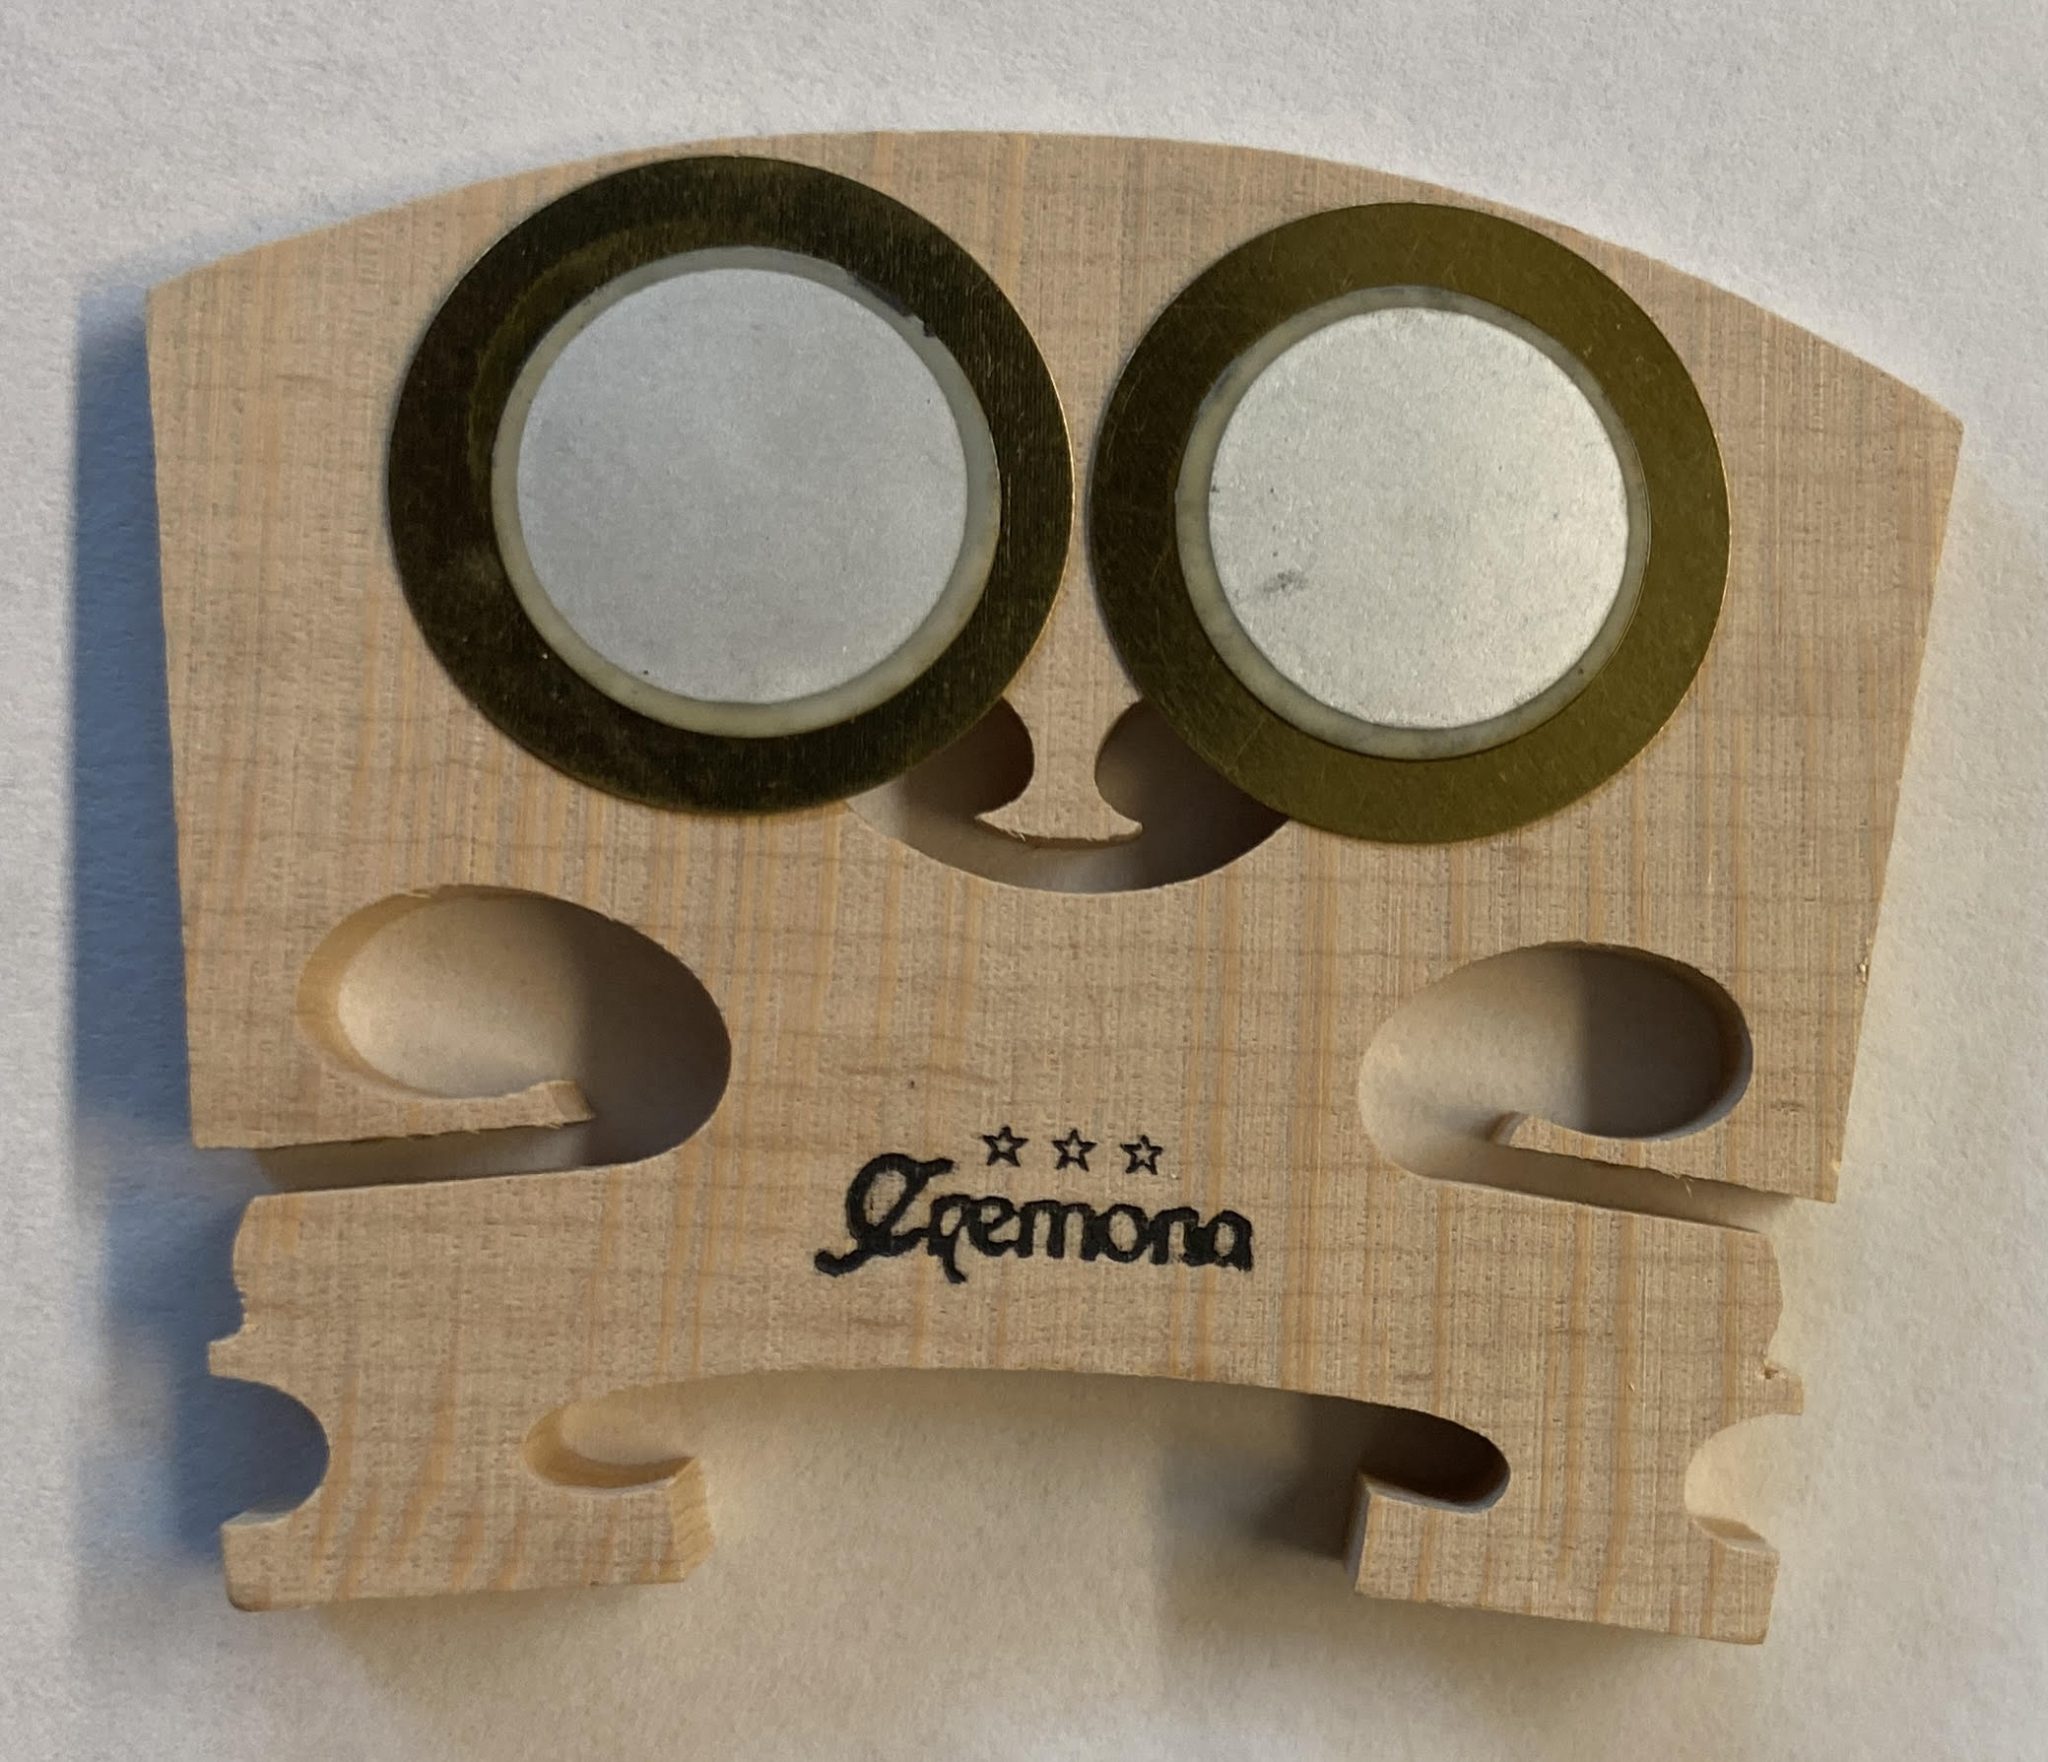
- Presented the piezo configuration and placement (shown in the images below) in CDR and no major flaws were brought up, which finalizes our design until testing with the actual electric viola.
To-Do List:
- Work with Georgia to make the more permanent piezo connections on the electric viola if she needs assistance.
- Compile a list of ideas to do for the metronome in a more organized fashion.
- Research ways we can power the module(s).
- Discuss with the group what ideas I come up with for the metronome.

2/17/2024
Work Complete:
- I wired/soldered two different types of connections with the pickups to the audio jack. One was with three piezos in series and the other one was three piezos in parallel.
- I met with Georgia to test the above configurations to see which one worked better and where we will want to place the piezos on the actual electric viola. The test conducted was trying out the piezos on her non-electric viola and hooking it up to an amplifier. The test was successful and we determined that will want a total of four piezos in series, two on each side of the bridge.
To-Do List:
- Work with Georgia to make the more permanent piezo connections on the electric viola.
- Get ready for Critical Design Review.
- Research more ideas and possible connections for the metronome.
2/10/2024
Work Complete:
- I researched some options we could do for the metronome.
To-Do List:
- Everything we ordered showed up so I will wire the pickups and solder connections from the pickups to the standard mono audio jack.
- Research more ideas and possible connections for the metronome.
2/3/2024
Work Complete:
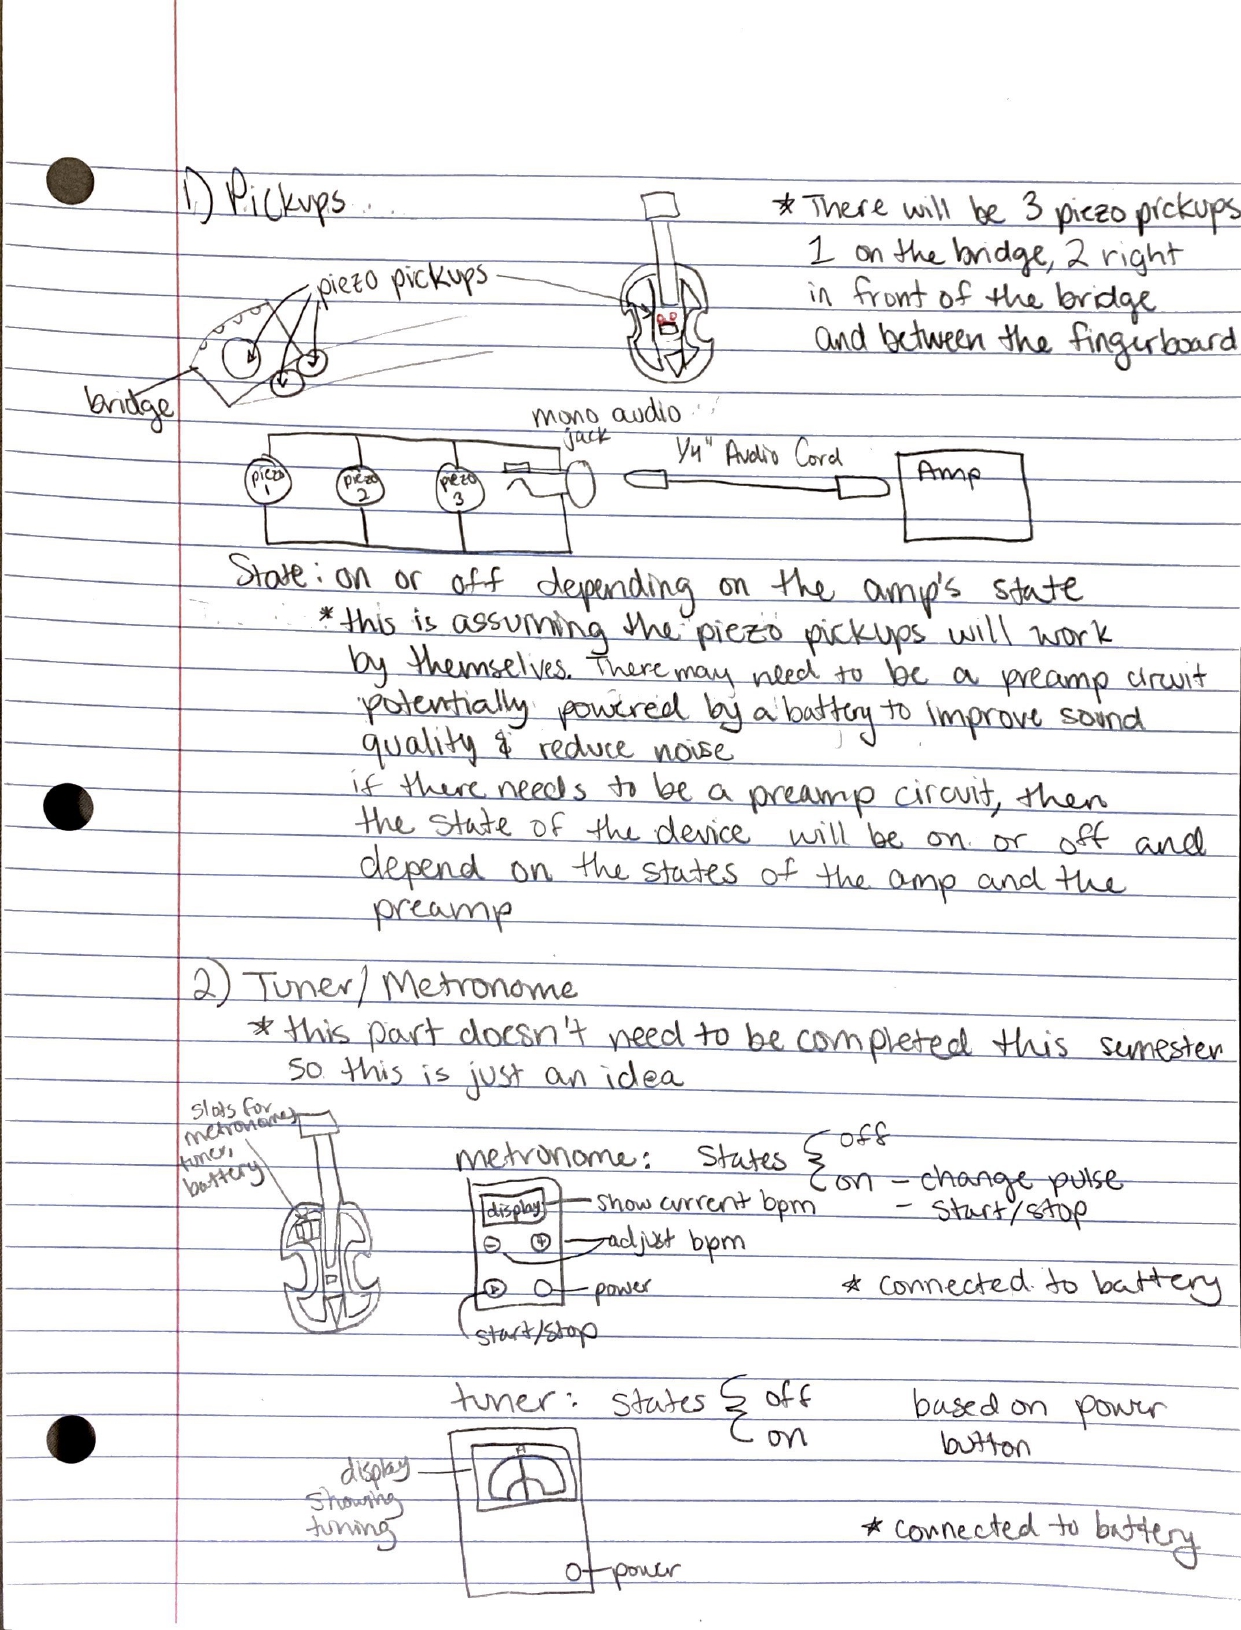
- I researched pickup options and decided with the group what we want to try first. The current plan is to wire the pickups straight to the audio jack and test it with three pickups located on and in front of the bridge.
- I helped make the shopping list with the group.
To-Do List:
- Wire the pickups when they arrive.
- Solder connections from the pickups to the standard mono audio jack.
- Research ideas for the metronome while we wait for parts to arrive.
Concerns:
- We might need to create and install a preamp circuit in between the pickups and the audio jack depending on the sound quality.
1/27/2024
To-Do List:
- Get more comfortable with modeling in freeCAD
- Research options for pick-ups
- Research connection options from pick-ups to standard audio output
- Compile a shopping list with the team
