
Intro
Our project was to bring more arsenal options to the local laser tag venue. This was going to be based off of the MILES Tag 2 protocol which can be found online in which it gives instructions on how one can recreate a blaster. However due to the design being a few years old and with no updates some companies came in and made slight changes to the code and board designs, this means that there was an update to the documentation needed.
After reading the published documents and getting ahold of an actual chip and seeing the new chips are locked and we would have to reconstruct the code from scratch. With this Ben suggested that we move to a newer microcontroller that would be able to shrink the size of the board and make it easier to reconstruct the code. This also proved to be beneficial to the other aspect of the project as well.
Physical Design
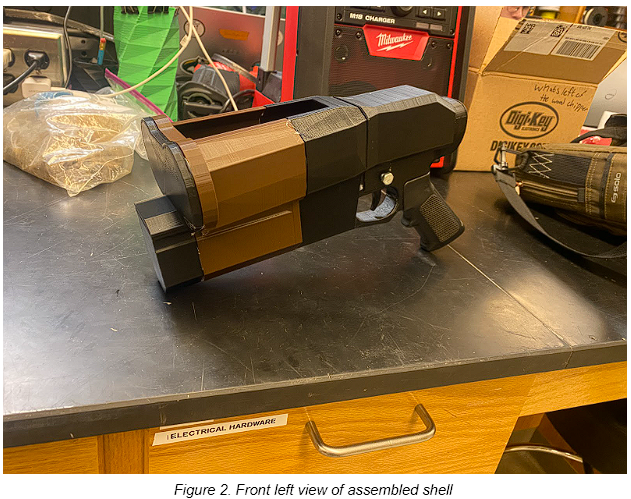
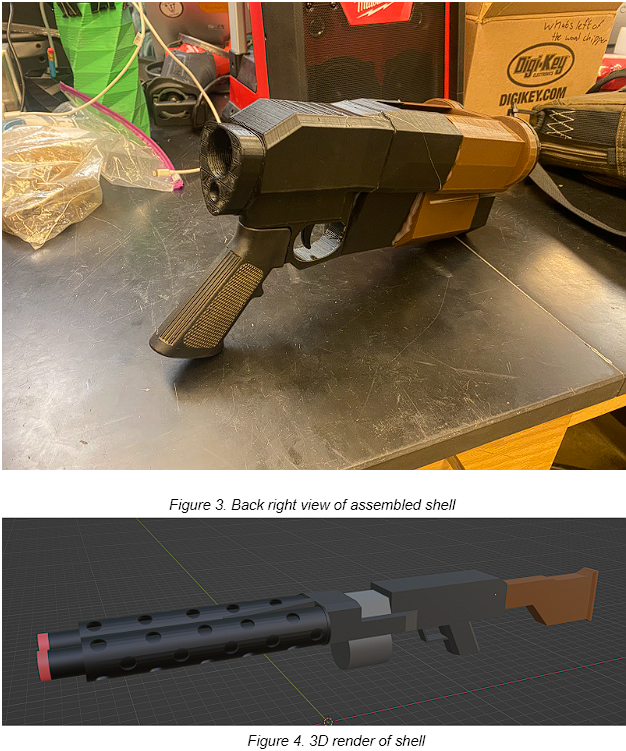
The physical design of the gun was up to us, but we knew we wanted to base it off a two-barreled design. Originally, the design in mind was based off of the Nerf Rhino, which is a two-barrel Beaufort gun design Nerf gun. We eventually edited the design a little bit, bringing the barrels in towards the center to make it a little less wide. Also, because our gun is a laser gun, it had no need for a place for a magazine, only a button for a magazine.
The next step was to design the general shape. We had to make some sacrifices to the design to fit within the scope of the project this semester and also to make it as easy to print on a 3D printer as possible. For this, we made sure to design the body in a way that would look good and still be functional and easy to make. The free software blender was used to model the gun and cut it for printing. One of the more complicated parts of this project is that we wanted to use actual gun parts for the stock and grip so that we could cut down on the number of parts we made in-house. The parts that we are using for these are some of the most common parts, so it’s easy to source them.
Looking forward into the future, the gun needs a redesign of the trigger mechanism to provide more room. It also needs a new system to access the internals, mostly for ease of access, as there is no issue with space. Additionally, fitting the lens and emitting diodes in the correct spots is a challenge. Overall, I would say the casing for the gun is about 80% there.
Software Design
From the software perspective, there were two main issues. The first issue is that the main microcontroller on our reference guns was a PIC microcontroller. As such, the code onboard couldn’t be easily removed to be redesigned to fit our needs. Thankfully, the developers of these guns did make the firmware available, but only in a precompiled form, so modifying the code would’ve needed a lot of reverse engineering work to be done. Because of this, and the electrical design constraints outlined below, we switched to an off-the-shelf microcontroller that could be easily programmed as needed. The other issue was speed. The custom protocol the guns use to communicate requires microsecond precision, so we needed to pick a microcontroller that could be fast/precise enough to adhere to the protocol. Thankfully, the teensy line of microcontrollers, specifically the teensy 4, fit the bill nicely. Its ease of use, being programmed using the arduino IDE, and extensive use of arduino libraries made coding the microcontroller to implement the protocol standards easy. It also contains a much faster clock than would be found on something like an arduino, allowing it to achieve microsecond precision with its code, allowing it to achieve the protocol’s precision.
Electrical Design
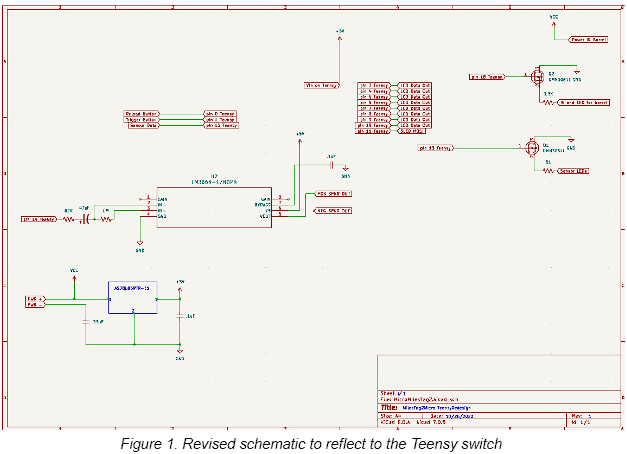
With the electronic design there were some issues with the hardware that was specified on the original documentation, most of the parts weren’t made anymore so there were some respecifications needed. First off the ISD and PIC chips were replaced with a Teensy 4.0 micro which will allow for a much much smaller design for the custom PCB, the old audio amp will be replaced with a Texas Instruments LM 386 op amp, and then the power regulation was changed to a AS78L05RTR-E1, the changes can be observed in Figure 1. These changes to newer parts may even add improved functionality and with smaller footprints this will allow for the board to fit into smaller blaster shells which would allow for further expansion to the program.
Summary
So far the project is well underway and has shown great potential to expand so far. With testing being the next milestone in this the possibilities may be limitless with what this can achieve. Our other thoughts into this expanded arsenal would be grenades, pistols, and sniper rifles. All which would be easy as changing the code and shells slightly to match the role that it is supposed to fulfill.
Appendix
| QTY | Item Name | Det | Part# | Source |
| 1 | Teensy | 4.0 | N/A | Sponsor |
| 1 | LM 386 | Audio op amp | 296-43959-5-ND | https://www.digikey.com/en/products/detail/texas-instruments/LM386N-3-NOPB/148191 |
| 1 | AS78L05RTR-E1 | Linear Power Regulator | AS78L05RTR-E1DITR-ND | https://www.digikey.com/en/products/detail/diodes-incorporated/AS78L05RTR-E1/4470943?s=N4IgTCBcDaIIIGUDsAOAMgBgKwCUAqOAtAKICMIAugL5A |
| 2 | DMN3051L-7 | Transistors for LEDs | DMN3051LDITR-ND | https://www.digikey.com/en/products/detail/diodes-incorporated/DMN3051L-7/1964680 |
| N/A | Various Surface Mount Resistors | Will add more detail when PCB design is finalized | ||
| N/A | Various Surface Mount Resistors | Will add more detail when PCB design is finalized |