
About the Project
The KeWee Energy Meters project aims to create a series of devices and software for home energy monitoring. We seek to make affordable sensors and IoT devices that can communicate with a central or self-hosted web server for storing data. We also seek to design a website for users to access their device information and share it with others. Our project has been ongoing since January 2022, and is expected to continue for at least a year or more into the future as this project has many areas prime for growth and development.
About the Team
Evan Grahs
Website, Server, and On-Device Software Development
Computer Engineering Major, 3rd Year
I develop the PHP, MySQL, JavaScript, HTML, and CSS necessary to build our website and various user interfaces. I manage a self-hosted LEMP stack (Linux, Nginx, MySQL, PHP) server for our development environment. This semester, I have been developing on-device Arduino/C++ software to handle all wireless communications and user interface components.
Bill Matt
Hardware Testing and Sensor Interfacing Software Development
Computer Engineering Major, 3rd Year
I design and test the hardware and sensors, as well as develop the Arduino C code necessary to interface with the sensor hardware we use.
Justin Rish
Hardware Design and Safety
Electrical Engineering Technology Major, 5th Year
I research and design most of the physical electronics used for this project, as well as develop hardware schematics. I am also responsible for ensuring the implementation of safety practices in our designs.
Project Goals for this Semester
Server Software Goals
- The server will have an account management page or pages for users to handle various account settings, particularly pertaining to registering new devices.
- Assignee: Evan Grahs
- Status: Completed
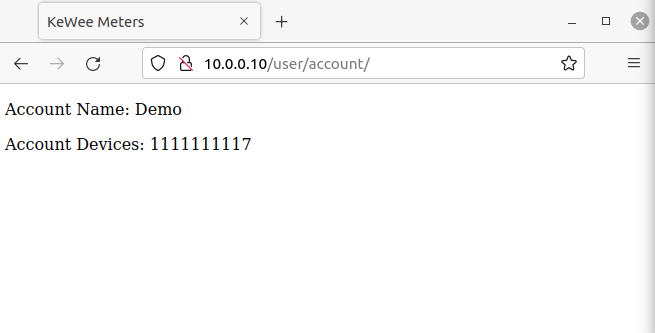
The server has a page for this now, but it ended up not being very useful yet in terms of functionality needed. Mostly handled on-device.
On-Device Software Goals
- The device will have an on-board setup interface or mechanism to facilitate initial registration with the server and assignment to a user account.
- Assignee: Evan Grahs
- Status: Completed
The device acts as an Access Point and broadcasts an SSID for setup, connecting to this network and visiting 192.168.4.1/config.html allows access to this interface.
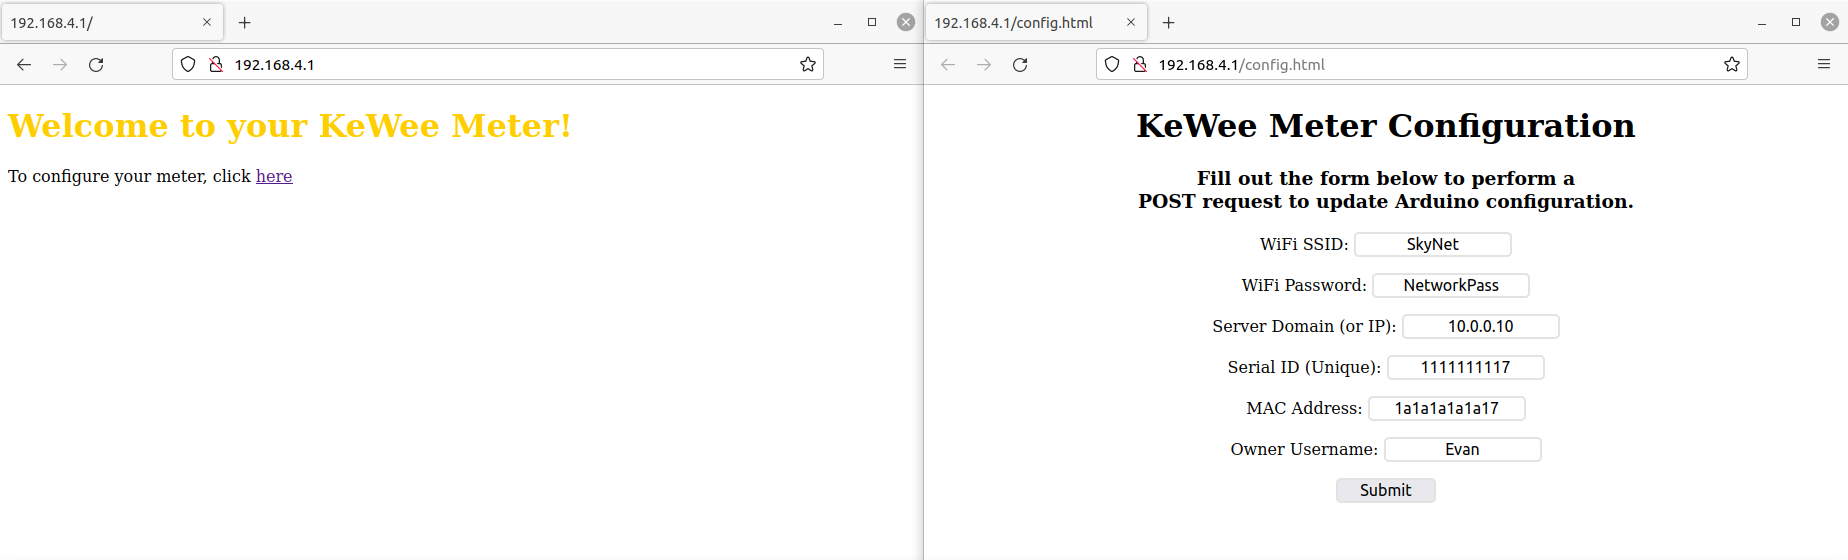
- The device will be able to use supplied configuration data to connect to a wireless network and begin transmitting data (not necessarily actual value readings) to a specified host after setup is completed.
- Assignee: Evan Grahs
- Status: Completed
The device takes info presented from the aforementioned config.html and connects to the network, registers with the server to obtain its authentication token, and begins transmitting data once registration is completed.

Device Logs from Registration and Transmission Phase
Info: Scanning for saved WiFi network…
Scanned SSID’s: Skynet.
Info: Saved network found! Attempting to connect…
Info: Attempting to connect to WPA/WPA2 SSID: Skynet
Info: Connection successful!
Info: Attempting to connect to server for initial registration…
———– | Start of HTTP Post Pairs | ———–
serial<6>=1111111117<10>&
macaddress<10>=1a1a1a1a1a17<12>&
username<8>=Demo<4>
———– | End of HTTP Post Pairs | ———–
———– | Start of HTTP Post Request | ———–
POST /device/register/index.php HTTP/1.1
Host: 10.0.0.10
Accept-Encoding: identity
Content-Type: application/x-www-form-urlencoded
Content-Length: 55
serial=1111111117&macaddress=1a1a1a1a1a17&username=Demo
———– | End of HTTP Post Request | ———–
———– |BEGIN INCOMING HTTP RESPONSE| ———–
HTTP/1.1 200 OK
Server: nginx/1.18.0 (Ubuntu)
Date: Wed, 26 Apr 2023 19:03:03 GMT
Content-Type: text/html; charset=UTF-8
Transfer-Encoding: chunked
Connection: keep-alive
28
Success:13iy00e6yqe8g808cwc40wg00w4wwgco
0
———– | END INCOMING HTTP RESPONSE | ———–
———– | Parsing data… | ———–
Info: Good response (200 OK).
Index Update: 15, 45
Index Update: 45, 81
Index Update: 81, 120
Index Update: 120, 147
Info: Transfer-Encoding header identified with value ‘chunked’.
Index Update: 147, 170
Index Update: 170, 171
Info: Headers complete. Moving on to body…
Index Update: 171, 174
Info: Processing next chunk of length 40.
Index Update: 174, 215
Info: Chunk processing complete.
Index Update: 215, 217
Info: Processing next chunk of length 0.
Index Update: 217, 218
Info: Body complete. Wrapping up…
Index Update: 218, 219
Info: HTTP Response completed properly with body length 40.
Body Data = Success:13iy00e6yqe8g808cwc40wg00w4wwgco
———– | Parsing Success | ———–
Info: Registration response is positive and of the expected length…
Info: Registration succeeded! Saving authentication token…
Token: 13iy00e6yqe8g808cwc40wg00w4wwgco, Size: 32
Writing file: /littlefs/authToken => Open OK
Writing OK
Info: Authentication token saved!
HTTP Response modified storage… Reloading.
Info: Attempting to upload data to the server…
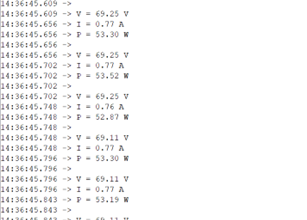
Voltage Sensor Reading: 132.32
Current Sensor Reading: 6.79
———– | Start of HTTP Post Pairs | ———–
serial<6>=1111111117<10>&
macaddress<10>=1a1a1a1a1a17<12>&
token<5>=13iy00e6yqe8g808cwc40wg00w4wwgco<32>&
data_voltage<12>=132322<6>&
data_current<12>=6786179<7>
———– | End of HTTP Post Pairs | ———–
———– | Start of HTTP Post Request | ———–
POST /device/upload/index.php HTTP/1.1
Host: 10.0.0.10
Accept-Encoding: identity
Content-Type: application/x-www-form-urlencoded
Content-Length: 121
serial=1111111117&macaddress=1a1a1a1a1a17&token=13iy00e6yqe8g808cwc40wg00w4wwgco&data_voltage=132322&data_current=6786179
———– | End of HTTP Post Request | ———–
———– |BEGIN INCOMING HTTP RESPONSE| ———–
HTTP/1.1 200 OK
Server: nginx/1.18.0 (Ubuntu)
Date: Wed, 26 Apr 2023 19:03:03 GMT
Content-Type: text/html; charset=UTF-8
Transfer-Encoding: chunked
Connection: keep-alive
b
Data Saved.
0
———– | END INCOMING HTTP RESPONSE | ———–
———– | Parsing data… | ———–
Info: Good response (200 OK).
Index Update: 15, 45
Index Update: 45, 81
Index Update: 81, 120
Index Update: 120, 147
Info: Transfer-Encoding header identified with value ‘chunked’.
Index Update: 147, 170
Index Update: 170, 171
Info: Headers complete. Moving on to body…
Index Update: 171, 173
Info: Processing next chunk of length 11.
Index Update: 173, 185
Info: Chunk processing complete.
Index Update: 185, 187
Info: Processing next chunk of length 0.
Index Update: 187, 188
Info: Body complete. Wrapping up…
Index Update: 188, 189
Info: HTTP Response completed properly with body length 11.
Body Data = Data Saved.
———– | Parsing Success | ———–
Info: Data point uploaded successfully!
Info: Attempting to upload data to the server…
Voltage Sensor Reading: 131.93
Current Sensor Reading: 6.82
———– | Start of HTTP Post Pairs | ———–
serial<6>=1111111117<10>&
macaddress<10>=1a1a1a1a1a17<12>&
token<5>=13iy00e6yqe8g808cwc40wg00w4wwgco<32>&
data_voltage<12>=131925<6>&
data_current<12>=6816736<7>
———– | End of HTTP Post Pairs | ———–
———– | Start of HTTP Post Request | ———–
POST /device/upload/index.php HTTP/1.1
Host: 10.0.0.10
Accept-Encoding: identity
Content-Type: application/x-www-form-urlencoded
Content-Length: 121
serial=1111111117&macaddress=1a1a1a1a1a17&token=13iy00e6yqe8g808cwc40wg00w4wwgco&data_voltage=131925&data_current=6816736
———– | End of HTTP Post Request | ———–
———– |BEGIN INCOMING HTTP RESPONSE| ———–
HTTP/1.1 200 OK
Server: nginx/1.18.0 (Ubuntu)
Date: Wed, 26 Apr 2023 19:03:13 GMT
Content-Type: text/html; charset=UTF-8
Transfer-Encoding: chunked
Connection: keep-alive
b
Data Saved.
0
———– | END INCOMING HTTP RESPONSE | ———–
Hardware Goals
- The entire device will have design files compatible with and editable from free and open-source software.
- Assignees: Evan Grahs, Bill Matt, Justin Rish
- Status: Completed
Arduino Code and KiCad Schematics provided at https://osf.io/9pn2d/.
- The device will be capable of measuring voltages and currents of a single connected device.
- Assignees: Bill Matt, Justin Rish
- Status: Completed
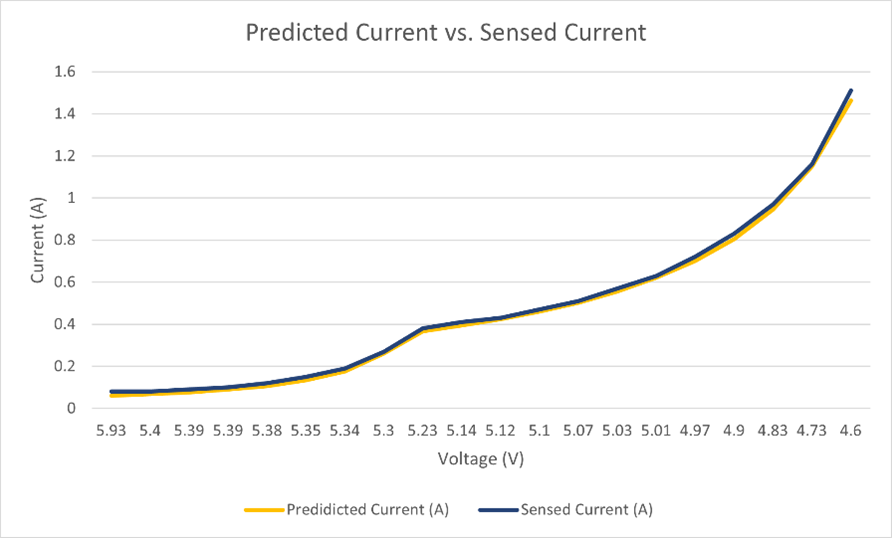
The device can measure both rms voltage and current values.
- The device will measure voltage and current within reasonable accuracy, specific accuracy defined at a later date.
- Assignees: Bill Matt, Justin Rish
- Status: Completed
View the chart below. More precise testing and calibration to be completed soon.
- The device will have an outlet that the user can connect a device to.
- Assignee: Justin Rish
- Status: Completed
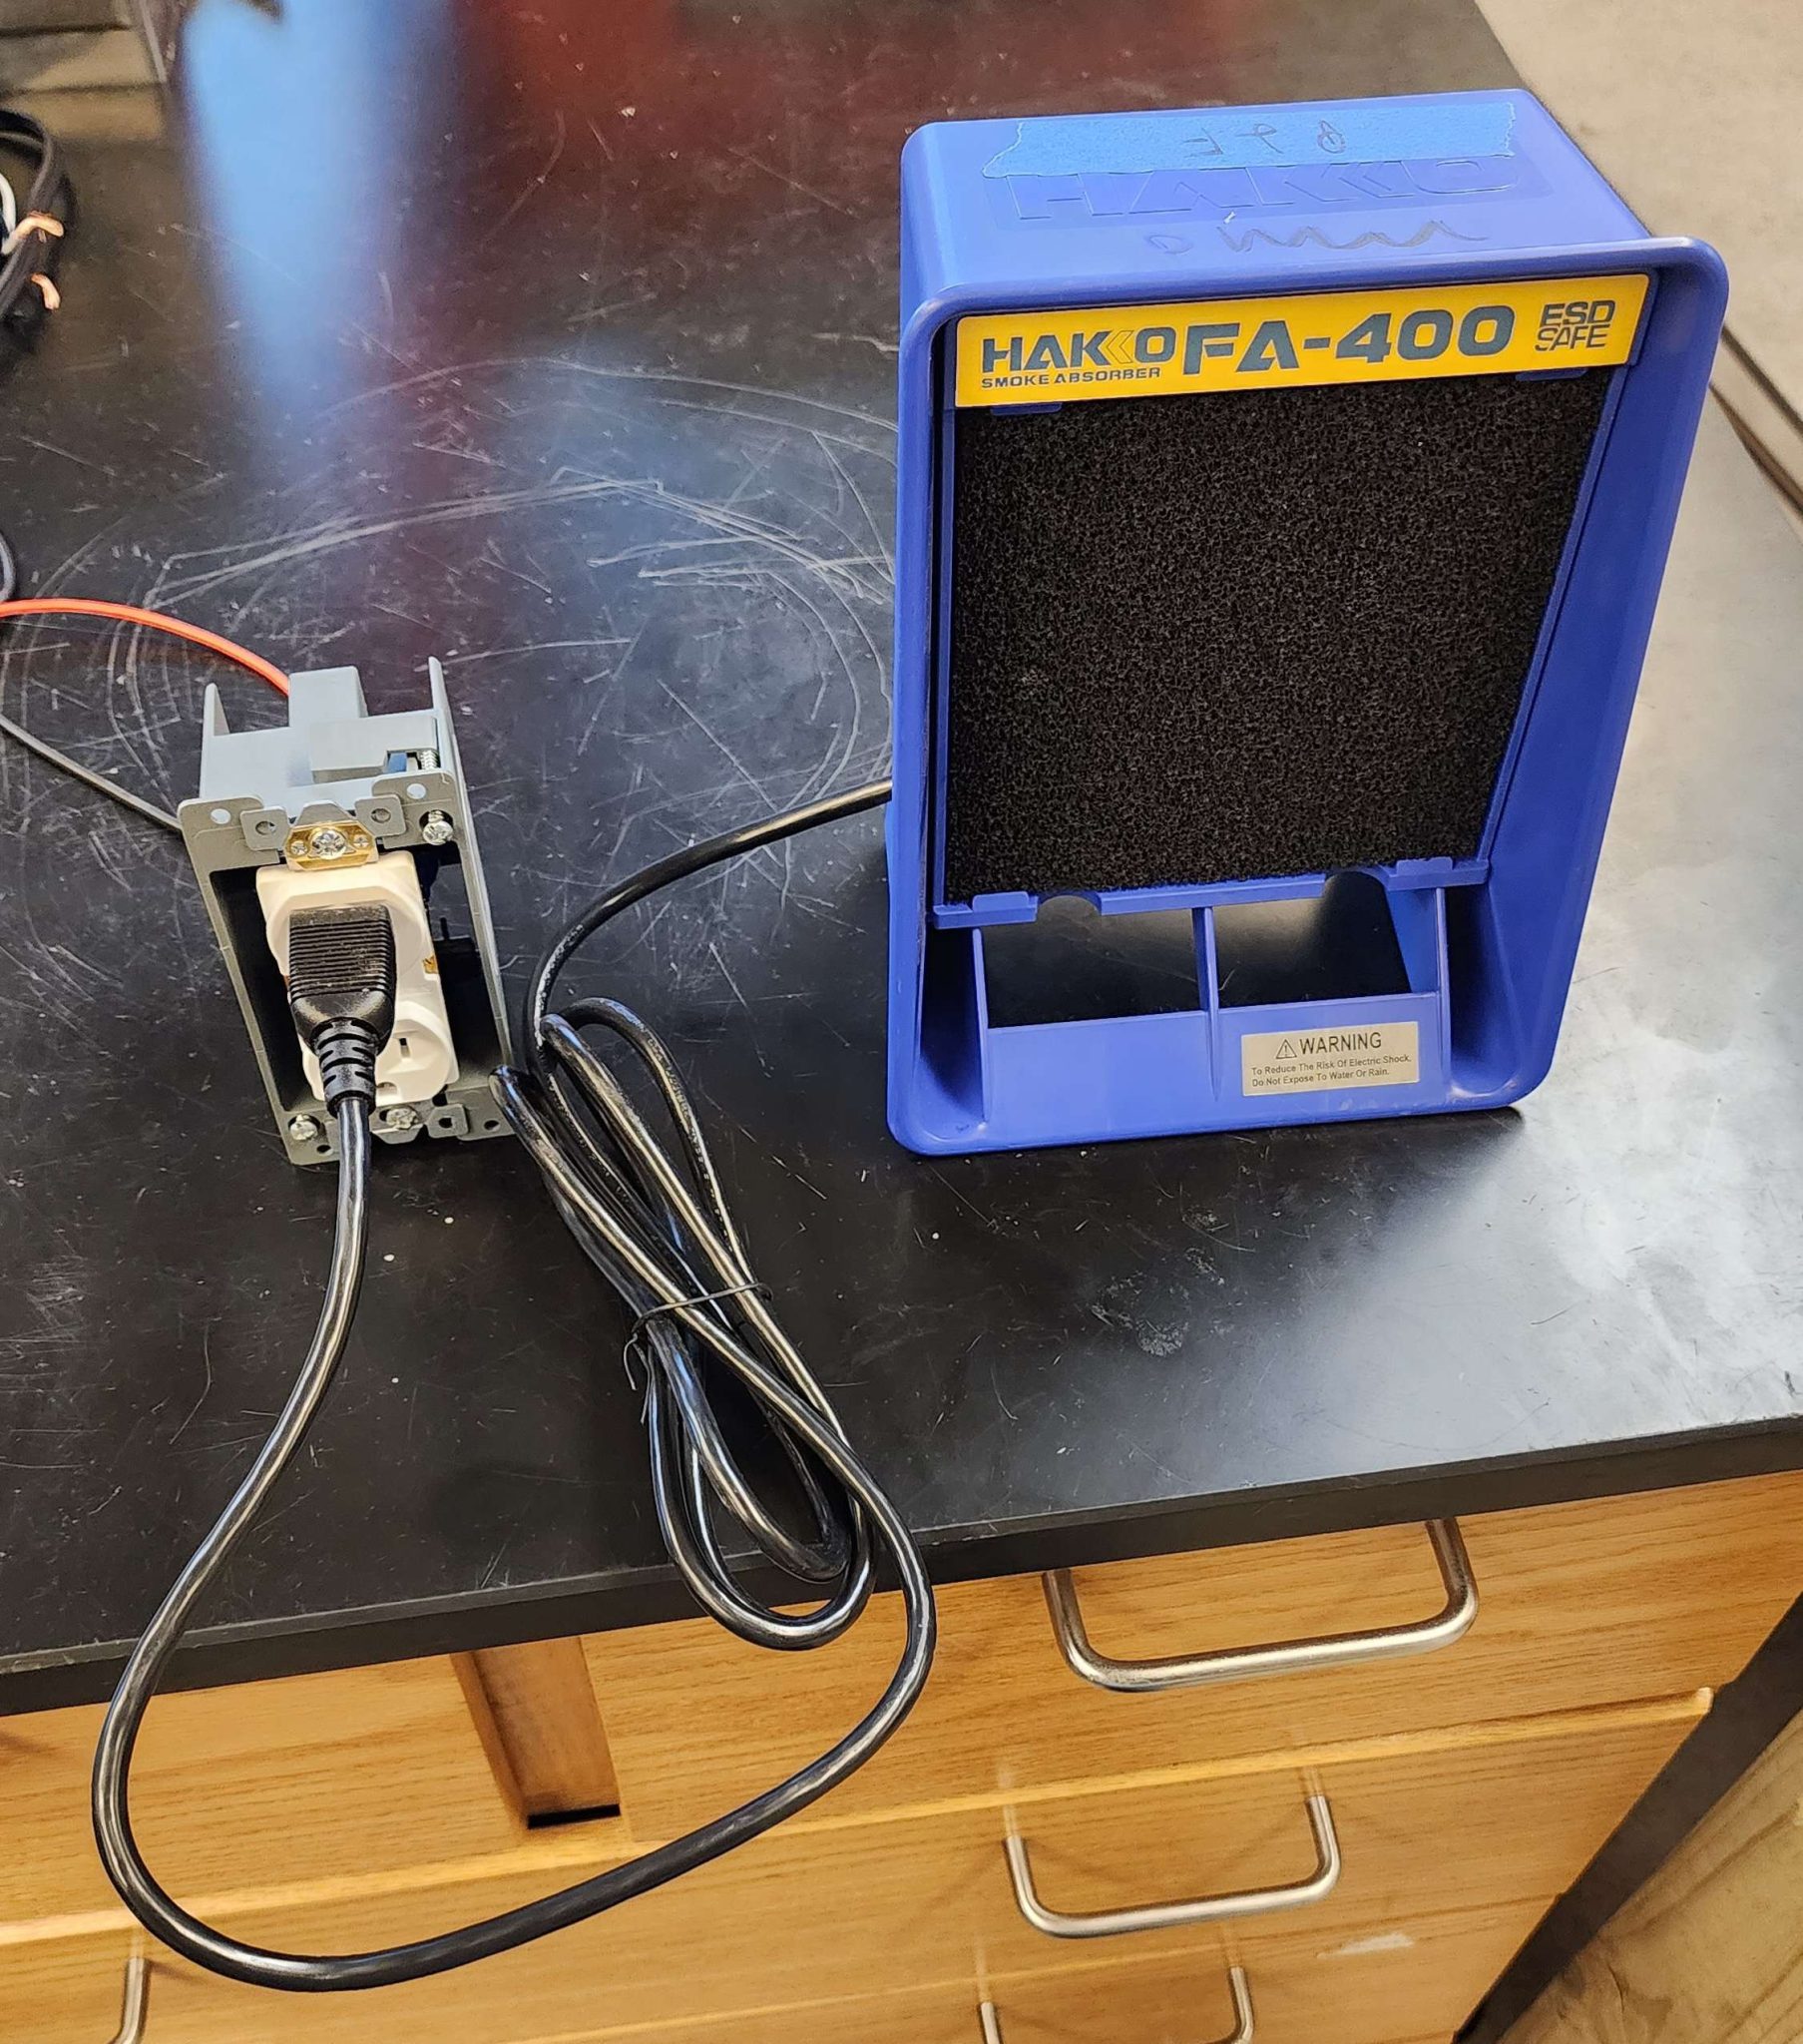
Image below showing a soldering fan connected to the outlet.
- The device will have some appropriate safety measures or design features in place for the outlet to remain safe.
- Assignee: Justin Rish
- Status: Completed
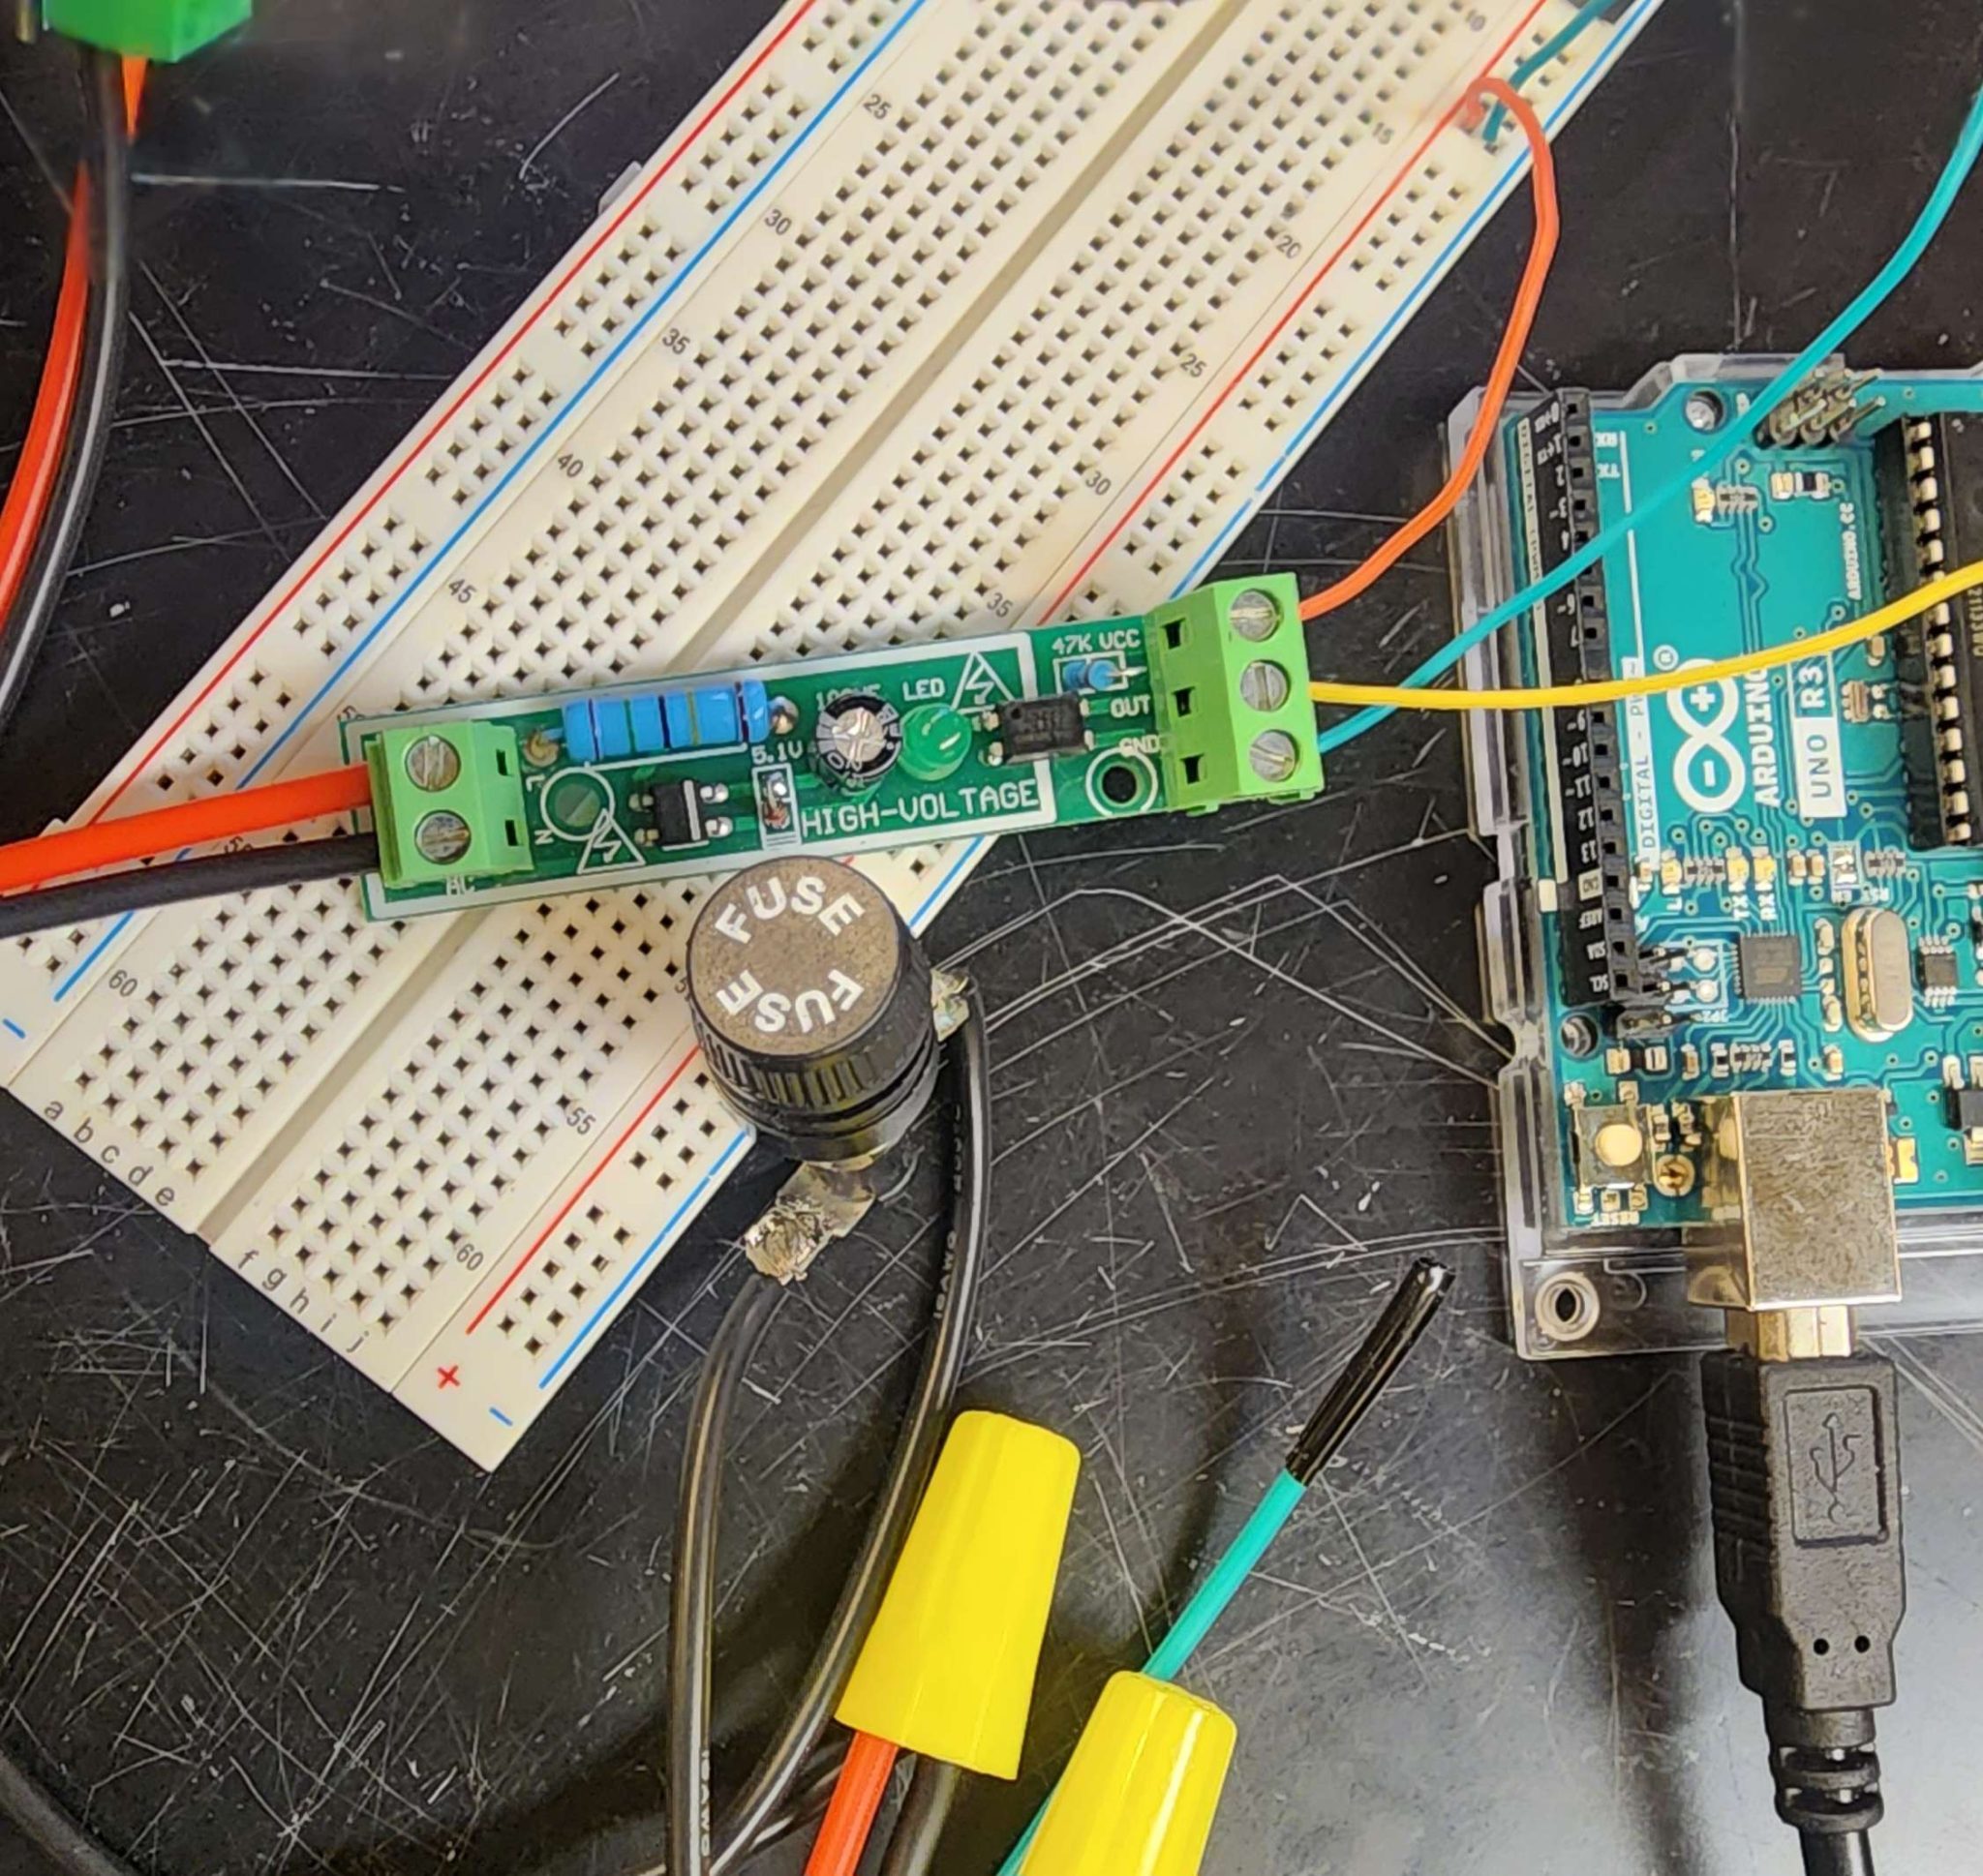
Current sensor is in series with a fuse, and control circuit is protected by an optocoupler. Image shown below.
Guide for Replicating this Project
All of our source code and design files are available on our Center for Open Science / Open Science Framework page:
https://osf.io/9pn2d/
How to Replicate the Server Software
The server software, besides the addition of a few pages, has largely remained the same as last semester. Please review our December 2022 Report for information on replicating the server.
How to Replicate the Arduino Software
Additional Libraries Required: https://github.com/khoih-prog/LittleFS_Mbed_RP2040, https://github.com/rkoptev/ACS712-arduino
Recommended IDE: Arduino IDE 2.X.X from https://www.arduino.cc/en/software
After installing the additional libraries in the Arduino IDE, download the “Arduino Software Files” folder from the OSF Repository and rename the directory to “OSHE_KeWee_Arduino2”. Then, open the OSHE_KeWee_Arduino2.ino file in the Arduino IDE, and compile/upload the code to a connected Arduino Nano RP2040 Connect via USB.
That’s it! Much easier than the Server is to set up. In case you wish to understand the inner workings of the source code, see the “Additional Resources and Recommended Reading” section to access resources the author behind much of the source code (Evan Grahs) used and recommends. For more information about how to use and interact with the meter after uploading the code, continue reading this section for a general overview of operations.
When the Arduino reboots after the code is uploaded to it from the Arduino IDE (or after any subsequent boot, you don’t need to upload the code every reboot, only after modifications), it will enter a waiting loop until you open the Serial Monitor in the Arduino IDE (or an equivalent monitoring application). Once connected, it will print a large amount of debugging information, detailing all the ongoing operations. First, the code initializes all relevant devices/packages: Sensors, Storage, WiFi, and the HTTP Server. Once this has completed, it enters the loop() function. This function’s behavior heavily depends on saved state information, such as saved WiFi credentials, visible WiFi Networks, account details, access tokens, and more. If you just booted the Arduino for the first time, then your Arduino will start the default setup WiFi Access Point (“KeWee Meters Setup”). Using the credentials found in the main sketch source file OSHE_KeWee_Arduino2.ino, you can connect any device with a web browser. Then, access the following URL: “http://192.168.4.1” This will have a hyperlink to /config.html, the actual setup page where you can specify the WiFi network, you’d like the device to join, as well as the account and server to register with (assuming you are self-hosting the server as described in our December 2022 report, since our instance is not public yet). Once you set the configuration, the Arduino will attempt to connect to the given network, and on success, attempt to register with the server to obtain an Authentication Token that it can proceed to use to upload data on a regular interval. If registration succeeds, and the token is saved correctly, your meter will now be uploading data measurements to the server you specified.
Additional Resources and Recommended Reading
How to Replicate the Hardware
- Purchase Hardware
- Arduino Nano Connect
- ACS712 20A Current Sensor
- Optocoupler PCB
- Breadboard
- Duplex outlet
- VARIAC (optional)
- 18 gauge wire
- Install Arduino IDE
- Install libraries for ACS712 20A Current Sensor
- Plug in Arduino Nano to PC and confirm that the IDE recognizes the device
- Test ACS712 with example code from the OSF repository
- Use jumper wires to connect the ACS’s Vcc to the 5V port on the Arduino, GND to GND, and Out to A0.
- Make sure that in the sensor method that ACS712_20A is used instead of 30A or 05A.
- Connect the sensor in series with whatever your load and source is just like you would with a multimeter.
- Compile and Upload to the Arduino
- Make sure that Serial.begin is set to 9600 baud, the serial monitor both shows timestamps and “Both NL & CR” is selected for ease of use.
- Test optocoupler with example code from the OSF repository
- Use jumper wires to connect the optocoupler’s Vcc to the 5V port on the Arduino, GND to GND, and Out to A1.
- Connect the sensor in parallel with whatever your load and source is just like you would with a multimeter.
- Compile and Upload to the Arduino
- Make sure that Serial.begin is set to 9600 baud, the serial monitor both shows timestamps and “Both NL & CR” is selected for ease of use.
- Combining the Optocoupler and ACS712
- Using your breadboard, connect the 5V and the GND to the positive and negative rails of the breadboard.
- Connect both of the Vcc and GND ports of both the sensors to the positive and negative rails of the breadboard
- Connect the out port of the ACS712 to A0, and the out port of the optocoupler to A1.
- Solder wires to the fuse holder. Begin with adding solder to the connector before inserting the wire through the hole in the connector.
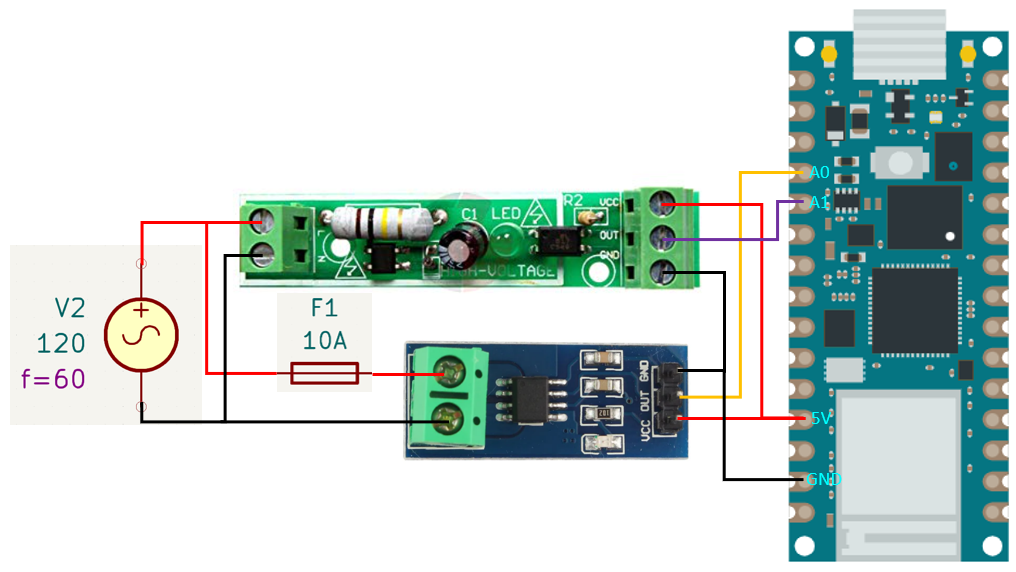
- Construct the circuit as shown in the diagram below.
Additional Resources and Recommended Reading
| Description | Link(s) |
|---|---|
| ACS712 Datasheet | https://www.sparkfun.com/datasheets/BreakoutBoards/0712.pdf |
| Arduino IDE | https://support.arduino.cc/hc/en-us/articles/360019833020-Download-and-install-Arduino-IDE |
| ACS712 Library | https://github.com/rkoptev/ACS712-arduino |
| Arduino Nano RP2040 Connect Datasheet | https://docs.arduino.cc/static/42ff80e3d99d80a1e04c971ee167a288/ABX00053-datasheet.pdf |
Bill of Materials
| Component | Part/Identification Number | Price Paid (at Time of Purchase) |
|---|---|---|
| ACS712 PCB | ACS712ELC-20A | — |
| Optocoupler PCB | B07ZCPM1V3 | $8.16 |
| Arduino Nano RP2040 Connect | ABX00053 | $29.40 |
| Duplex Outlet | $3.14 | |
| Outlet Housing | $2.08 | |
| Breadboard | — | |
| 10A Fuse | — | |
| 10A Fuse Holder | — | |
| 18 AWG Wire | — | |
| Wire Nuts | — | |
| VARIAC | W5MT3 | — |