
About the Project
The KeWee Energy Meters project aims to create a series of devices and software for home energy use monitoring. We hope to make affordable sensors and IoT devices that are able to communicate with a central self-hosted web service for storing data. We also seek to design a website for users to access their device information and share it with others. Our project is expected to span several years, and as an open-source project, we will release all files necessary to replicate our work.
About the Team
Evan Grahs: Website and Server Development Lead
I develop the PHP, MySQL, JavaScript, HTML, and CSS necessary to build our website and I manage a self-hosted LEMP stack (Linux, Nginx, MySQL, PHP) server for our development environment.
Bill Matt: Hardware Design and Development Lead
I develop the hardware and Arduino C code necessary to gather, calculate, and send data over to a server via Wi-Fi.
Goals for this Semester
Server Goals:
- The server will run on open-source web hosting technologies.
Completed: This goal was achieved using a LEMP stack server, and all site code was made in such a way that the files do not depend on closed source libraries to operate. - The server will be able to store information sent by a device.
Completed: See the MySQL screenshot below.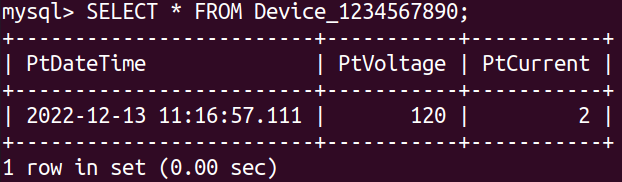
- The server will have a website where a user can retrieve device data.
Completed: See the website screenshot below.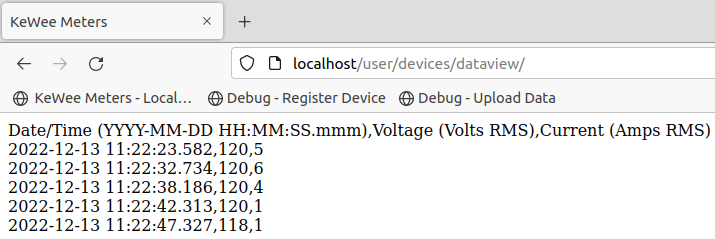
- The server will have a means of keeping track of separate users and associating devices with users.
Completed: See the MySQL screenshots below.

- The server will have a way to specify the data sample rate.
Completed: See the MySQL screenshot below. - The server may have an interface for allowing one user to access multiple devices.
Completed: See the website screenshot below.
Hardware Goals:
- The hardware will have design files originated entirely from free and open-source software.
Completed: This goal was achieved using the Arduino IDE with every library used being open source. - The hardware will be capable of measuring voltages and currents for AC signals close to 120 Vrms (a standard based on most wall outlets in America).
Incomplete: The hardware has not yet been able to measure current or voltage accurately up to this point. - The hardware will be capable of transmitting voltage and current information over a network.
Incomplete: The hardware cannot send data over a Wi-Fi network up to this point.
Steps to Replicate this Project
Files available here: https://osf.io/9pn2d
How to Replicate the Server
- Set up a computer or virtual machine with a Linux distribution of your choosing (we recommend an LTS branch of Ubuntu). Alternatively, find a hosting provider for a LEMP stack server.
- Install Nginx, MySQL, and PHP on that system.
- We recommend following a guide based on the most recent LTS version of Ubuntu.
- At the time of writing, Ubuntu 22.04 LTS can be configured following the guide linked in the Server Resources section.
- As the last part of setting up the LEMP stack, create a MySQL database and keep track of the name for use later (when in the mysql terminal, type “CREATE DATABASE <insert database name>;”).
- Load the contents of “WWW Root Directory” into “/var/www//” and follow the article in how to configure Nginx to appropriately access this directory.
- The site name is just for Nginx to be able to reference, it is not actually changing the published domain (which is not covered by this tutorial, we only operate within a local network at the time of writing.)
- The site name is just for Nginx to be able to reference, it is not actually changing the published domain (which is not covered by this tutorial, we only operate within a local network at the time of writing.)
- Load the contents of “Database Creation Scripts” into an easily accessible directory on your system. Make sure this directory is not published. We recommend just placing it in your user account’s desktop directory.
- Modify the “Create_User_MYSQLTestUser.sql” file to replace any redacted data with the relevant credentials you’d like to have for your new database.
- If the command structure / meaning of items is unclear, please reference a tutorial on SQL. We highly recommend W3Schools.com and link to them below.
- If the command structure / meaning of items is unclear, please reference a tutorial on SQL. We highly recommend W3Schools.com and link to them below.
- Modify the “/var/www/libraries/security/kewee_credentials.php” to contain the credentials created in the last step.
- Please note the warnings in these files, this is not an ideal security practice and should be replaced by some better method for allowing local scripts to access a database.
- Please note the warnings in these files, this is not an ideal security practice and should be replaced by some better method for allowing local scripts to access a database.
- Modify the “/var/www/libraries/security/kewee_crypt.php” to contain a password hashing algorithm of your choice.
- If you are unsure of the options available to you, please see the linked PHP Documentation for more information regarding the password_hash() and password_verify() functions.
- If you are unsure of the options available to you, please see the linked PHP Documentation for more information regarding the password_hash() and password_verify() functions.
- After connecting to your newly created MySQL database from a Linux terminal (“mysql”, then “connect <insert database name>;”), use the “source” command (type “help” once in MySQL for more info) to execute the three “Create_<table/user/etc>.sql” files from the “Database Creation Scripts” directory. These will create the “Users” and “Devices” tables, as well as allow all scripts to access the database with the variables in “kewee_credentials.php”.
- Now, you should be ready to connect! The server will be hosted at http://localhost or whatever your LAN IP address is.
- Note, before port forwarding and publicly hosting your server, you should configure SSL and only accept HTTPS connections to ensure data is adequately encrypted in transit.
- Note, before port forwarding and publicly hosting your server, you should configure SSL and only accept HTTPS connections to ensure data is adequately encrypted in transit.
Resources Used/Recommended for the Server
| Description | Links |
|---|---|
| Ubuntu installation pages, you can choose the server edition if you do not want a GUI on the system you use as a server. Also, a MakeUseOf article explaining the difference. | https://ubuntu.com/download/desktop https://ubuntu.com/download/server https://www.makeuseof.com/tag/difference-ubuntu-desktop-ubuntu-server/ |
| Rufus is a tool that can help make a bootable USB for installing a Linux distribution of your choice. | https://rufus.ie |
| DigitalOcean is a great resource for setting up a self-hosted environment. Linked is an article for setting up a LEMP stack on Ubuntu 22.04 LTS. | https://www.digitalocean.com/community/tutorials/how-to-install-linux-nginx-mysql-php-lemp-stack-on-ubuntu-22-04 |
| W3Schools is a great place for learning all about MySQL, PHP, JavaScript, HTML, CSS, and more! I (Evan Grahs) made great use of this site as a tool to learn many of the skills required for this project, as most of these languages have not been covered in my college classes. | https://www.w3schools.com/ |
| The PHP Documentation, while less easy to understand than W3Schools, is an important resource for understanding the PHP code used in this project and has nearly everything about the language covered in detail. | https://www.php.net/manual/en/index.php |
| The Mozilla MDN Documentation website, a deeper dive on some things covered in W3Schools, and a good reference resource. | https://developer.mozilla.org/en-US/docs/Web/ |
How to Replicate the Hardware
- Install Arduino IDE 1.8.19 from the Arduino website and other drivers and libraries associated with the project
- To install the libraries associated with the ESP8266, go to File-> Preferences-> Settings-> Additional Boards Manager URL’s and enter http://arduino.esp8266.com/stable/package_esp8266com_index.json into the text box. Then go to Tools -> Board -> Boards Manager and type in “esp8266” and press install.
- A library called WiFiManager may be required to install if it is not already included.
- Go to https://www.instructables.com/Simple-Arduino-Home-Energy-Meter/ and build the circuit on your breadboard,
- For this project the polarized 10uf capacitor was replaced with a .1uf ceramic capacitor.
- For this project the polarized 10uf capacitor was replaced with a .1uf ceramic capacitor.
- At the same instructibles link use the code provided and edit it so it can be used for 120Vrms instead of 220Vrms.
- Follow Figure 4-2 of the ESP-01S datasheet to connect the ESP-01S to your Arduino Uno R3
- If you would like to test out your ESP8266 I would recommend getting an ESP8266 to usb adapter with a CH340G chip inside it.
- After installing the drivers for the CH340G copy the code from https://arduino.stackexchange.com/questions/59847/http-get-request-using-arduino-uno-and-esp8266 and replace the ssid and password strings with your Wi-Fi network of choice
- Compile the code onto your ESP8266 Generic Board and open the Serial Monitor and make sure it is set to “Both NL and CR” and your baud rate to 115200
- Once the ESP connects the serial monitor should output some garbage ASCII characters and then stop outputting anything.
- If you would like to test out your ESP8266 I would recommend getting an ESP8266 to usb adapter with a CH340G chip inside it.
Resources Used/Recommended for the Hardware
| Description | Link |
|---|---|
| Instructible used to make circuit that would measure a current at 120Vrms | https://www.instructables.com/Simple-Arduino-Home-Energy-Meter/ |
| ESP8266 Arduino documentation and installation instructions | https://arduino-esp8266.readthedocs.io/en/latest/installing.html |
| ESP-01S ESP8266 Datasheet | https://www.universal-solder.ca/downloads/esp8266_series_modules_user_manual_en.pdf |
| Wi-Fi Test Program | https://arduino.stackexchange.com/questions/59847/http-get-request-using-arduino-uno-and-esp8266 |
| CH340G Driver | https://learn.sparkfun.com/tutorials/how-to-install-ch340-drivers/all |
Bill of Materials
| Component | Part/Identification Number | Price Paid This Semester |
|---|---|---|
| JANSANE 100A Non-invasive AC Current Sensor Split-Core Clamp Current Transformer | SCT-013-000 | $11.99 |
| JANSANE SCT-013-030 30A Non-invasive AC Current Sensor Split-Core Current Transformer | SCT-013-030 | |
| JANSANE SCT-013-030 100A/1V Non-invasive AC Current Sensor Split-Core Current Transformer | SCT-013-001 | |
| Stemedu ESP-01S USB to ESP8266 ESP-01S Wireless WiFi Adapter Module Wi-Fi CH340G 4.5-5.5V, 115200 Baud Rate, Upgrade to 4MB Flash | B07KF119YB | |
| ESP-01S ESP8266 | 3647-Ai-ThinkerESP-01SESP8266-ND | |
| E-Projects 25EP514100K 100k Ohm Resistors, 1/4 W, 5% (Pack of 25) | 25EP514100K | $5.51 |
| E-Projects 25EP51456R0 56 Ohm Resistors, 1/4 W, 5% (Pack of 25) | 25EP51456R0 | |
| Arduino Uno R3 | A000066 | |
| Ceramic .01uf Capacitor | 104 | |
| Ceramic 100pcs 10uf Capacitors | X0030CE4ZD |