
Spring 2025 Start
Project Update 1 (1/22/2025)
To-Do List Week 3
-Design shop vac latch mount system
-Print and mount castor mounts to frame
-Look into drive base redesign
-Get Sick Lidar mount file or design our own
Concerns For the Week:
I do not have any real concerns for this week, I just need to start 3d printing and designing some more parts this week. If I had to pick a concern it would be the drive base sprockets from last semester functioning well under load once we start more testing.
Project Update 2 (1/26/2025)
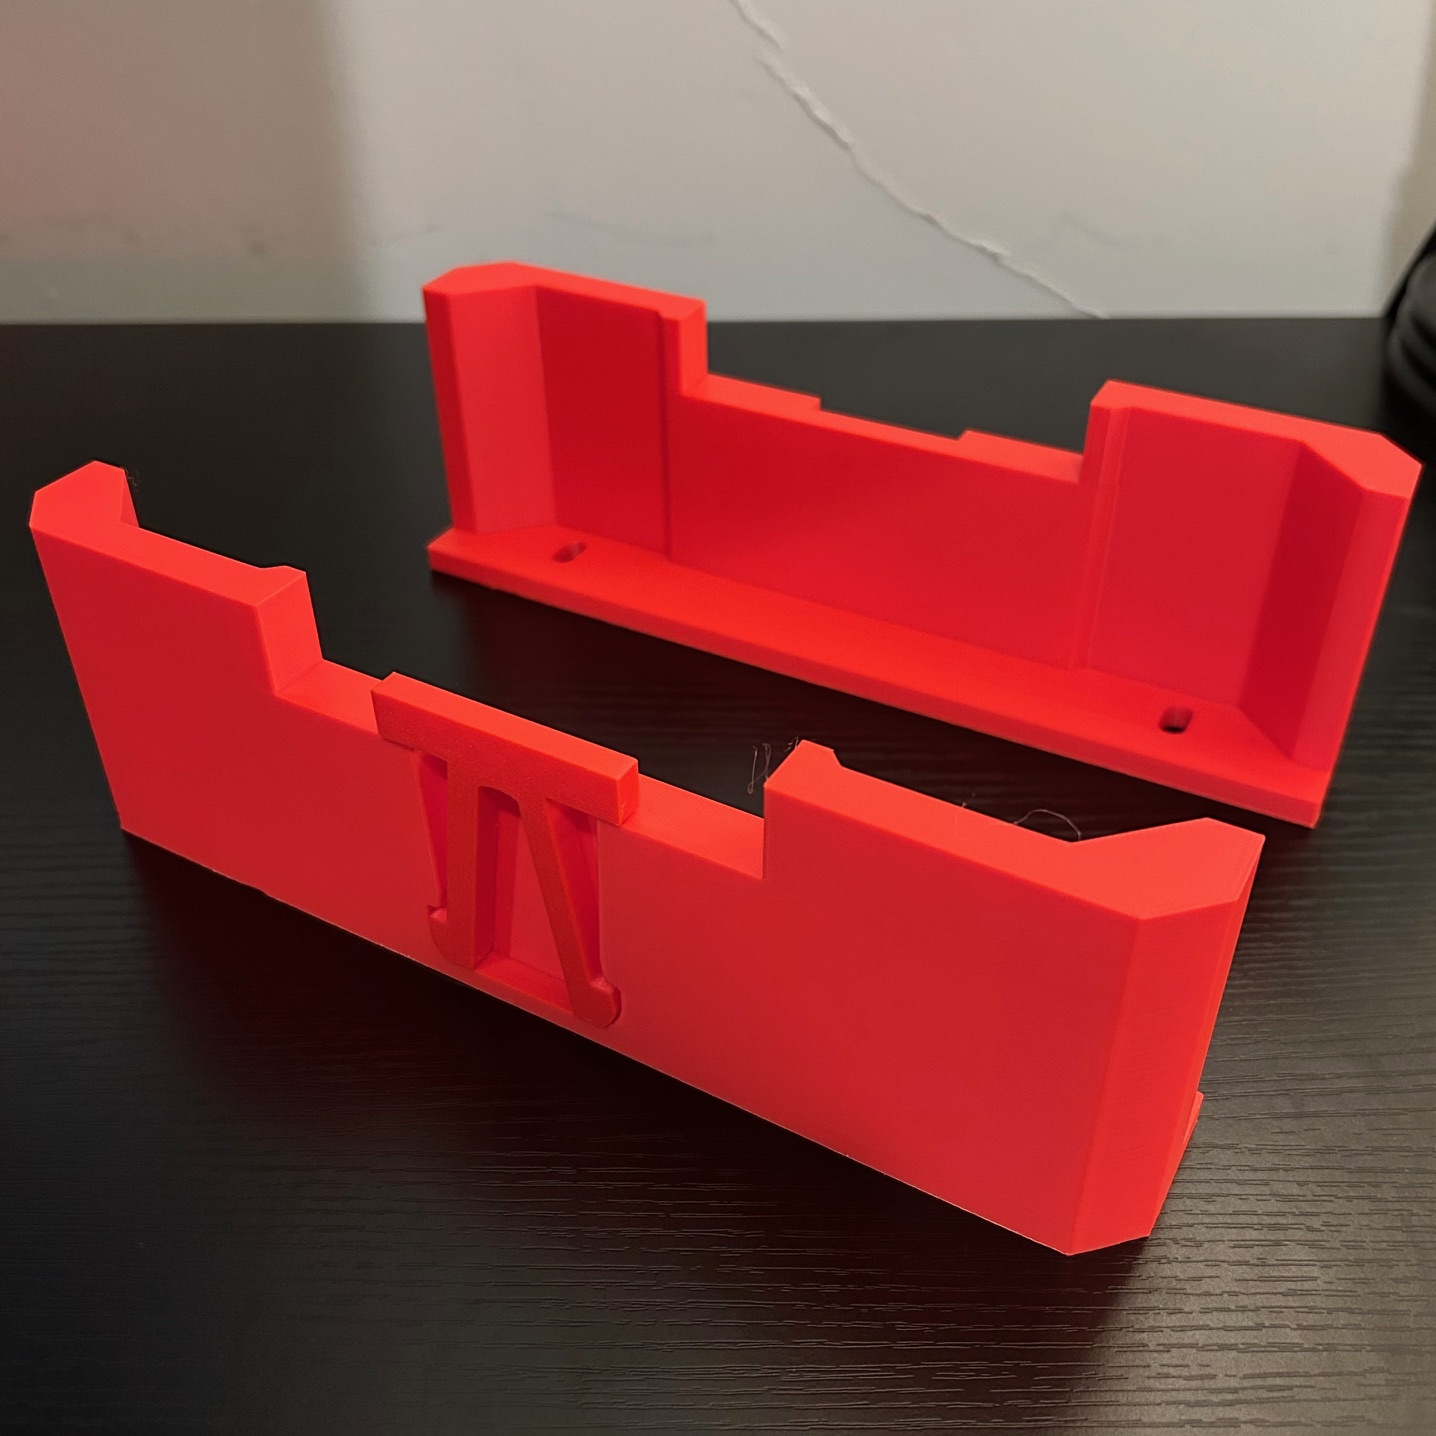
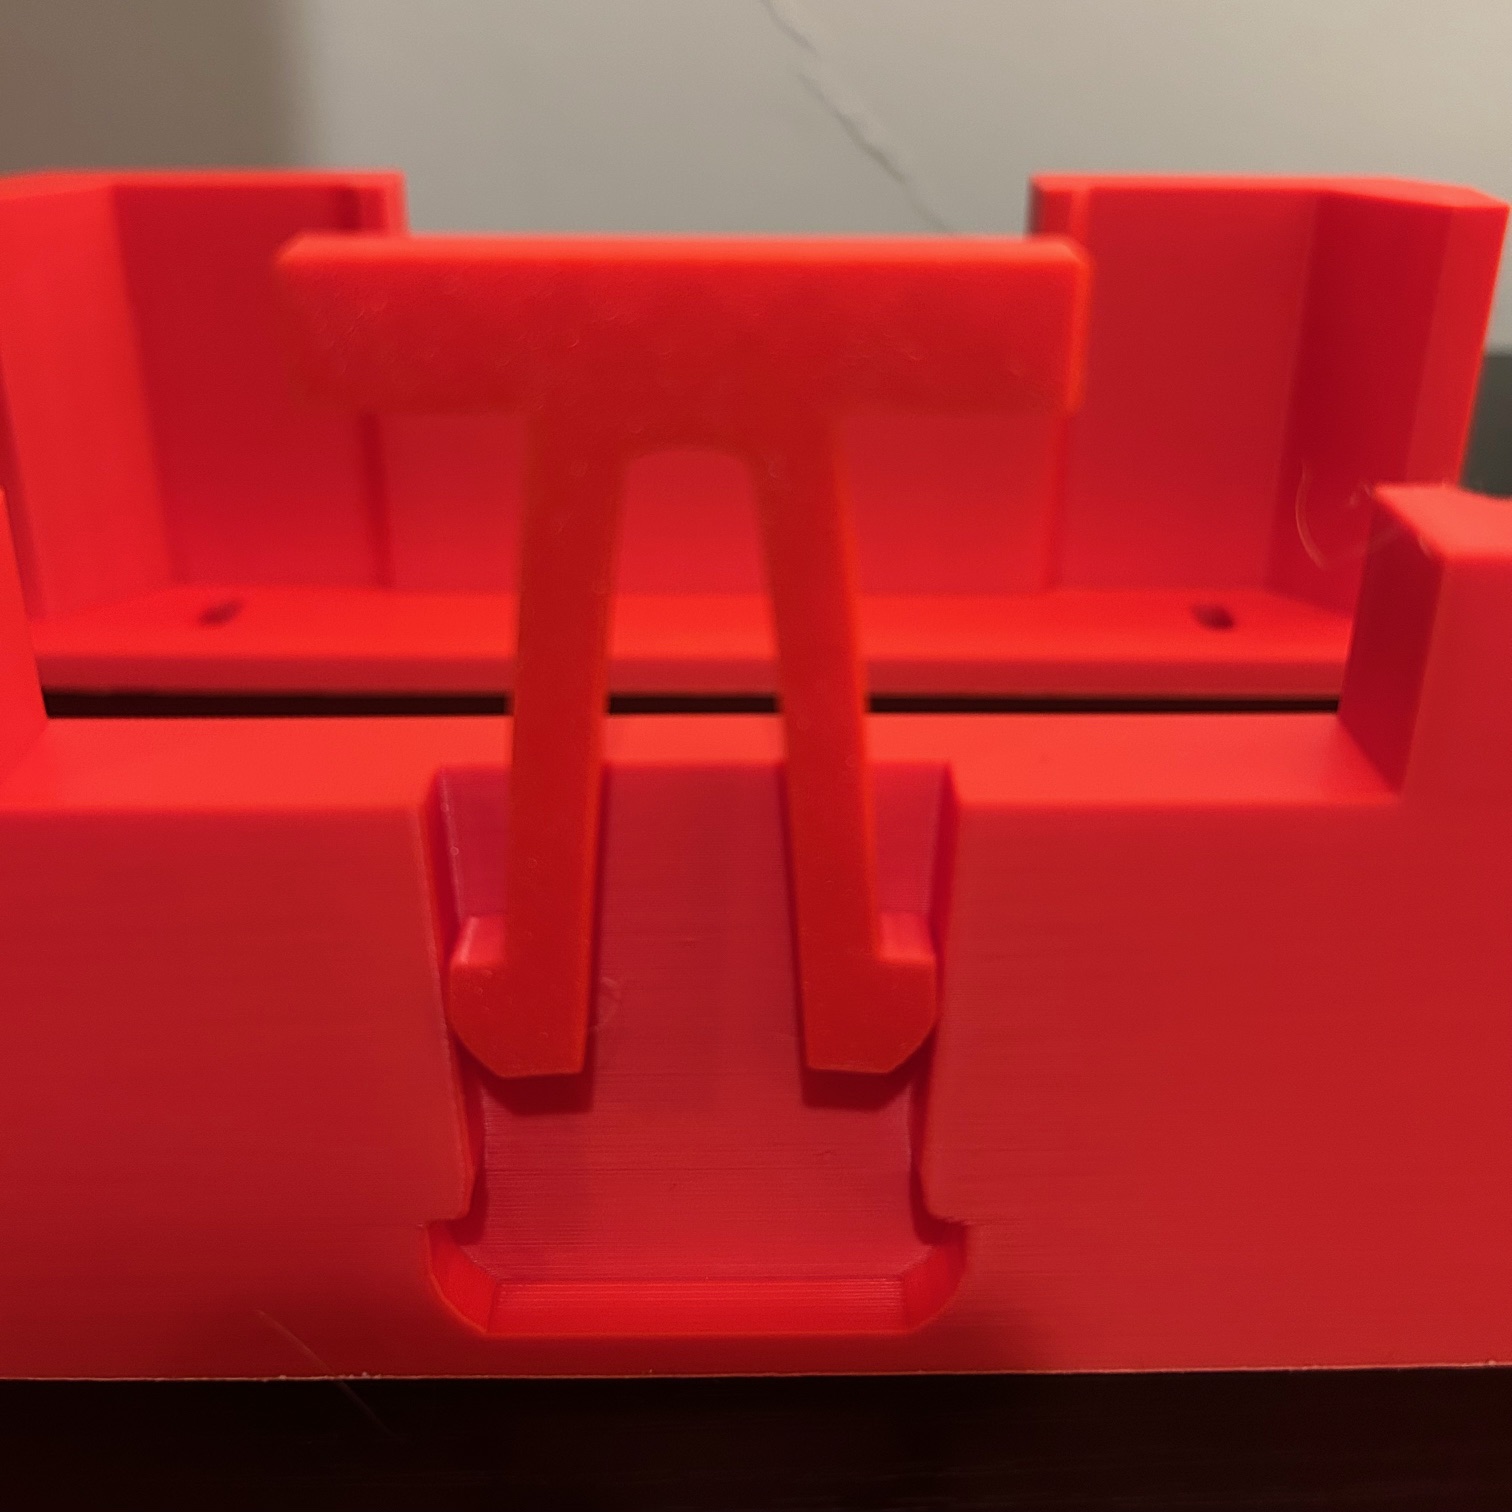

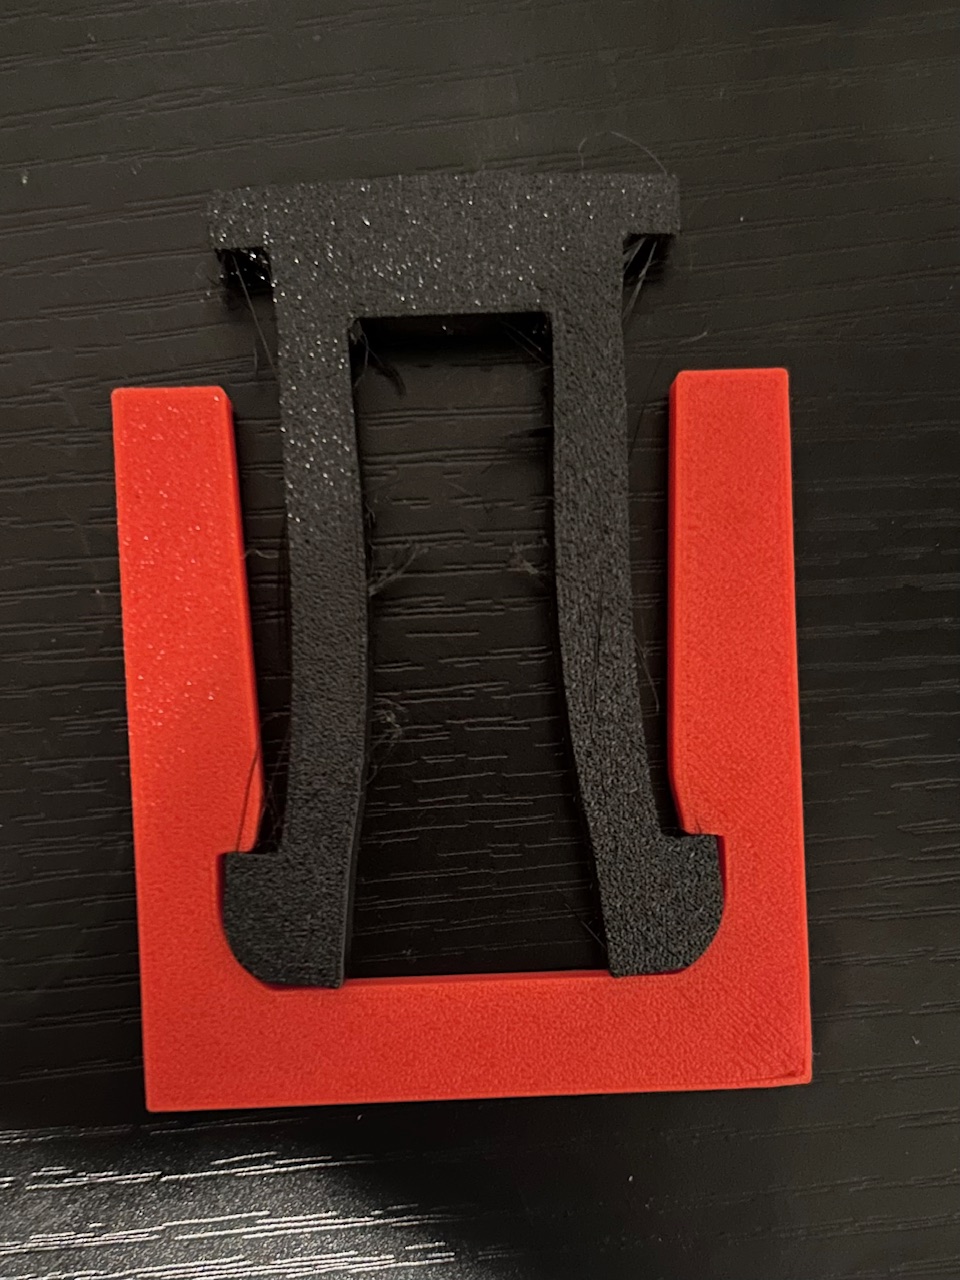
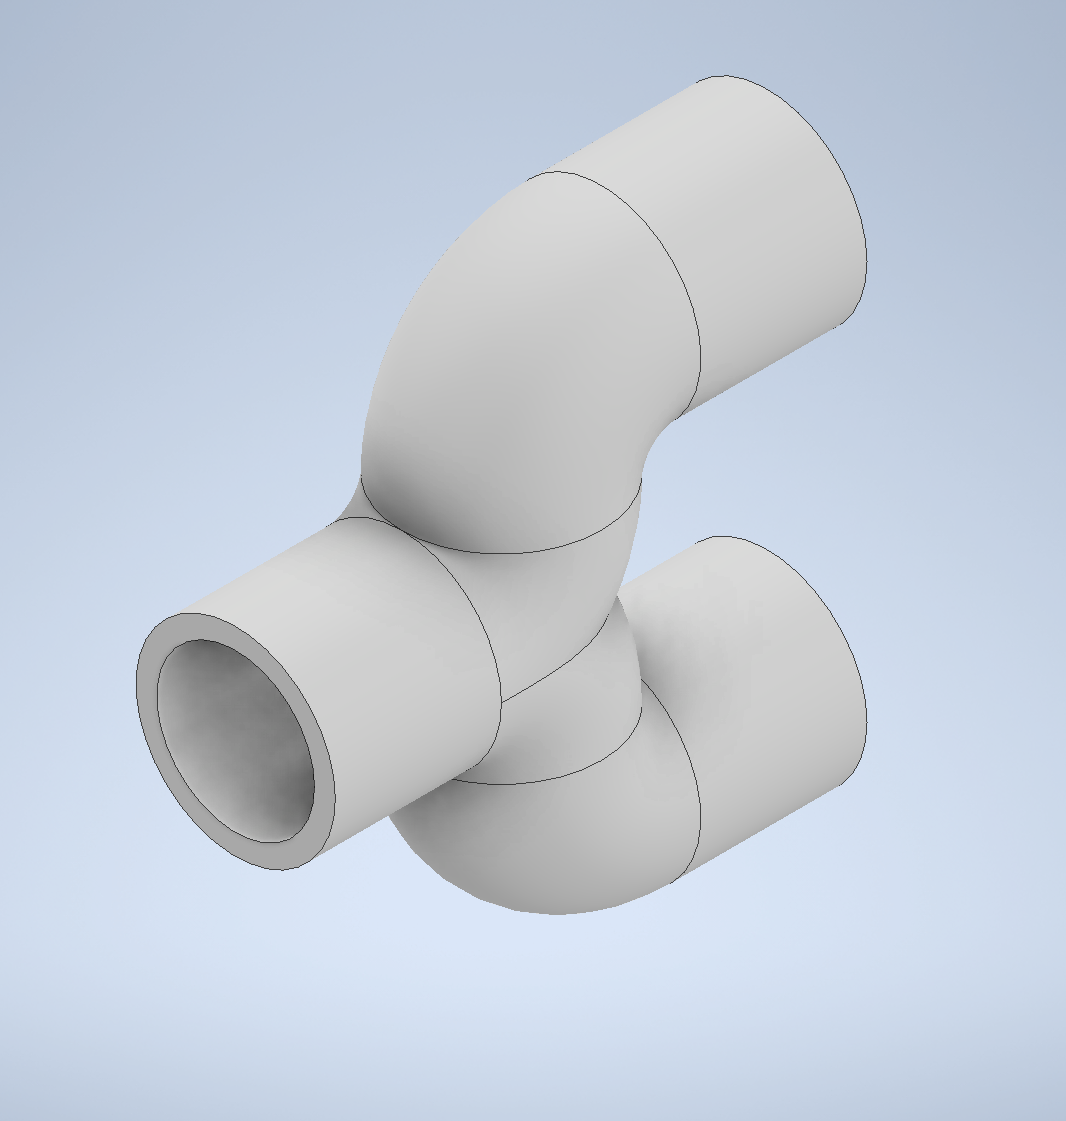
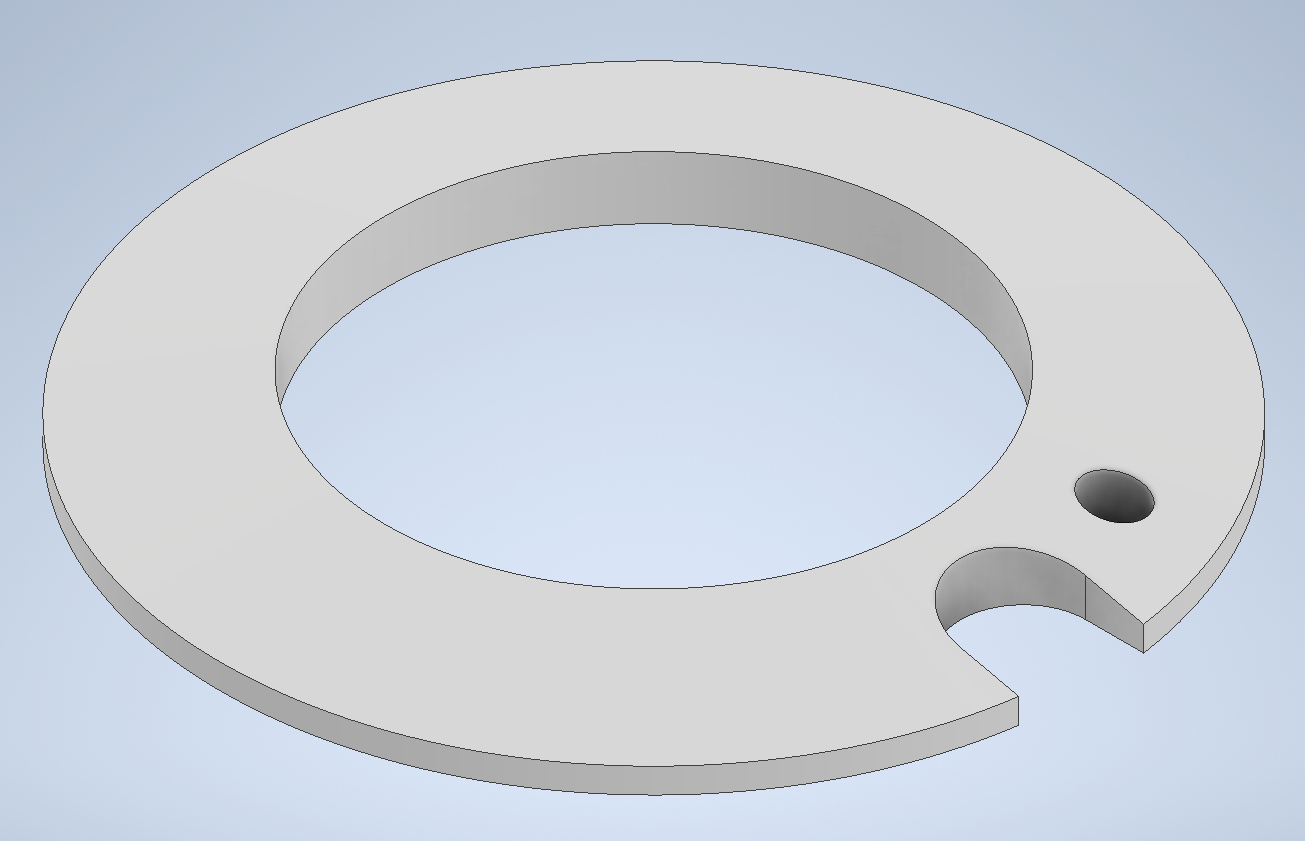
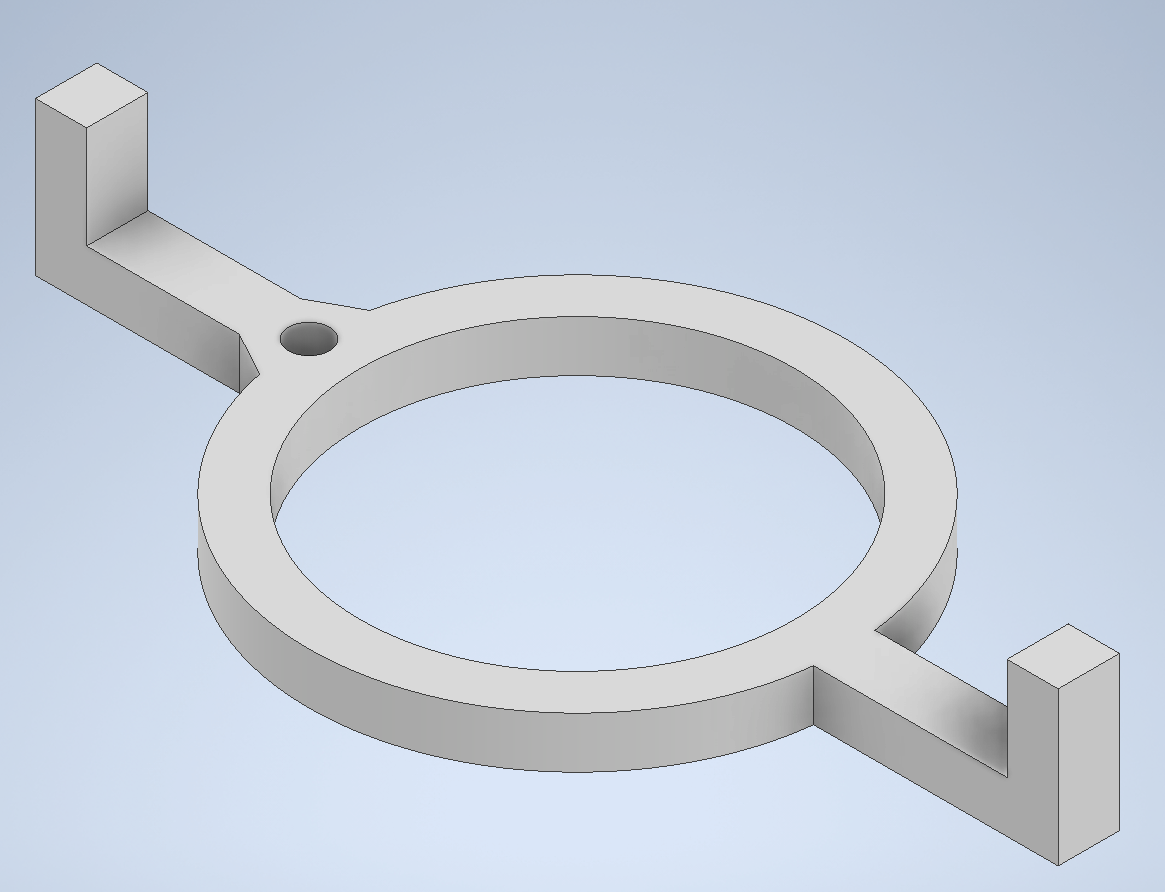
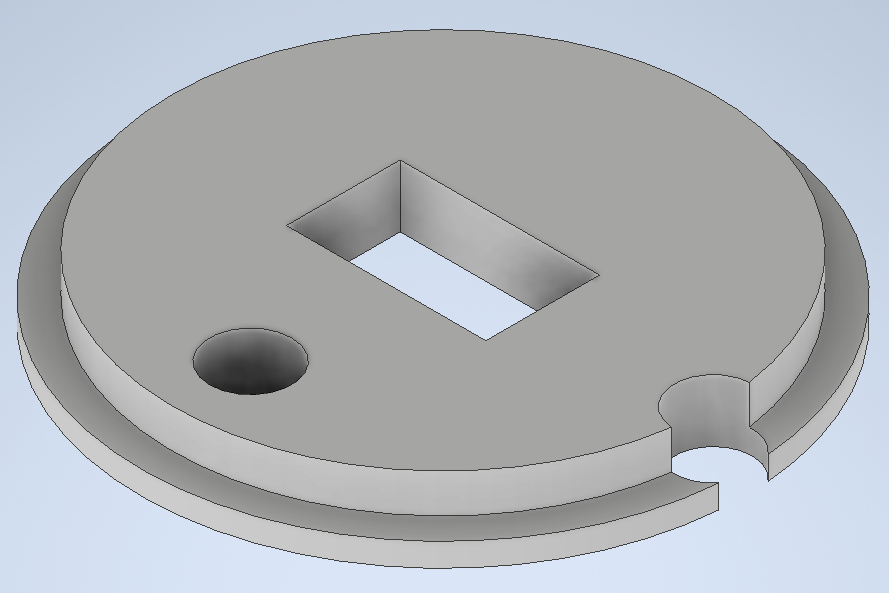
Since last week I came up with four possible designs for the shop vac mount system and ended up testing out my first design. It utilizes a pin that slides down a narrow channel before snapping into place. This locks the vacuum in place up and down, while the rest of the bracket constrains the vacuum from side to side motion. An example pin can be seen in the center picture, while will be adapted to mount to the vacuum base on each side. I also printed both of the castor mounts but did not get time to secure them to the frame this week.
To-Do List Week 4
-Design and print finalized mounting pins for vacuum
-Print new wheel design from last semester
-Look into drive base redesign
-Design our own lidar mount as the provided mount is side orientated
Concerns For the Week:
My only real concern for the week is that I will not get as much work done as needed with career fair this Tuesday as I am seeking a full time job post graduation. I am also concerned the pins my fatigue over time and become less ridged as they are printed from PLA.
Project Update 3 (2/4/2025)
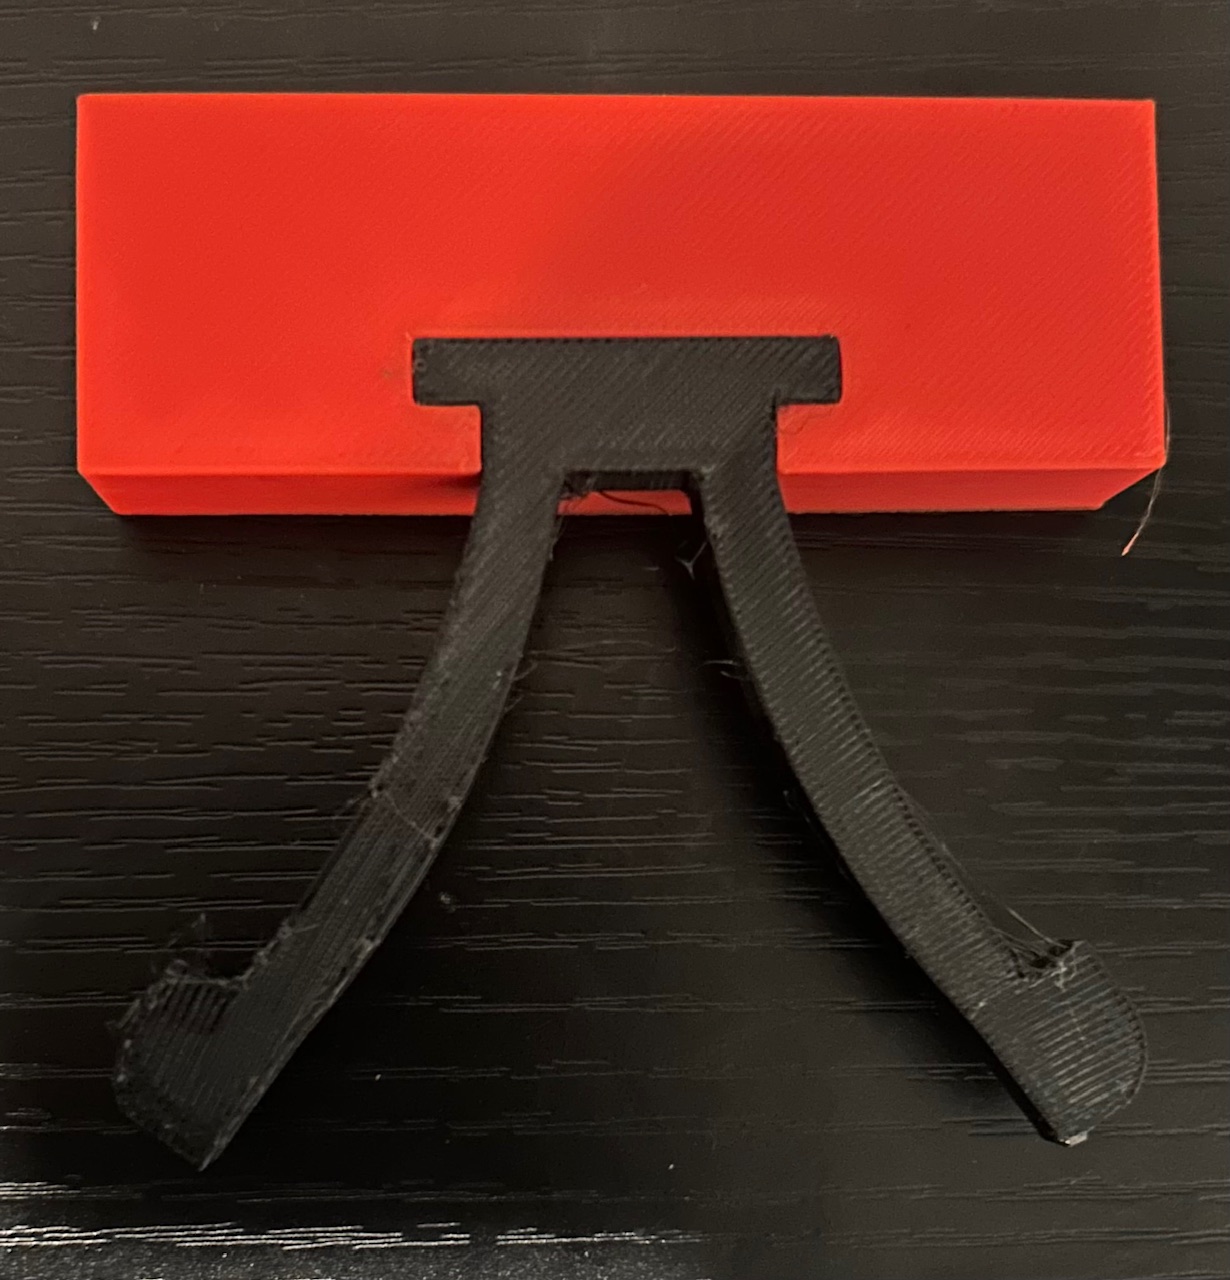
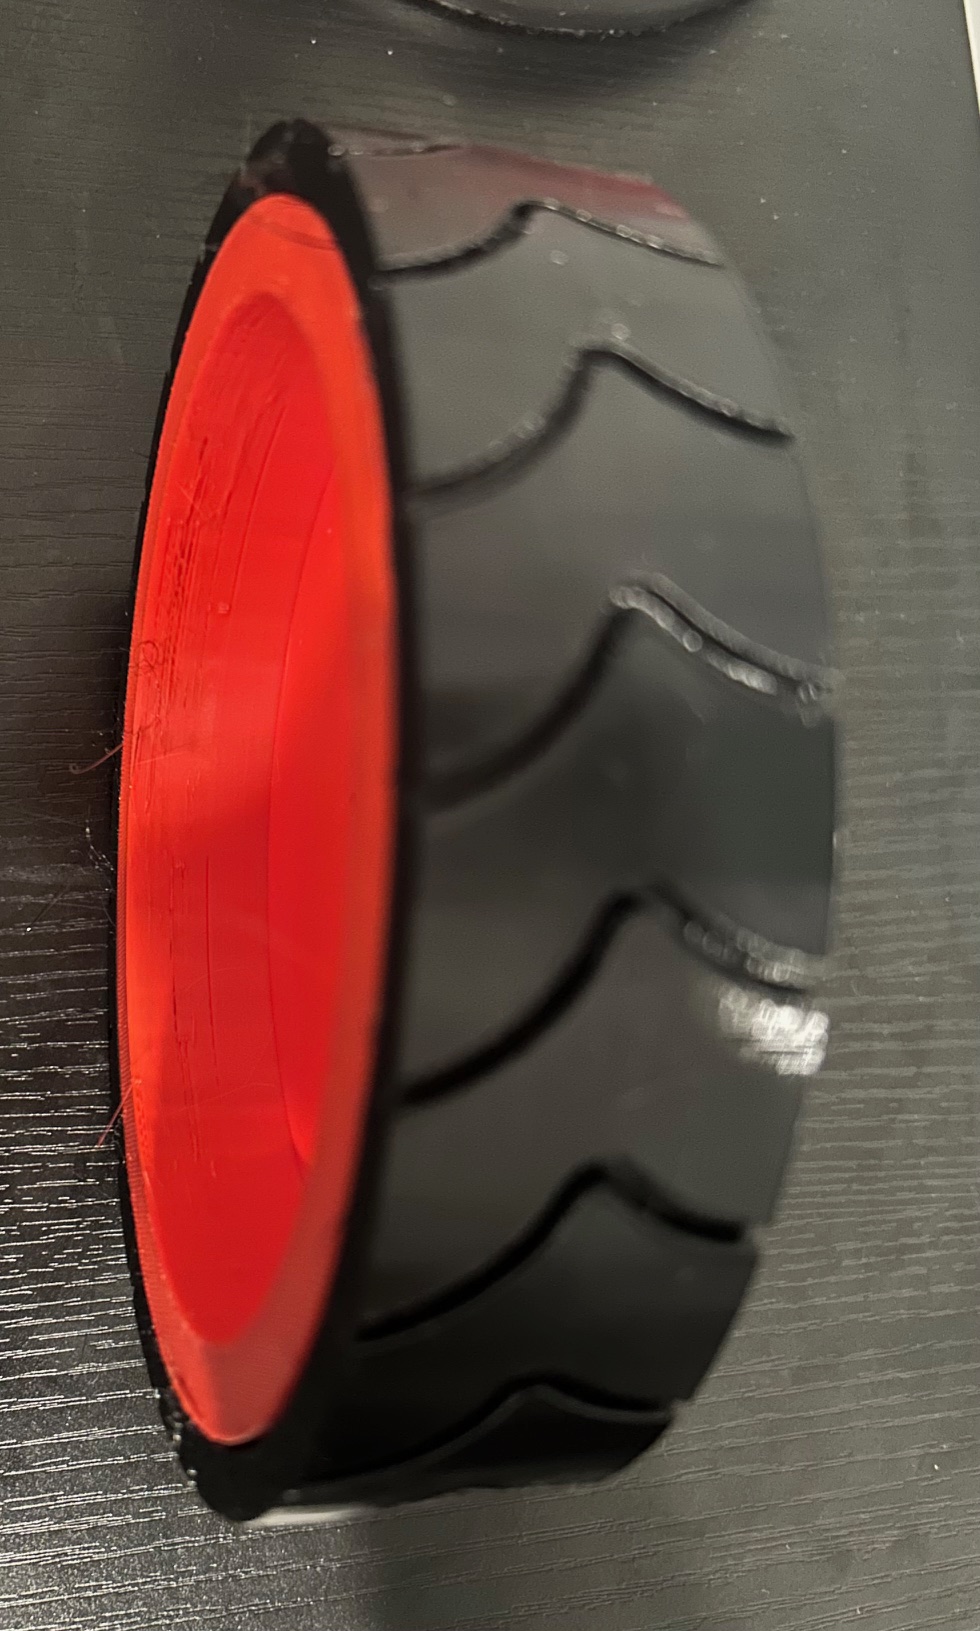
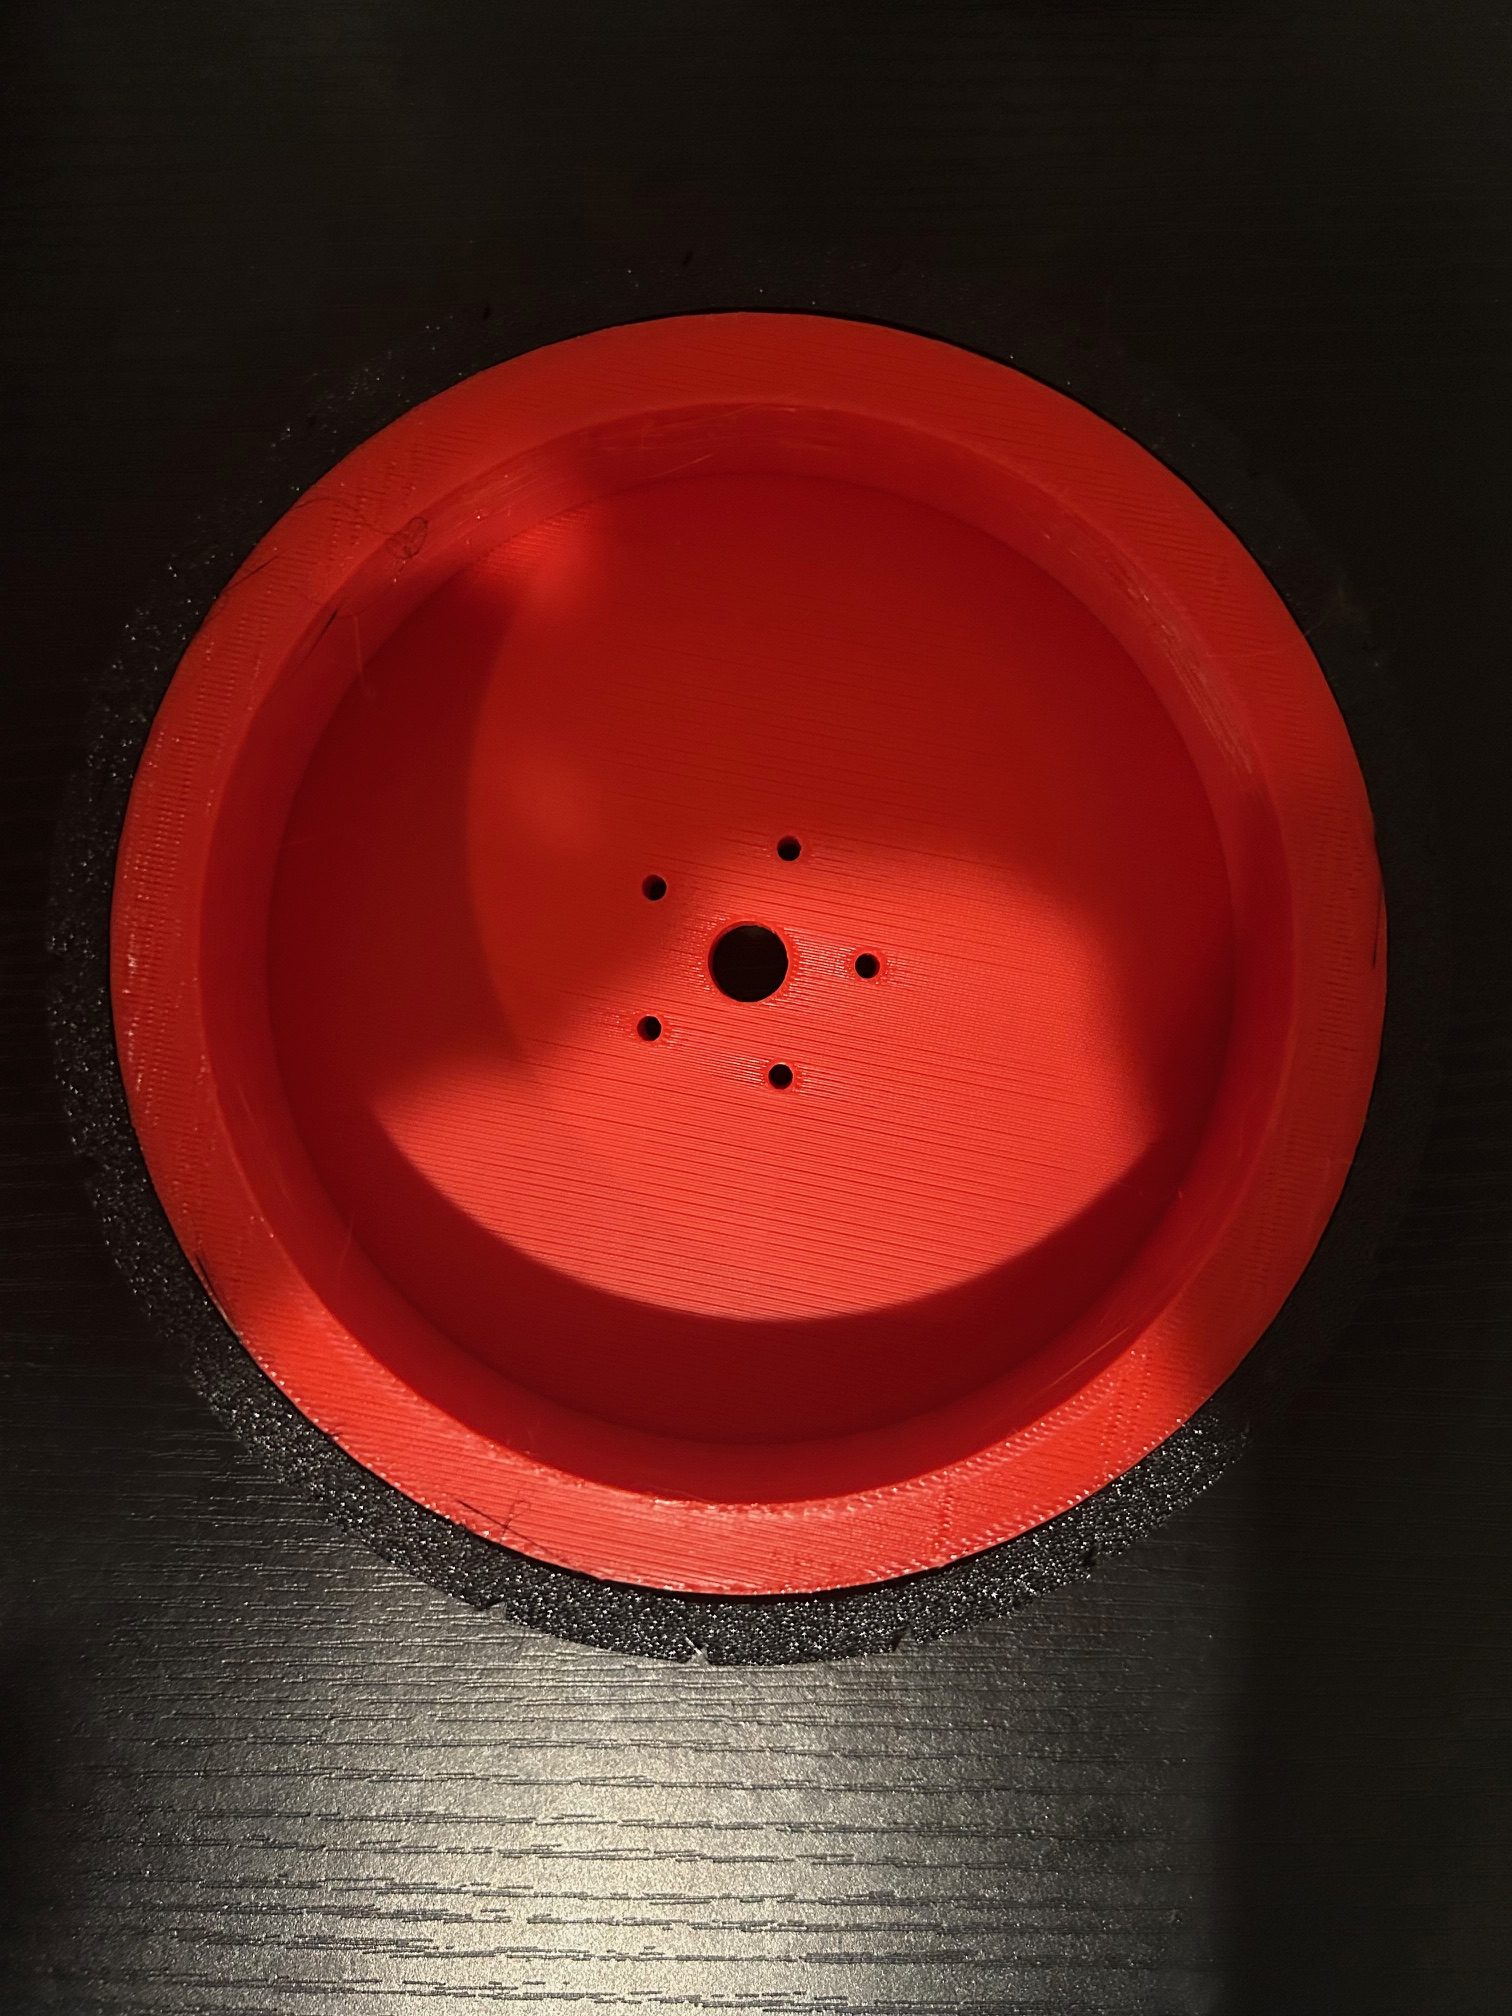
Since last week I got both of the new wheels printed, in TPU for the tires and PLA for the rims. I decided to redesign and print the pins in TPU not PLA so they do not fatigue and break over time. The pins are printed curved outward so the elasticity of the pins forces them outward. I also mounted the vac holders on the side of the frame for the pins to slot into.
To-Do List Week 5
-Design our own lidar mount as the provided mount is side orientated
-Mount fluid reservoir once it ships
-Mount castors to the brackets
Concerns For the Week:
I have no concerns for the week, just waiting for parts to ship to get more work done on the design.
Project Update 4 (2/16/2025)
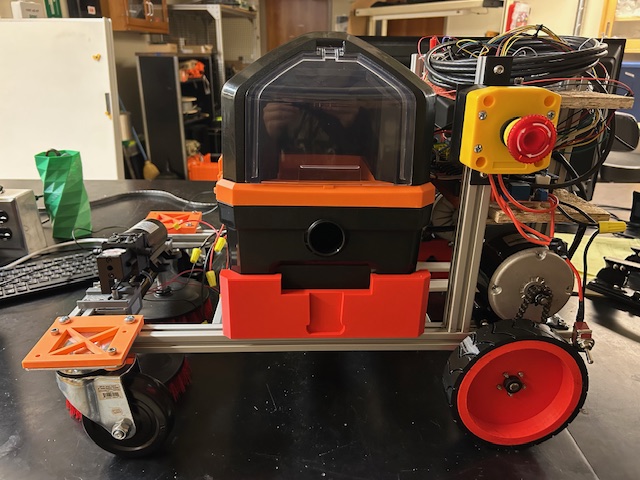
Since last week I got the new wheels mounted, the castors mounted, and have the rest of the mechanical design planned out. We are still on target to finish all mechanical parts by week 8 so we can put more effort into lidar implementation. The CDR was this week so I also worked on the slides for the presentation.
To-Do List Week 5
-Mount fluid reservoir once it ships
-Design and assemble electrical enclosure
-Attach squeegee and shorten tube if needed
Concerns For the Week:
My only concerns for this week are just how difficult the lidar work is going to be because two of my teammates have been having trouble all semester with it. I will be joining them to hep after all mechanical design is done, however, documentation is limited.
Project Update 5 (3/3/2025)
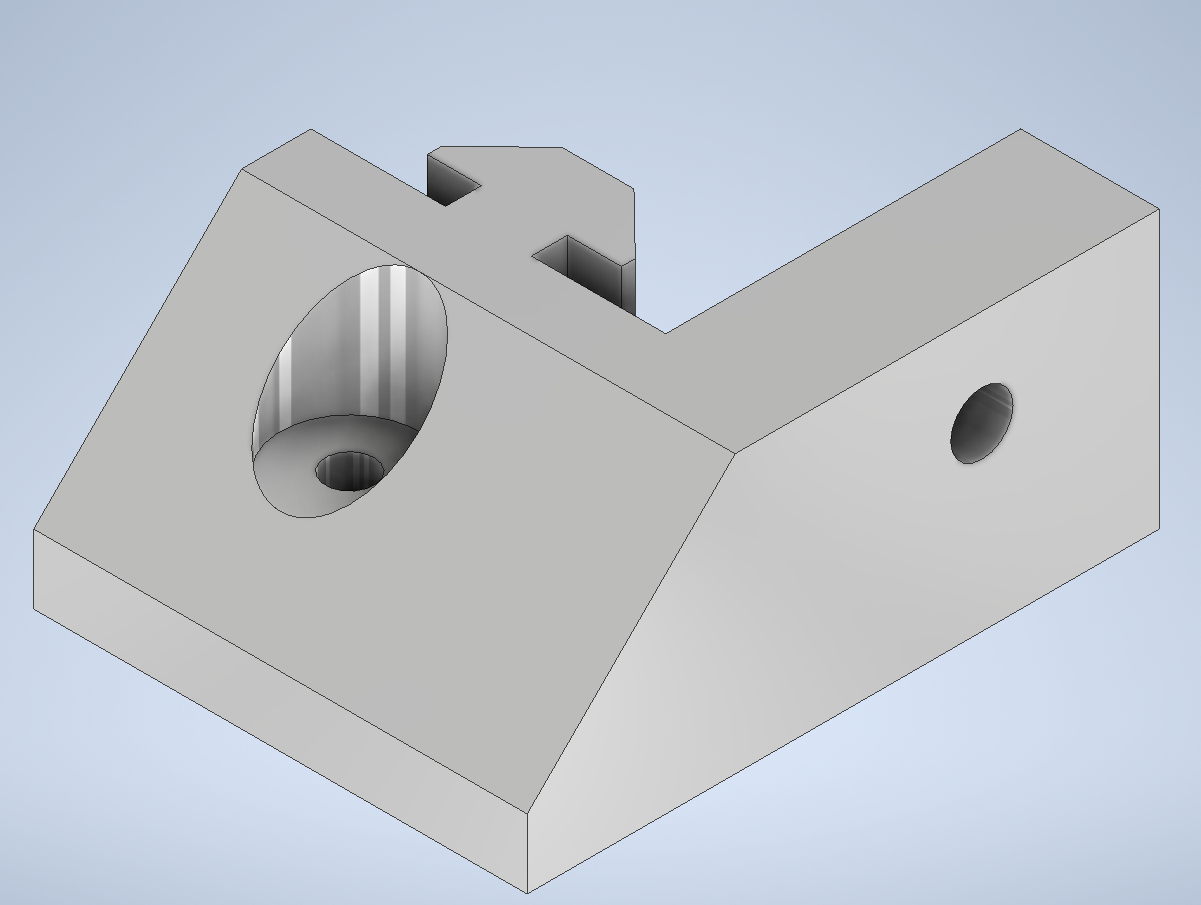
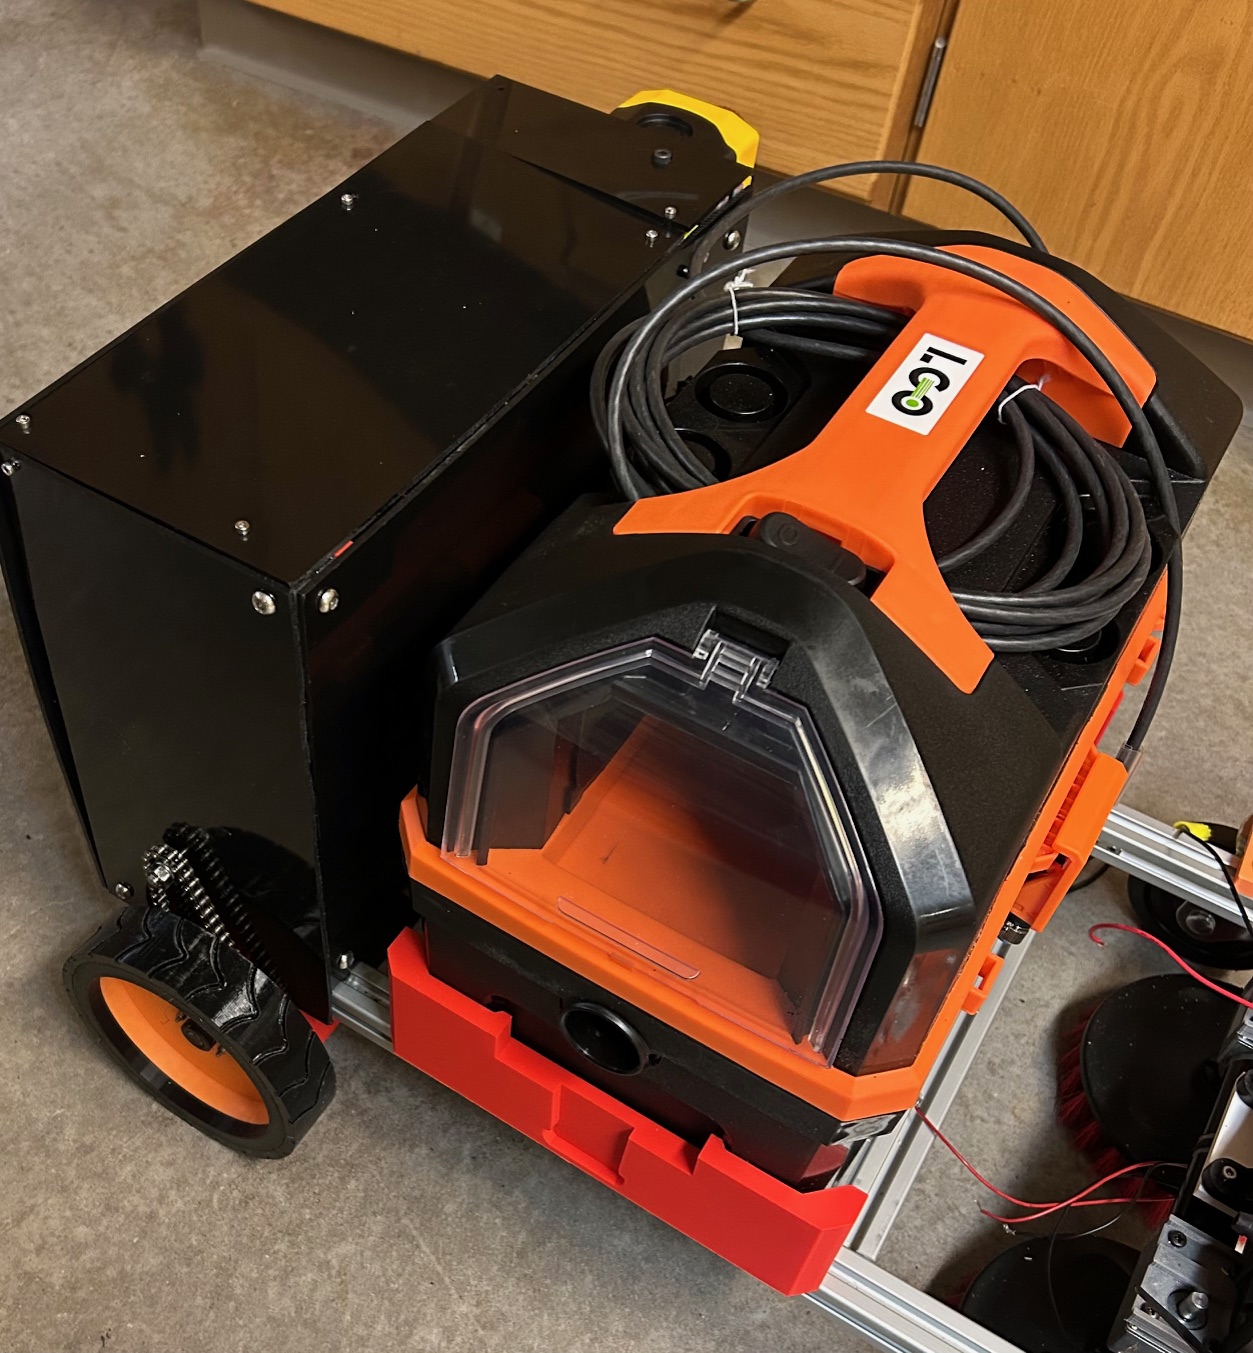
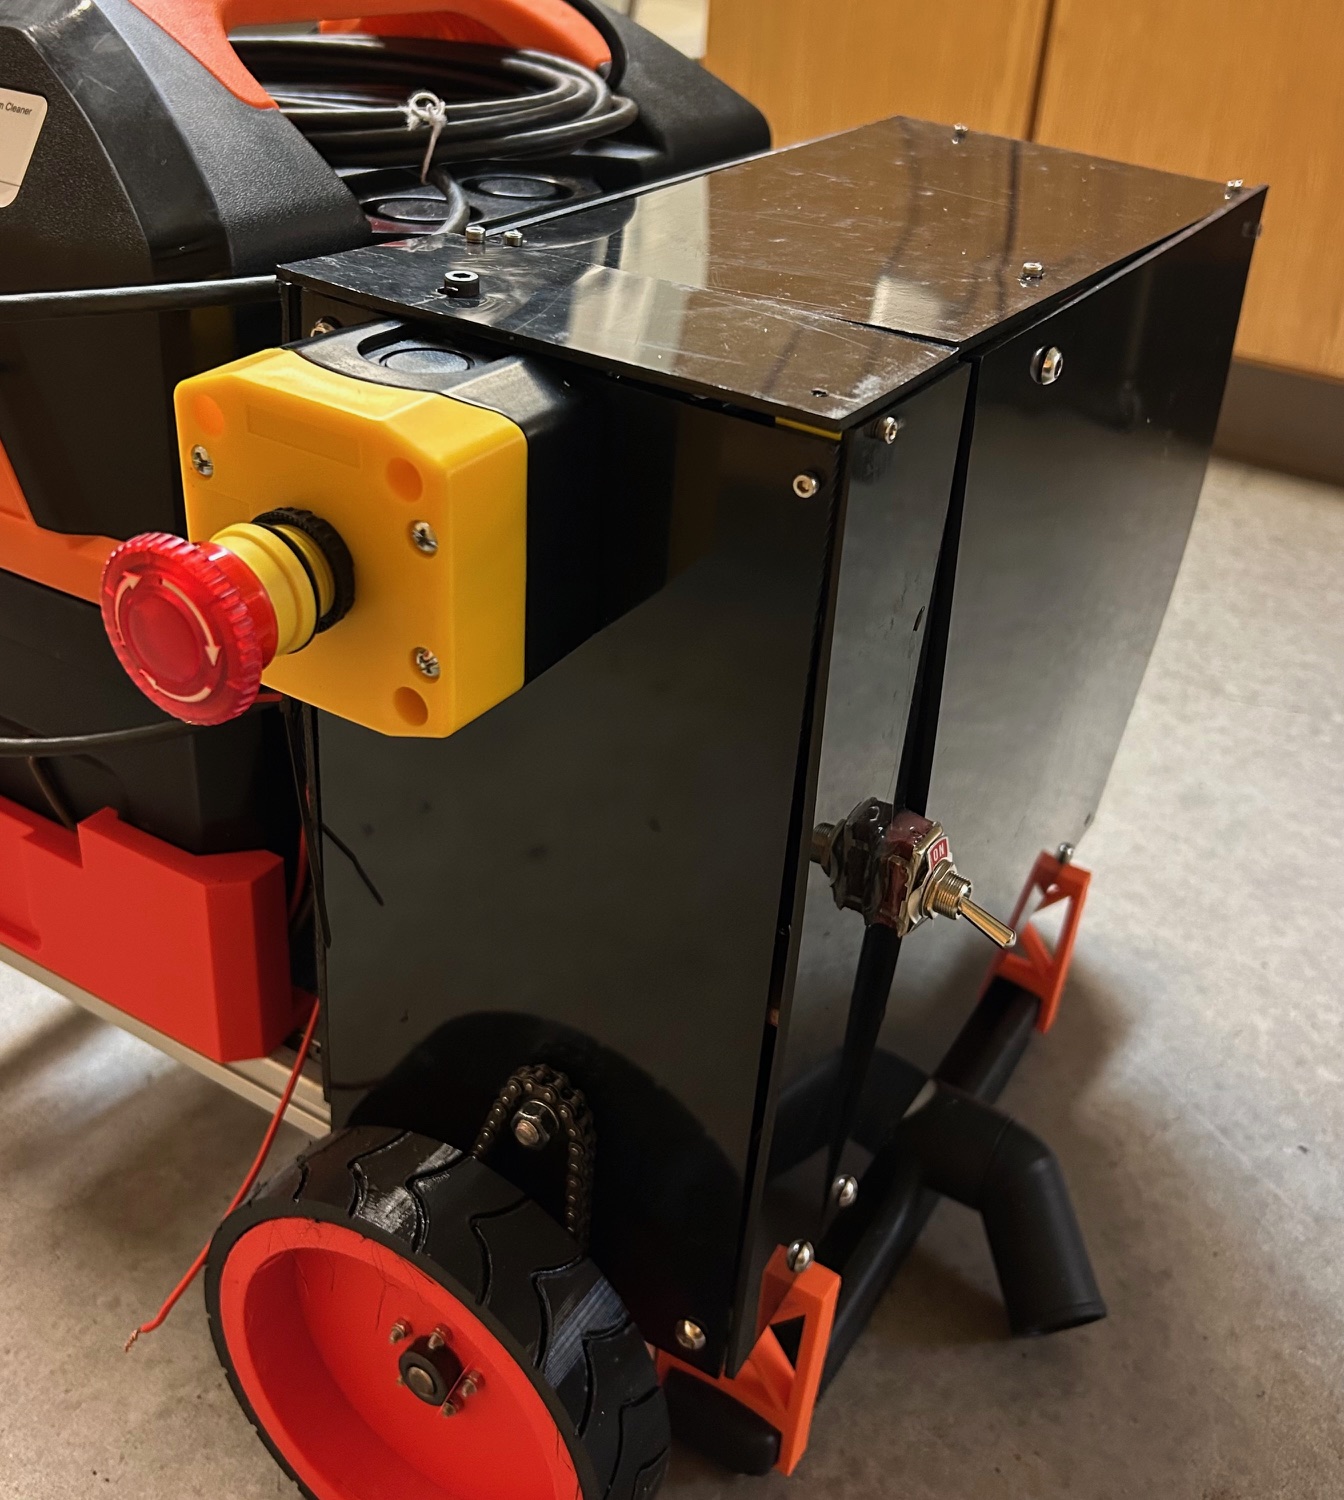
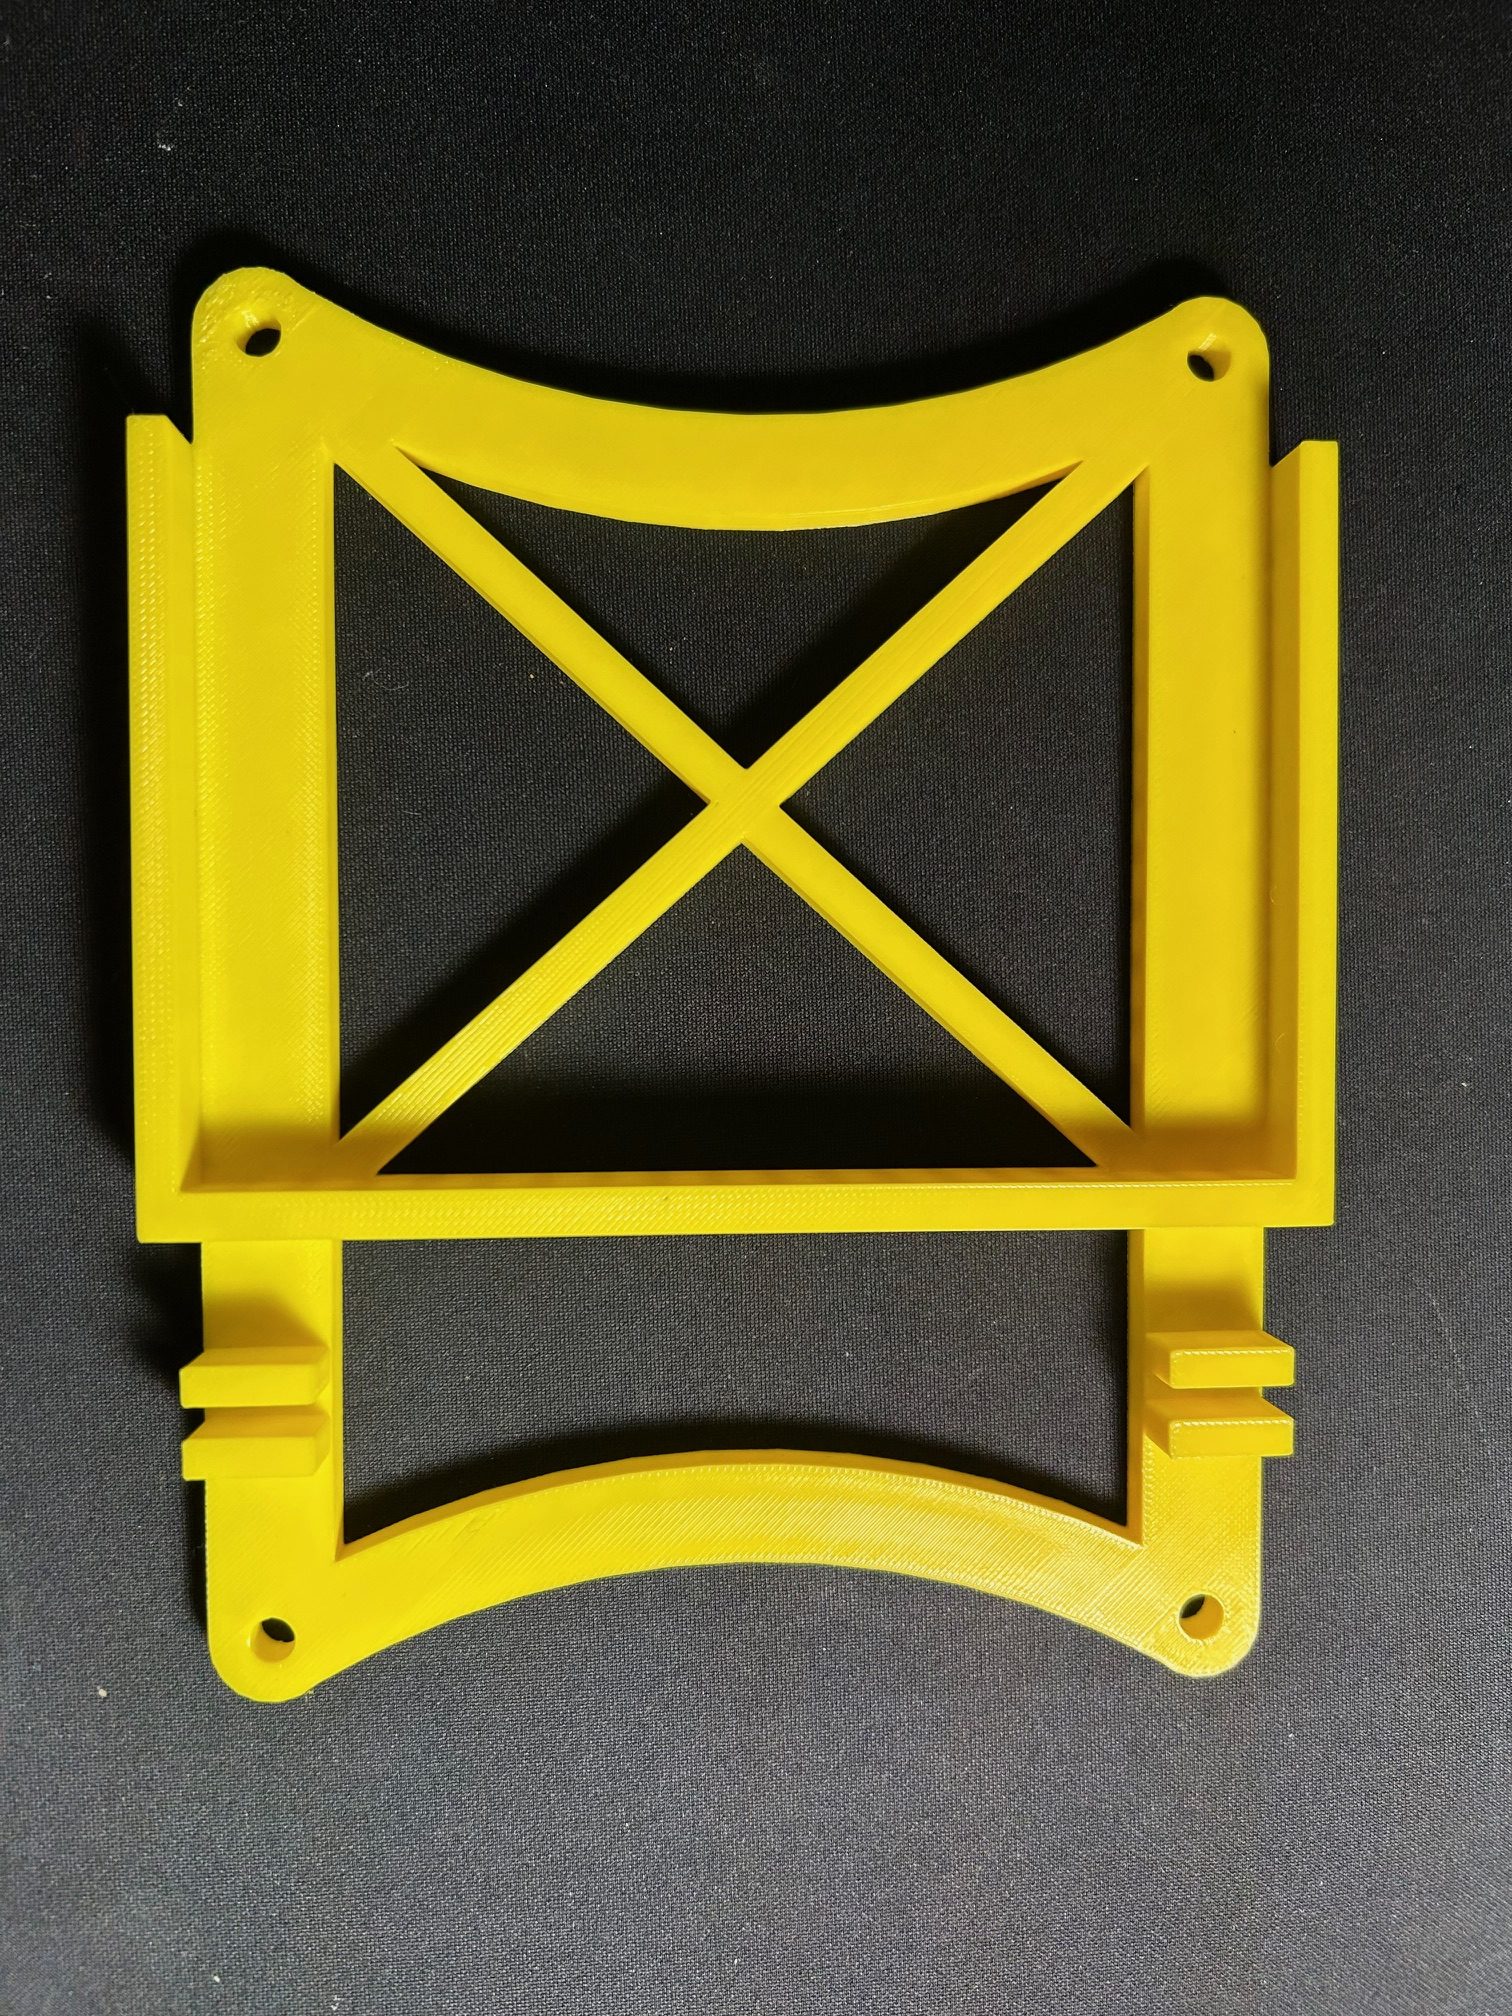
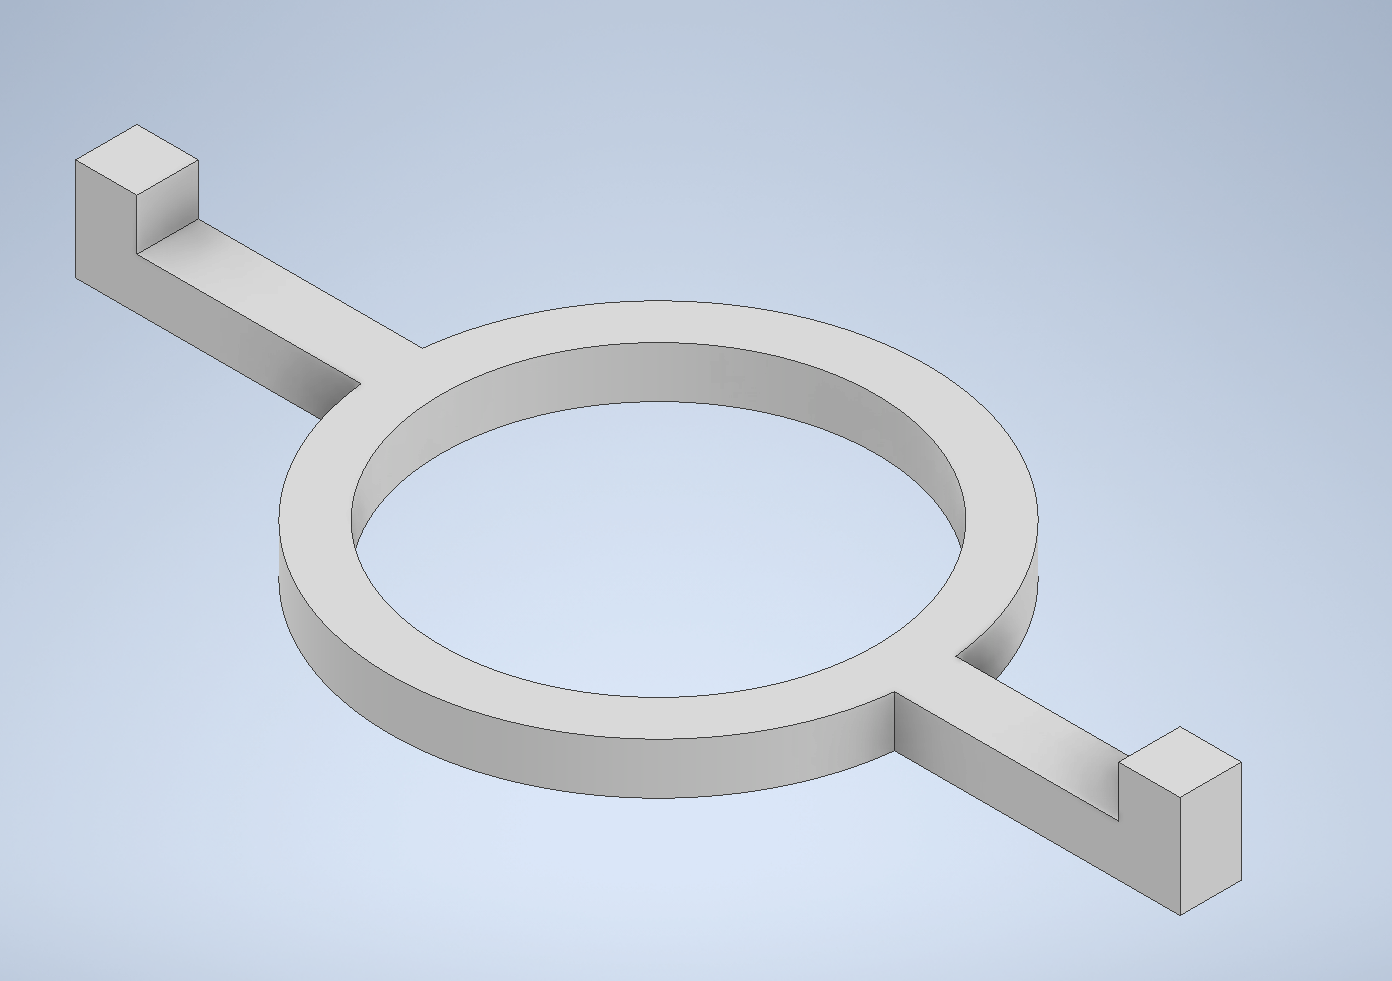
Since my last update the only notable thing I did before spring break was cutting all of our ABS sheets to size, and I have started mounting 3/6 sides. I also designed a bracket shown on the left that holds the top on and uses a screw and a nut to hold it firmly in place against the 8020. You can see one of the three on the robot in red in the top right of the first image.
To-Do List Week 7
-Mount fluid reservoir
-Mount Lidar
-Finish assembling electrical enclosure
-Start helping lidar team
Concerns For the Week:
My only concern for this week is exactly the same as last week. The lidar work is going to be difficult and the Sick Lidar competition deadline is in 3 weeks, which is earlier then the enterprise project is due.
Project Update 6
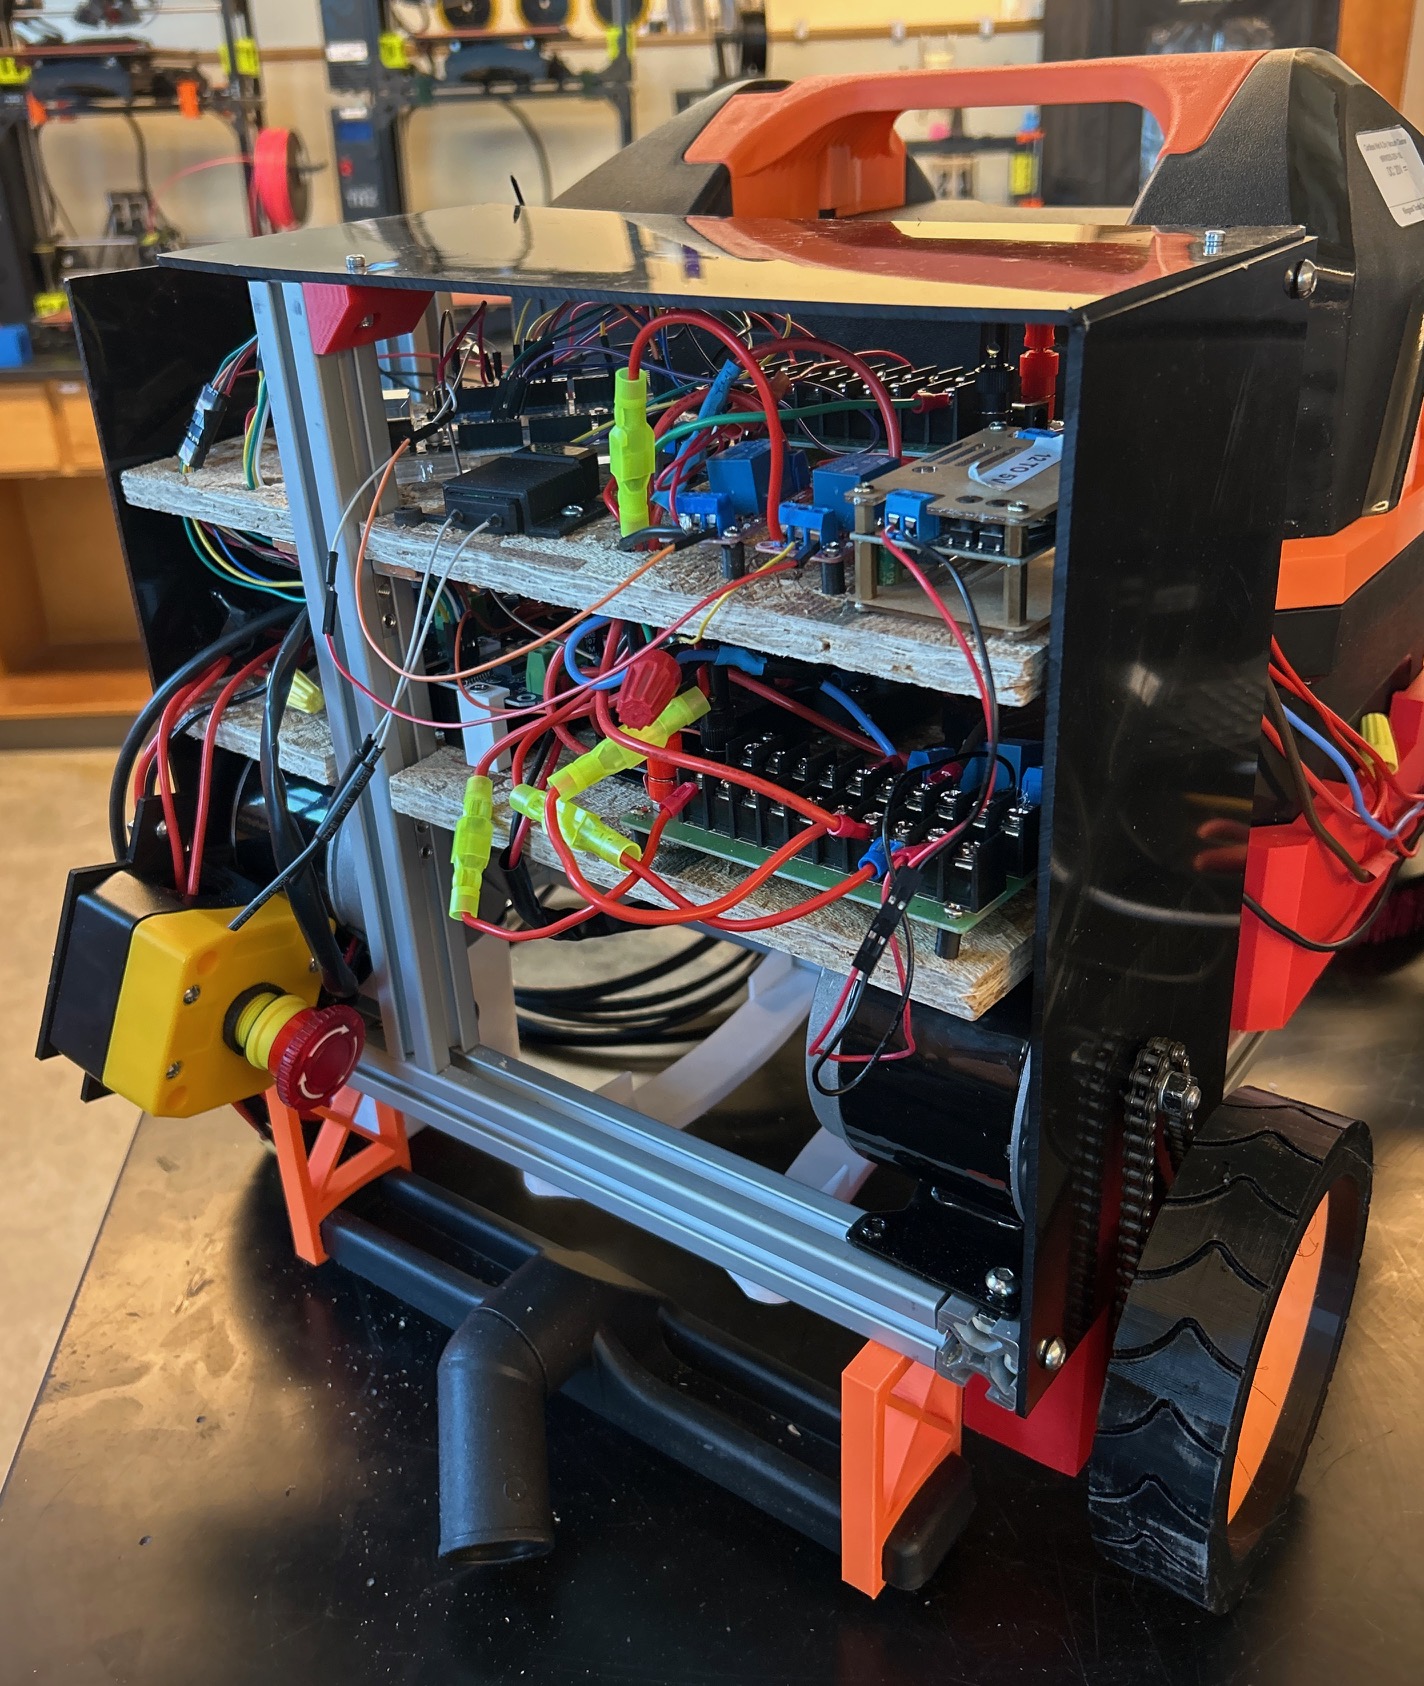
Since the last project update I cut new electrical boards inside so they are dimensionally accurate to make the black enclosure fit better around the electronics. I then cut the rest of the sheets and 3d printed mounts for them. While it sucks the plastic sheets we are using are not long enough, they were free, and we are trying not to go over our initial budget even though we were approved for $150 more. Another thing that changed is the battery mount is now orientated the other direction, and I added two slots in the back to help hold the back plastic sheet in place.
To-Do List Week 8
-Mount fluid reservoir
-Mount Lidar
-Start helping lidar team
Concerns For the Week:
My only concern for the duration of the semester is the lidar implementation, and the Sick Lidar Challenge deadline approaching.
Project Update 7
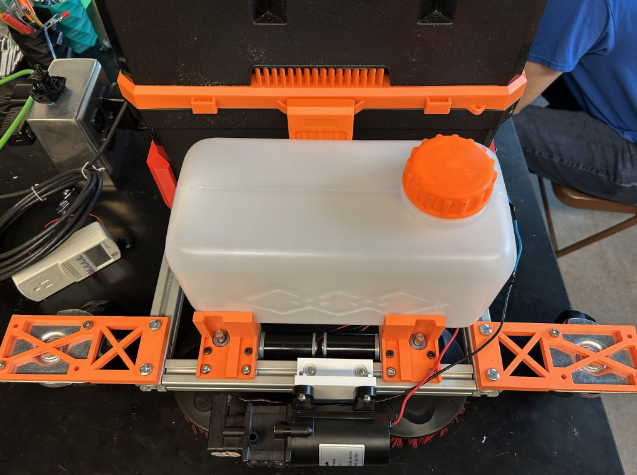

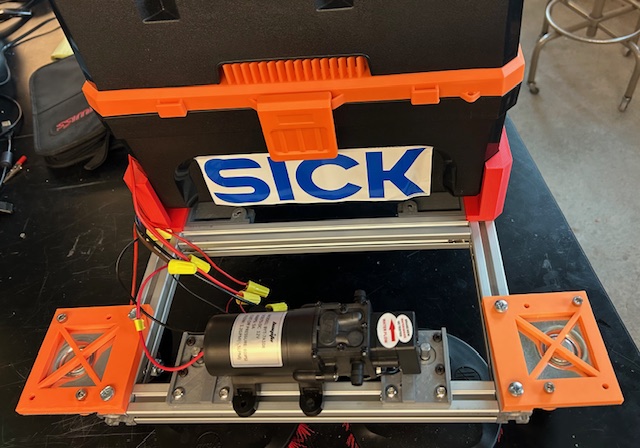
Since the last project update I started working with the lidar team, and we have gotten the Sick Multiscan165 to publish its point cloud data to a ROS topic. Next, I redesigned the squeegee mount to sit slightly higher up because of the new tire design from a few weeks ago. I also remade the castor mounts so the castors can spin 360 degrees because of a past design oversight that had them too close to the frame to work correctly. Finally, I made two mounts to hold the clean fluid tank, and redesigned the scrub brush mounts to help hold the tank in the front.
To-Do List Week 9
-Mount Lidar
-Continue helping lidar team
-Sick lidar competition video submission
Concerns For the Week:
My only concern this week is the sick lidar competition submission is due this Friday at midnight.
Project Update 8

This week was the Sick Lidar competition. While I wish we could have gotten more done, we successfully got a very basic PID based obstacle avoidance script for our robot. Its current state is show in the image above, and during testing we noticed a few design limitations I hope to resolve before the end of the semester. Overall, we prepared a seven minute demonstration video for the sick lidar competition as well as writing a short report to turn in.
To-Do List Week 10
-Redesign castor mount for more strength
-Strengthen drive base
-Improve Lidar Navigation Script
Concerns For the Week:
My only concern for the week is getting the lidar navigation working as well as possible for the design checkoff.
Project Update 9

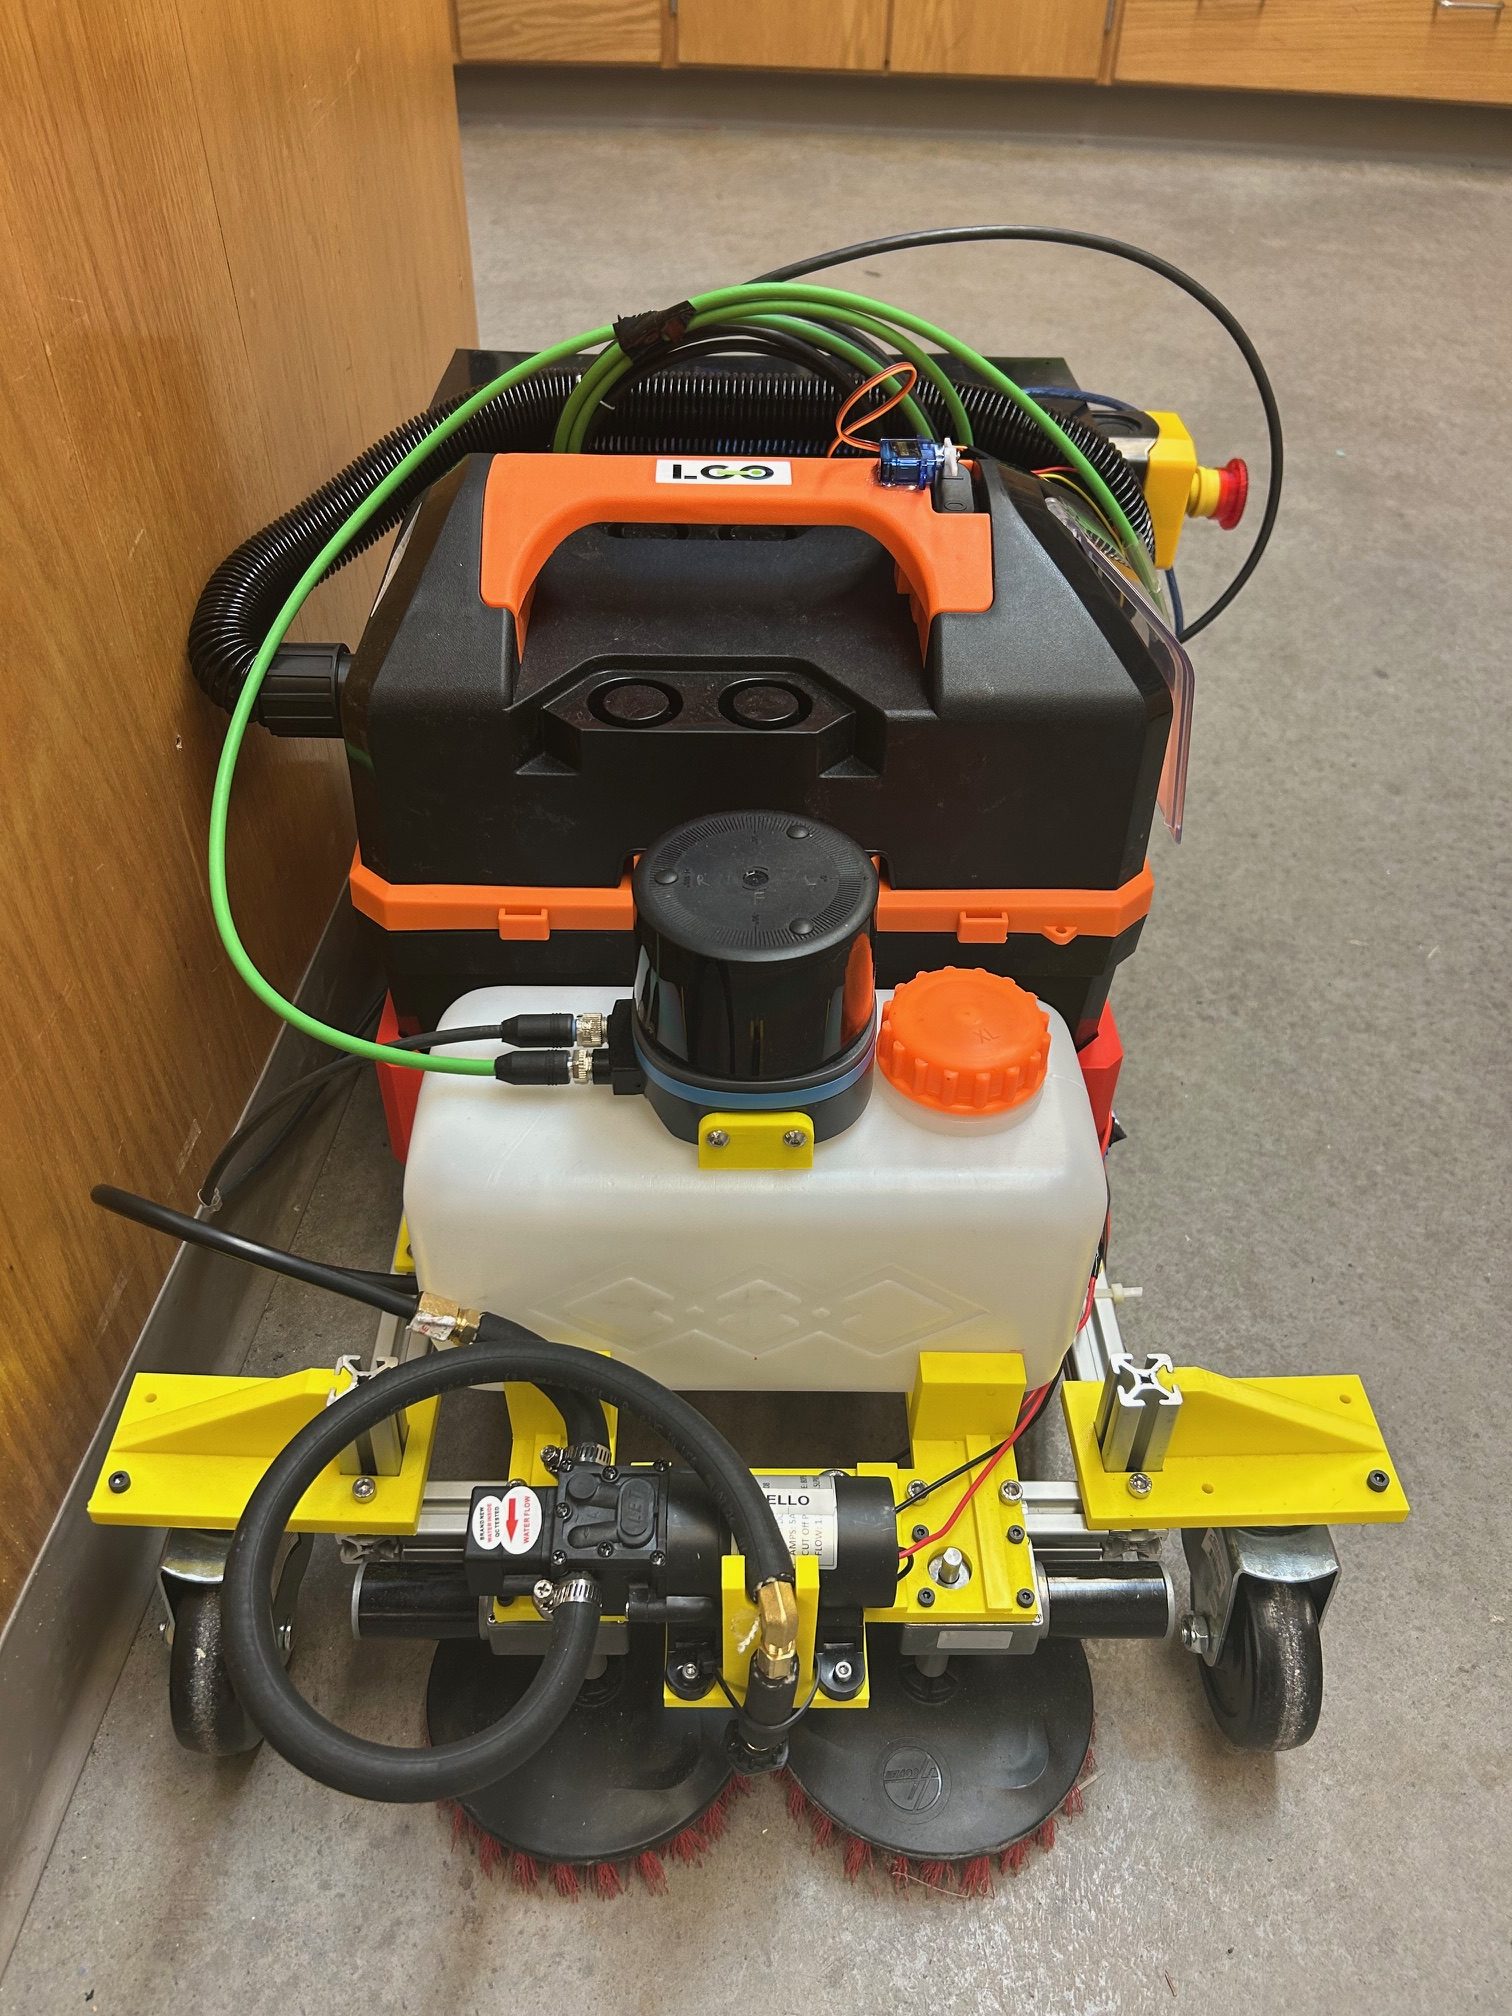
Next week is our design checkoff for enterprise, and as a team we are trying to polish up the design as much as we can. As pictured above, the design for the robot is now 100% finalized for the semester unless a shortcoming is found during additional testing. This week I strengthened the castor mounts so they hold up better during autonomous testing and other abuse. In addition, the scrub brush mount, pump mount, and hose mount have all been combined into one part to simplify the design of the robot as well as make it more robust. Finally, we have been working on improving our obstacle avoidance script so the robot can clean the floor better.
To-Do List Week 11
-Improve Lidar Navigation Script
-More Floor Cleaning Testing
-Design Checkoff
Concerns For the Week:
My only concern for the week is getting the lidar navigation working as well as possible for the design checkoff.
Project Update 10
This week we had our design checkoff which went fairly well. We did lots of floor cleaning testing and got lots of good results recorded on video. The main thing during testing was just some inconsistencies with the obstacle avoidance only working well sometimes. The robot would occasionally hit things before turning away too late to avoid the crash. The team and I plan to tune the PID values for the drive control as well as refining the obstacle avoidance script to work better than it does currently with its three vision cones.
To-Do List Week 12
-Improve Lidar Navigation Script
-Capstone Presentation Slides
-Report Draft
Concerns For the Week:
My only concern for the week is improving the lidar navigation script.
Project Update 11
This week I was quite busy with exams and other projects. The main thing I worked on was developing a lidar script that just prints every single scan value 0-720 and the angle of the minimum distance in that range. We will use this code to help understand what our new program we are starting to develop does. Our old obstacle avoidance script was very basic and had very inconsistent results. We are currently developing a new one in this last week that will make vectors of all 720 scans and move though the vector field in the path of least resistance. The only other thing I did was help the team make the report rough draft.
To-Do List Week 13
-Improve Lidar Navigation Script
-Project Report
Concerns For the Week:
My only concern for the week is improving the lidar navigation script.
Project Update 12

My team and I put in lots of hours to get the new navigation script running, however, we ran into too many debugging issues to get it done before the end of the school year. My team decided with exams this week and everyone graduating besides 1 person, we will not be finishing the code. Between the Raspberry Pi running out of storage space, and being limited on computation power I don’t think the new code will work anyways. While it is sad, we just ran out of time to finish the new code, and the old code had limitations. However, I could not be more proud of the physical design I completed this semester.
To-Do List Week 14
-Project Report
**Lidar Navigation Script**
Concerns For the Week:
I have no concerns for the week, but it would have been nice to finish the lidar navigation script.
Fall 2024 Start
Project Update 1 (9/13/2024)
To-do List Week 4
-Order 2-4 drive base motors
-Start CAD for drive base motor brackets
-Stress test drive base motor brackets
-Calculate gear ratio for drive base
-Start CAD for gearbox
Concerns For the Week:
My only real concern for the week is that the excel sheet I have been making this past week has an error in the torque, velocity, or max weight calculations that will cause me to over or under spec the drive base motors. Our robot will be moving between 8-12 kgs of water and cleaning solution, and the robot plus batterie weight may be anywhere between 2-8 kg’s in additional weight so it is important our motors can handle that. However, it is very important that I do not overspend on the motors so finding a good price to performance balance will be key.
Project Update 2

Since the last project update I have revisited my motor calculations spread sheet and have utilized a new equation which factors in static friction which makes me more confident in my calculations. Using the new spread sheet I am quite confident out two motor dive system will be able to move the needed weight of the robot full of cleaning solution at a reasonable speed. We purchased the second motor from the bottom (24V 14A) because it has the second highest weight moveable and has one of the lowest prices. My team was also able to order the majority of our parts including the shop vac, 80 20 aluminum, batterie, motors, motor controllers, e-Stop, and more. The final thing I did this last week was spec out a simple frame design using 80 20 that will hold our two drive base motors, scrub brushes, and batterie to the shop vac body.
To-do List Week 5
-Start CAD for drive base motor brackets
-Stress test drive base motor brackets
-Start CAD for gearbox
-Start new tire design
Concerns For the Week:
My main concern for the next few weeks is that we ordered our parts Wednesday the 18th and neither the shop vac nor the 80 20 aluminum is supposed to arrive before October 2nd. This presents a major problem as we can not mount anything because we will not have the shop vac which is the main body of the robot, nor the 80 20 to start building the frame. I fail to see how we will meet some of our goals before the critical design review which starts week 6.
Project Update 3
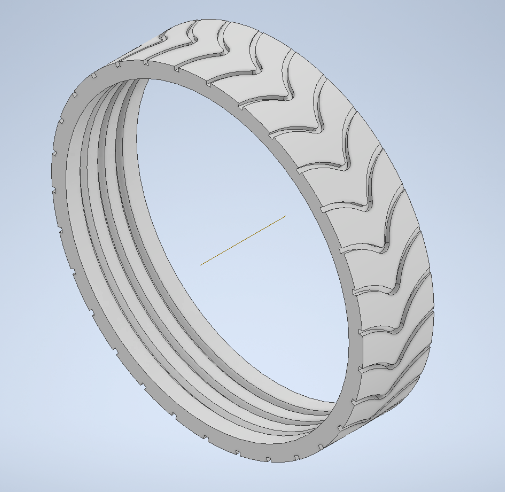
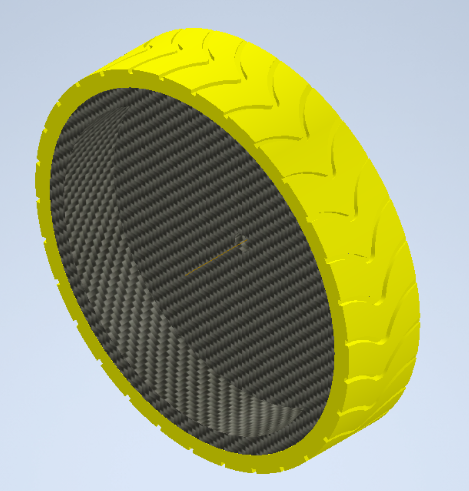
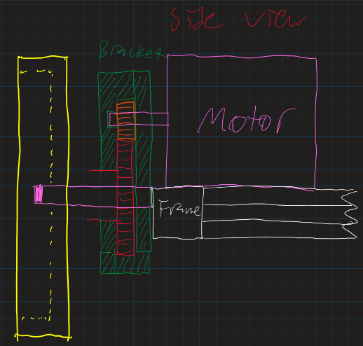
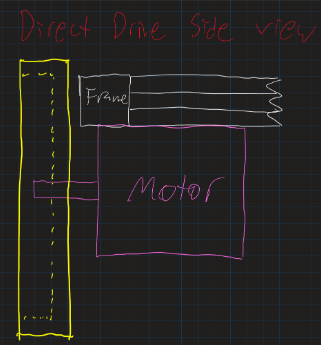
Since the last project update our motors and the shop vac have still not shipped. Over the course of this last week I refined the motor calculation spread sheet and finalized all of my math. Additionally, I designed new tires which will consist of a TPU/ Ninja flex outer tread, and an ABS/ PLA inner rim. These components will be press fit together and lock into the triangle groves in the rim. Next, I calculated an estimated total weight of our robot to be 22.497 kilograms based on the weights of all major components. Then I found some motors on amazon that actually had torque listed on their specifications and compared these numbers to what my sheet would have calculated for them. The worst one was off by 0.233 Nm, or roughly 40% error. My best result was off by only 0.0162 Nm or 10.88% error. The good news is my math always underestimates the motors potential torque which is good because the motors that don’t list their torque online were most likely underestimated by my math. With this data validated, I found that the motor we ordered will be able to move approximately 20.995 Kg’s with the new 220mm diameter tires I designed this week. This made me realize with two motors in a direct drive system, there is actually no need for me to make a gear box, so for now I will not be designing this component unless it is needed later as we do physical testing. As a result, once our motors ship I will be mounting the wheels directly to them, and hopefully hard mounting the motors to the 8020 aluminum for a robust and simple drivetrain.
To-do List Week 6
-Design a way to attach 8020 to shop vac
-Mount motors to 8020
-Start planning out the next steps in the physical design
Concerns For the Week:
My main concern for the week is that our parts will not be here in time for the critical design review Monday which means we are slightly behind our anticipated progress.
Fall 2023 Start
Project Update 1 (9/28/2023)
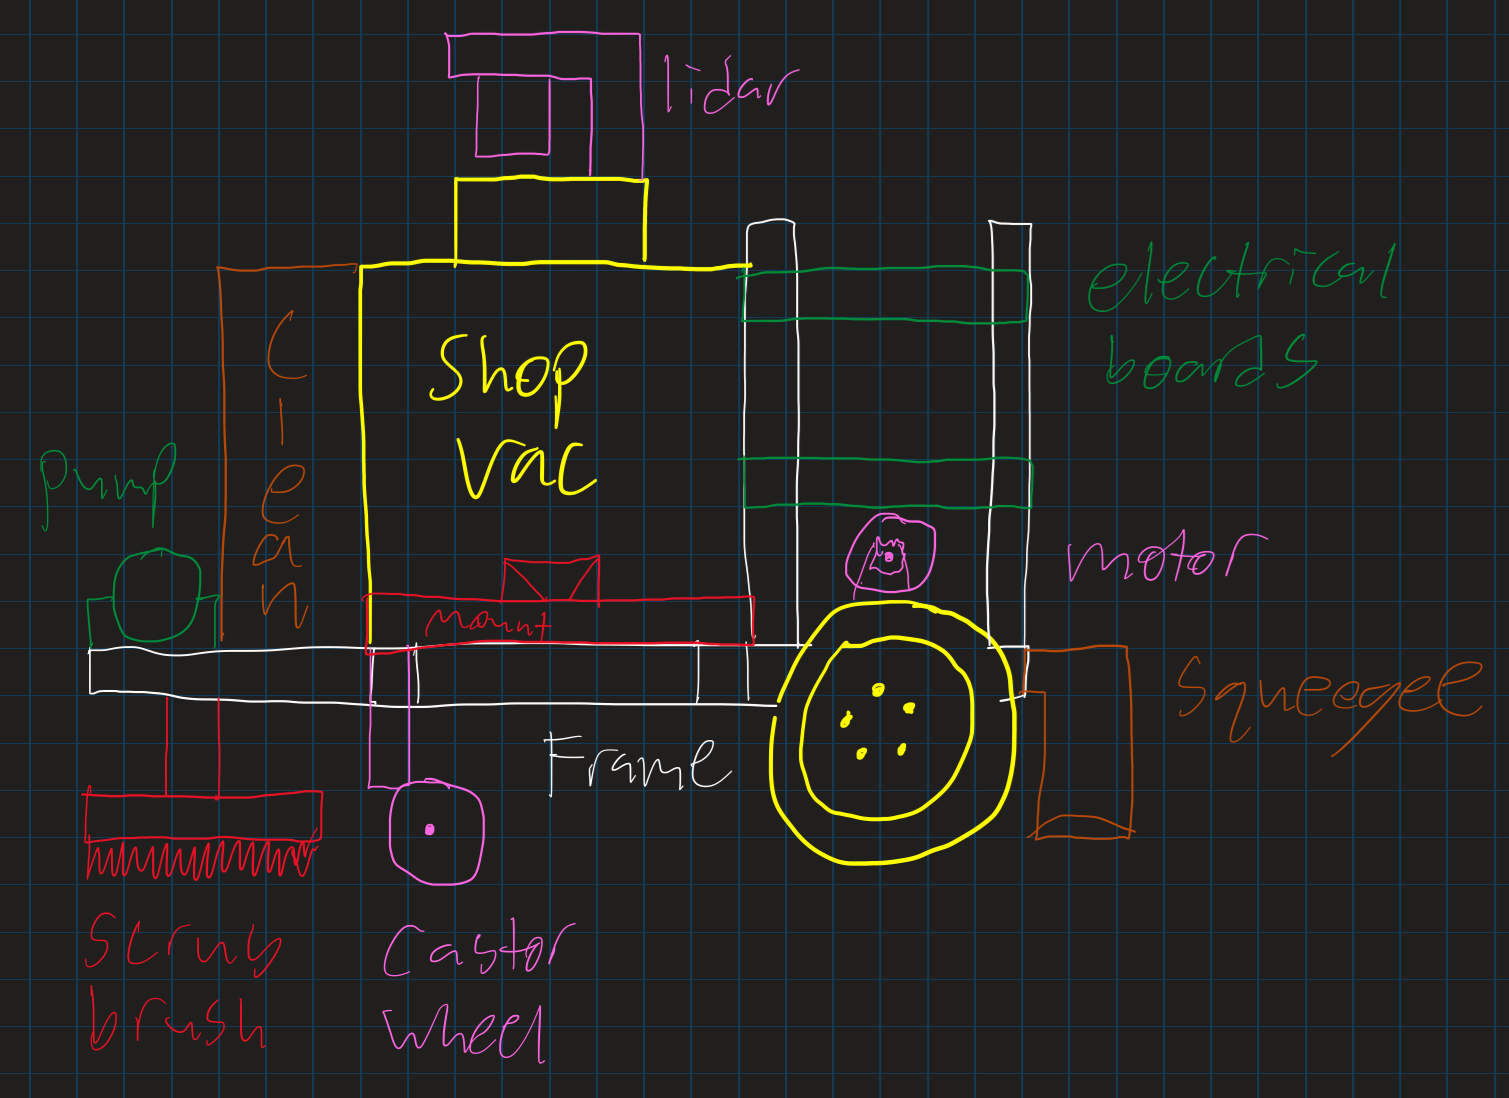
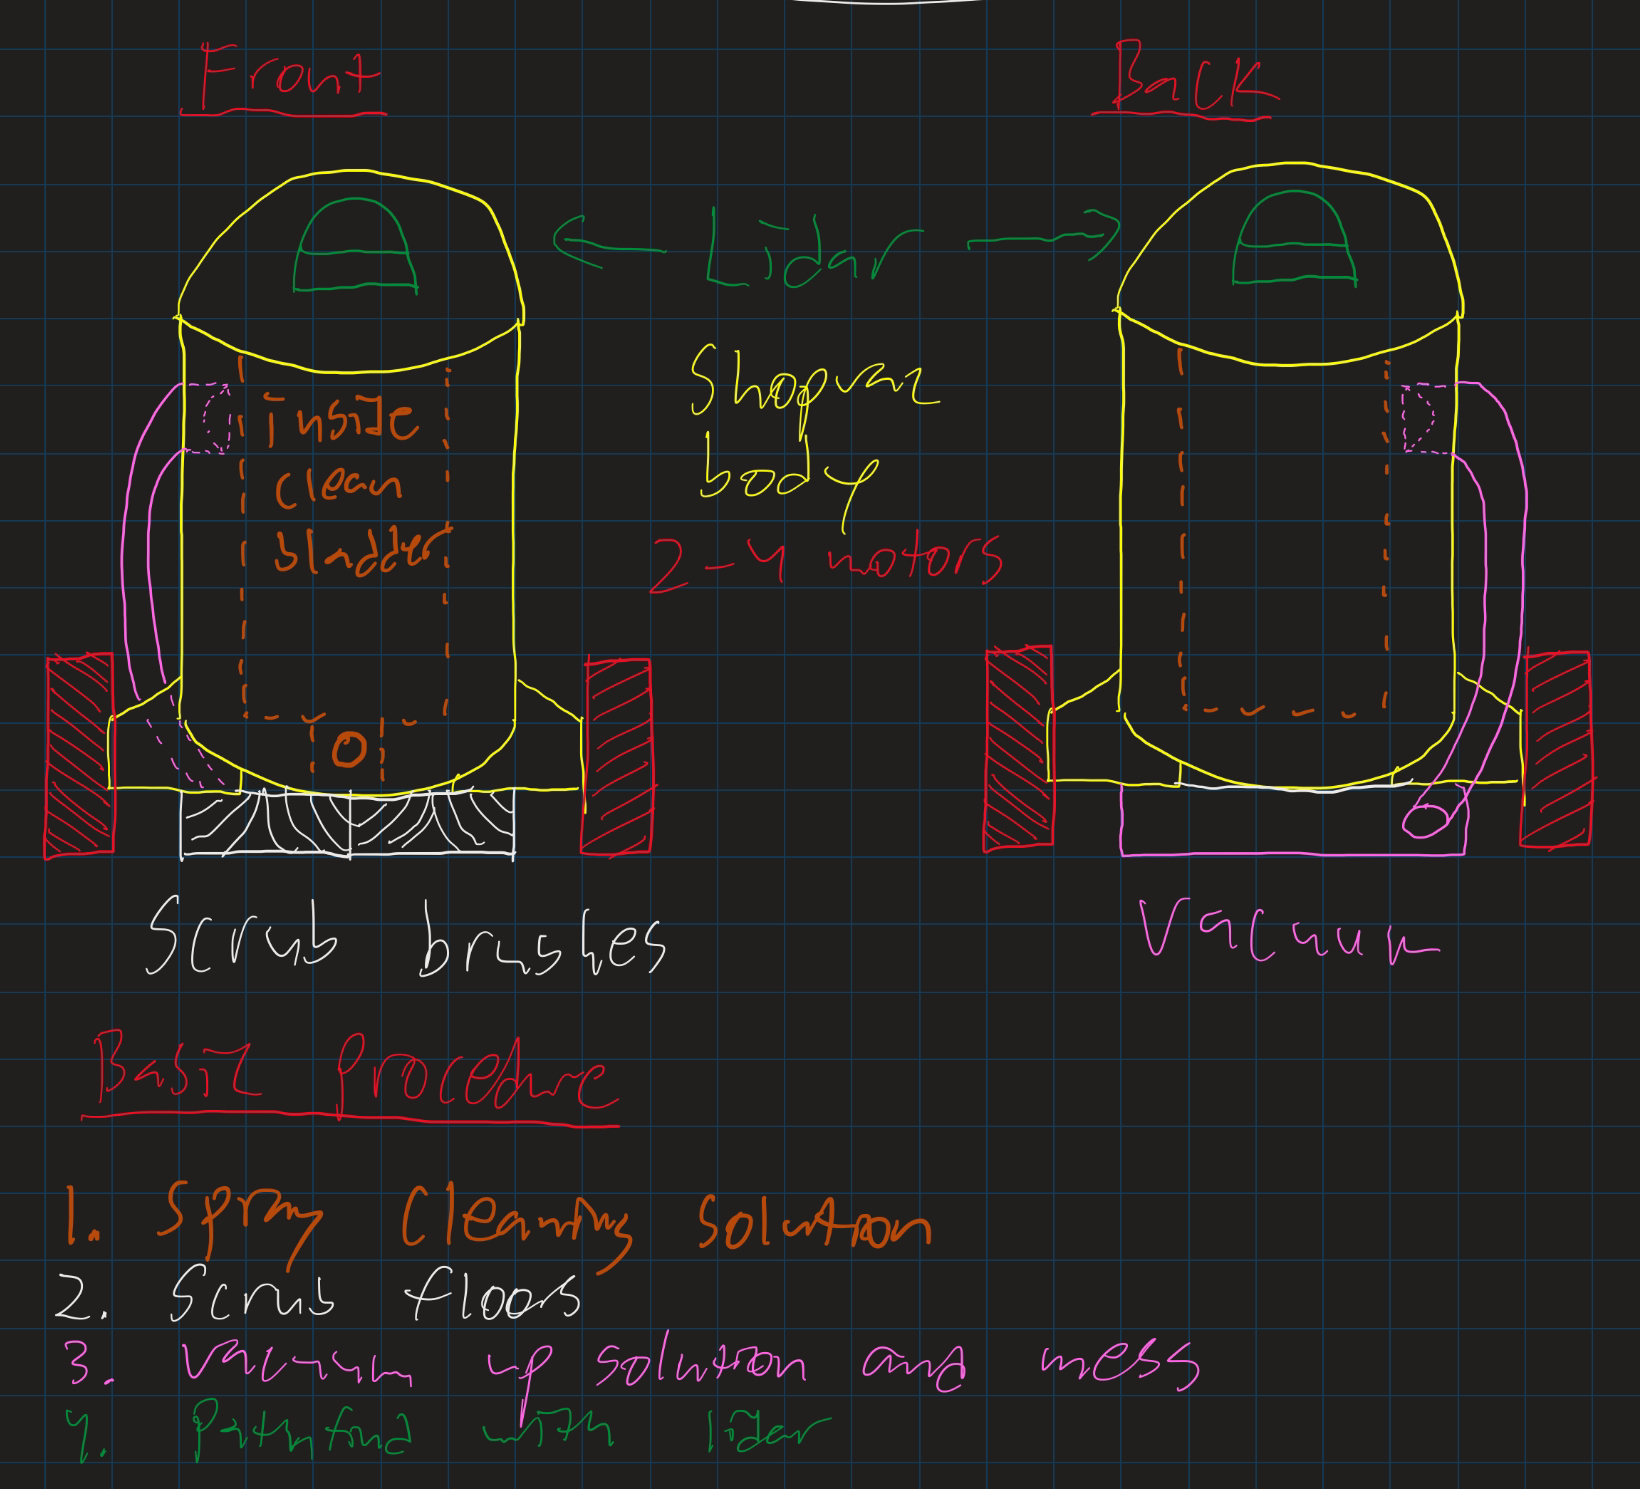
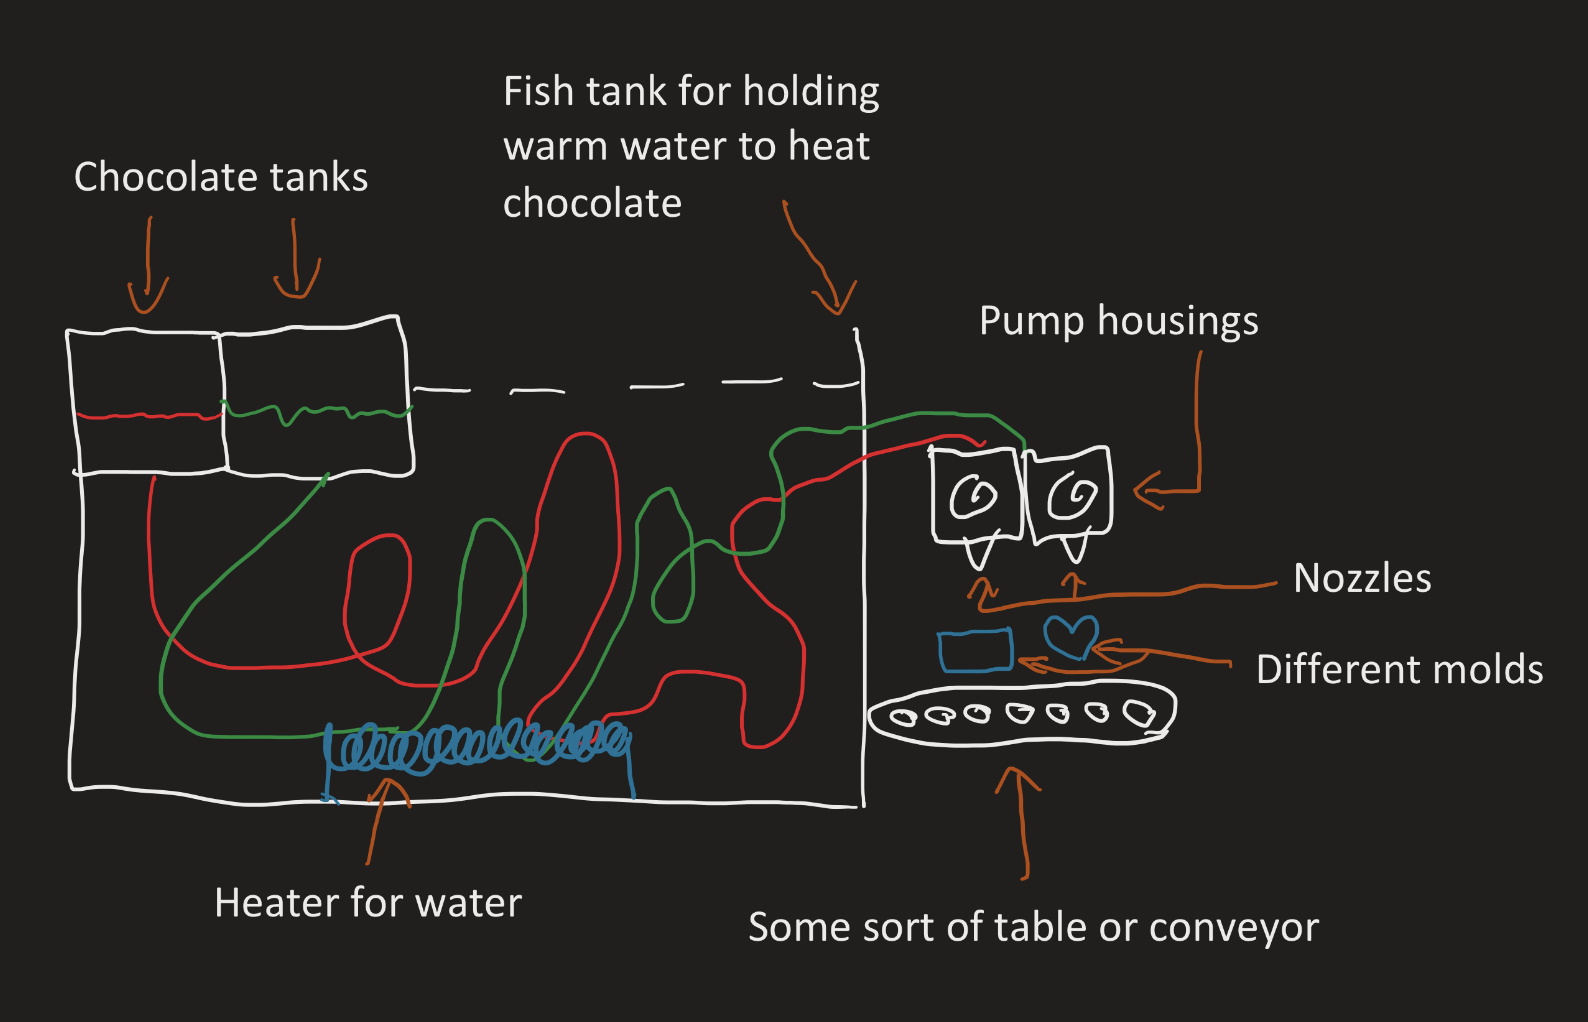
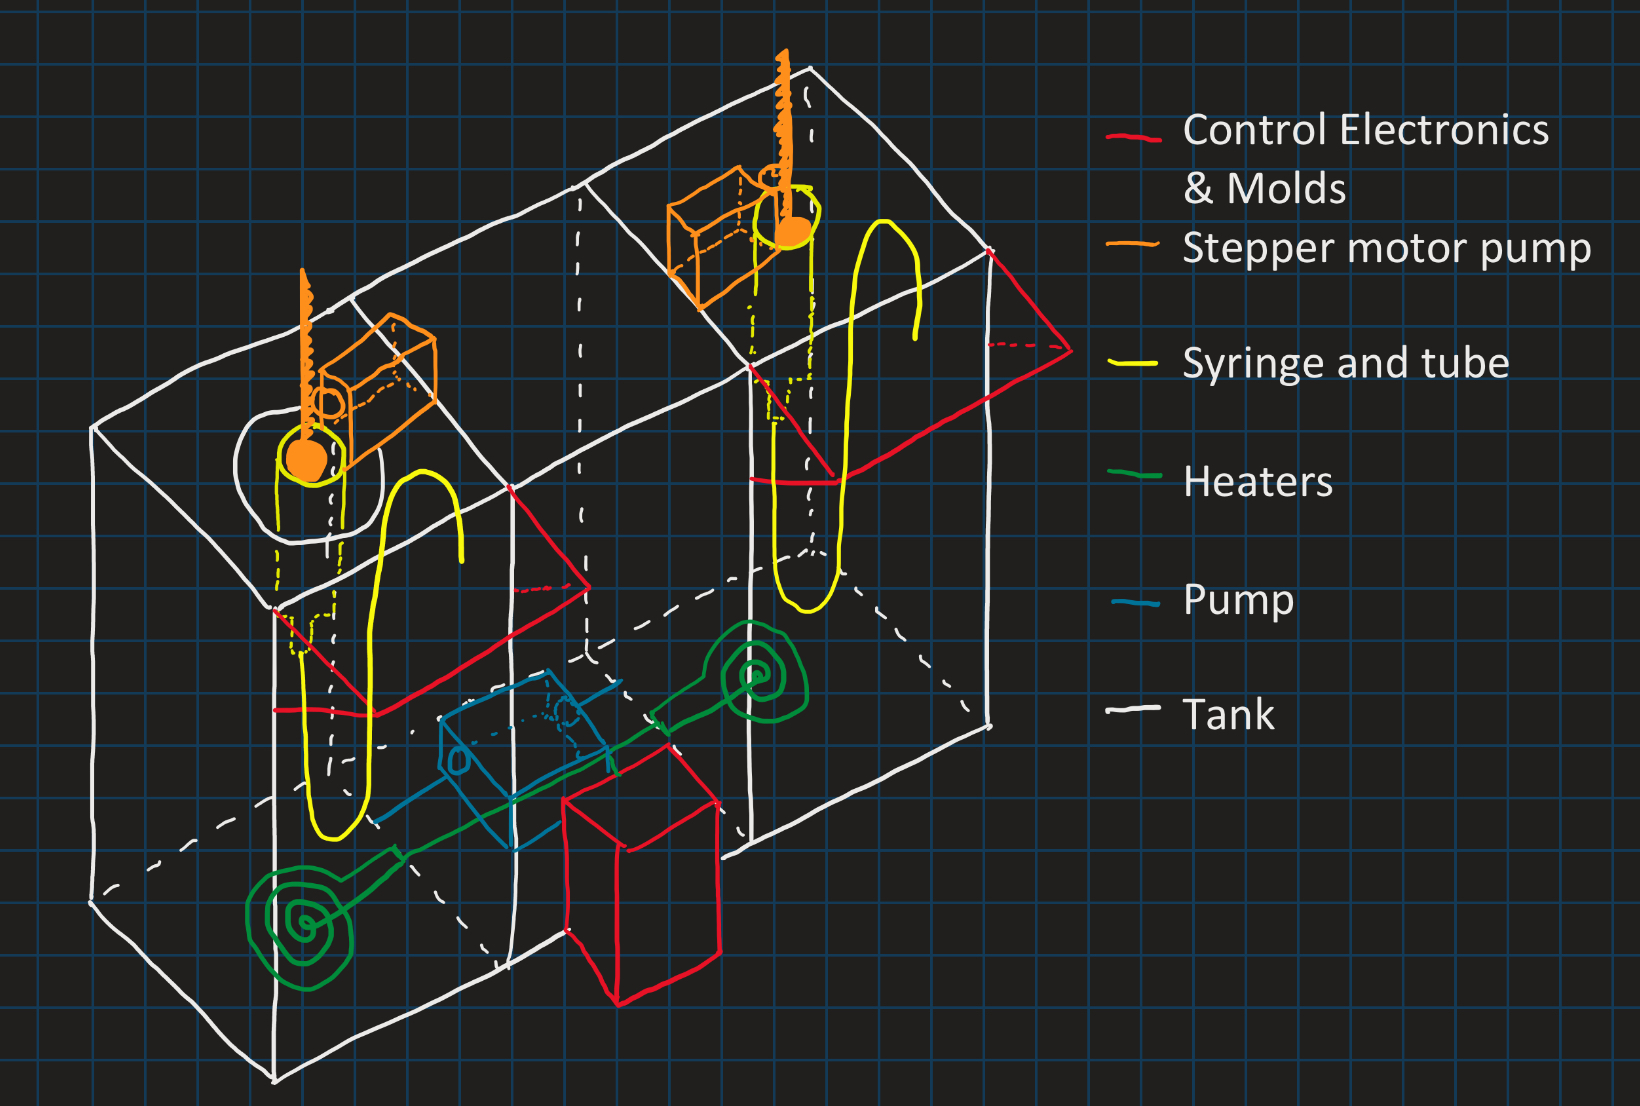
These first couple weeks will be key in defining the goals and function of our coco-fab robot. We have decided at the moment to use a tank of water to heat the cholate. We also want it to take a fun path through some flexible tubes on its way to our extruder and pump ends, which are external to the tank. We would like to 3d print molds for the chocolates to get some cool shapes, maybe even the enterprise logo 🙂
This week I pretty much just drew some sketches like the one pictured above, and did research. I looked into pumps for high viscosity substances like our chocolate when its melted, and found out we should use positive displacement pumps. I also did some research on food-safe PLA and PETG but i think coating our molds will just be better for various reasons. That’s the gist of this week, brainstorming!
Project Update 2 (10/7/2023)
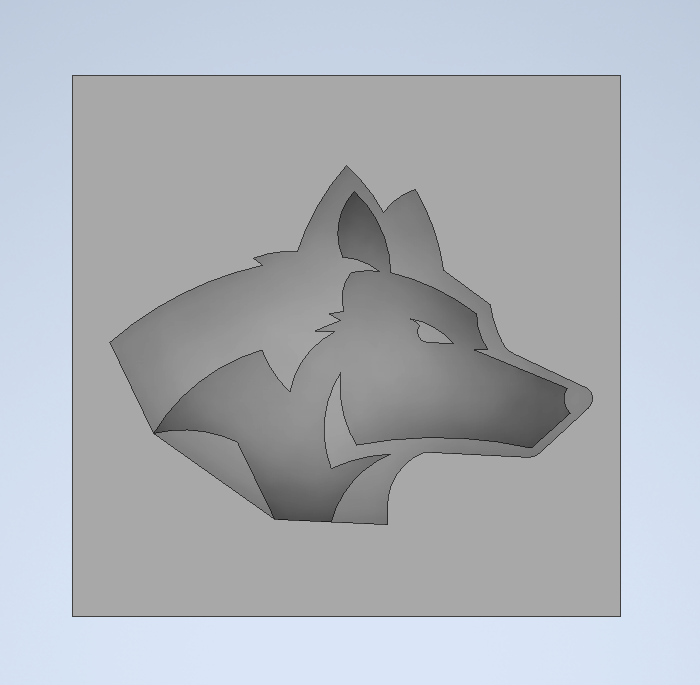
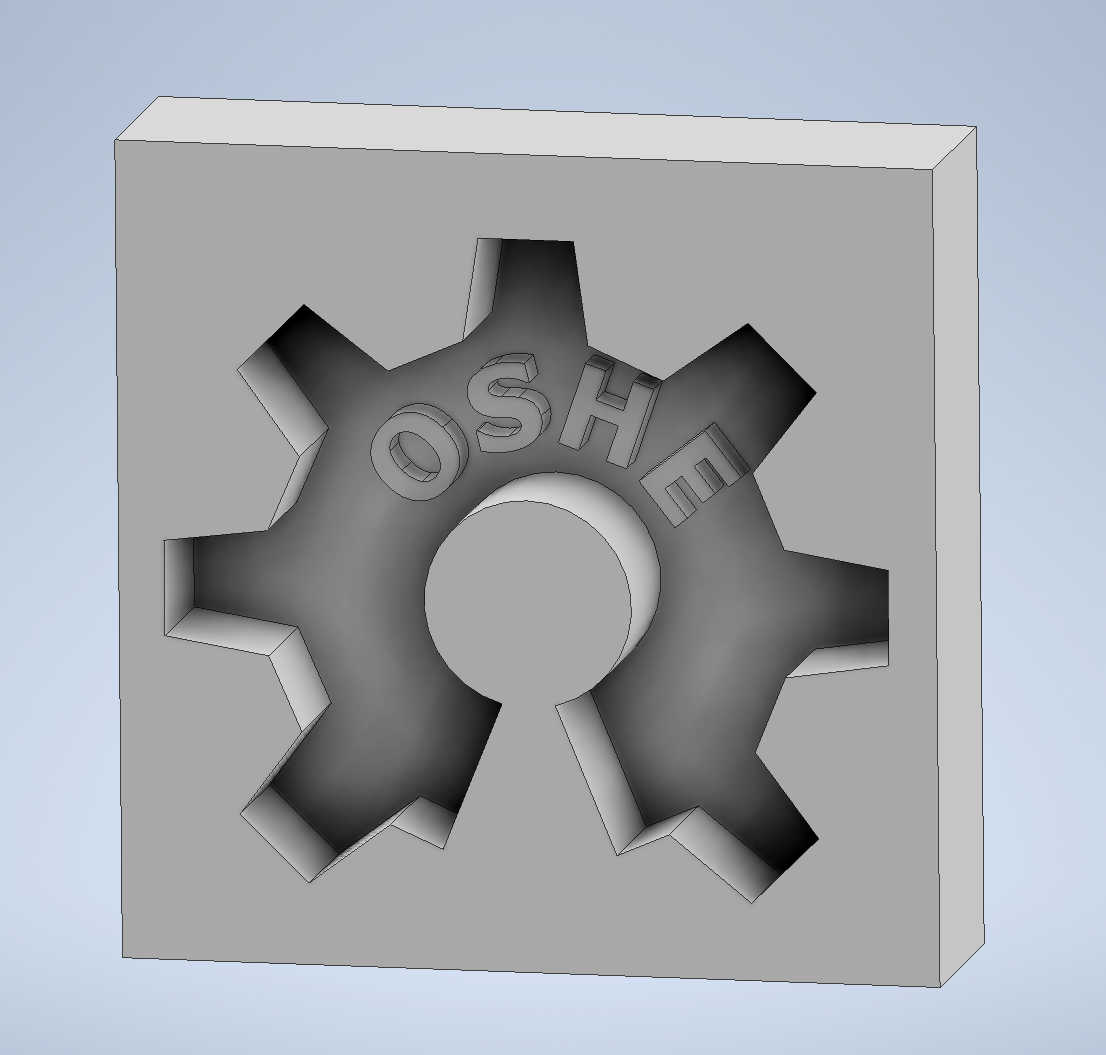
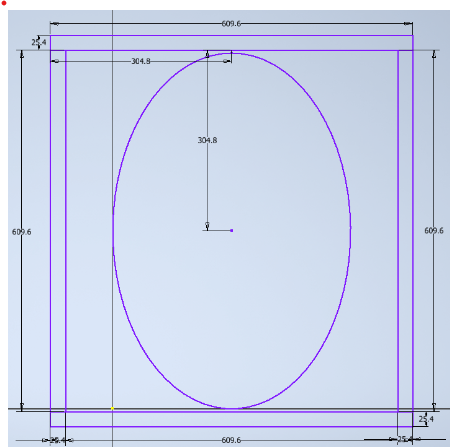
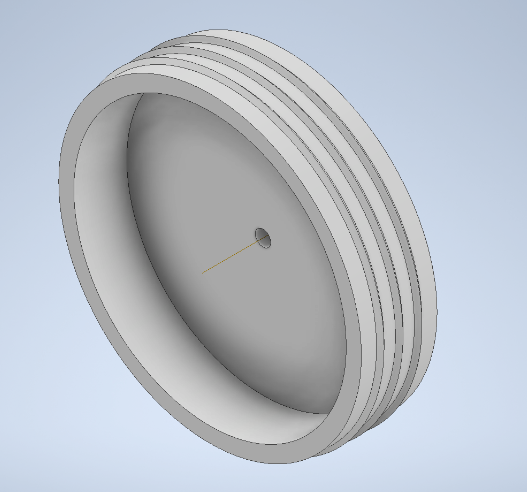
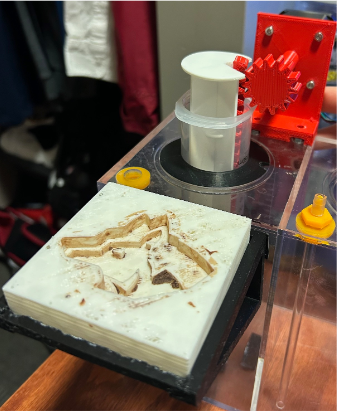
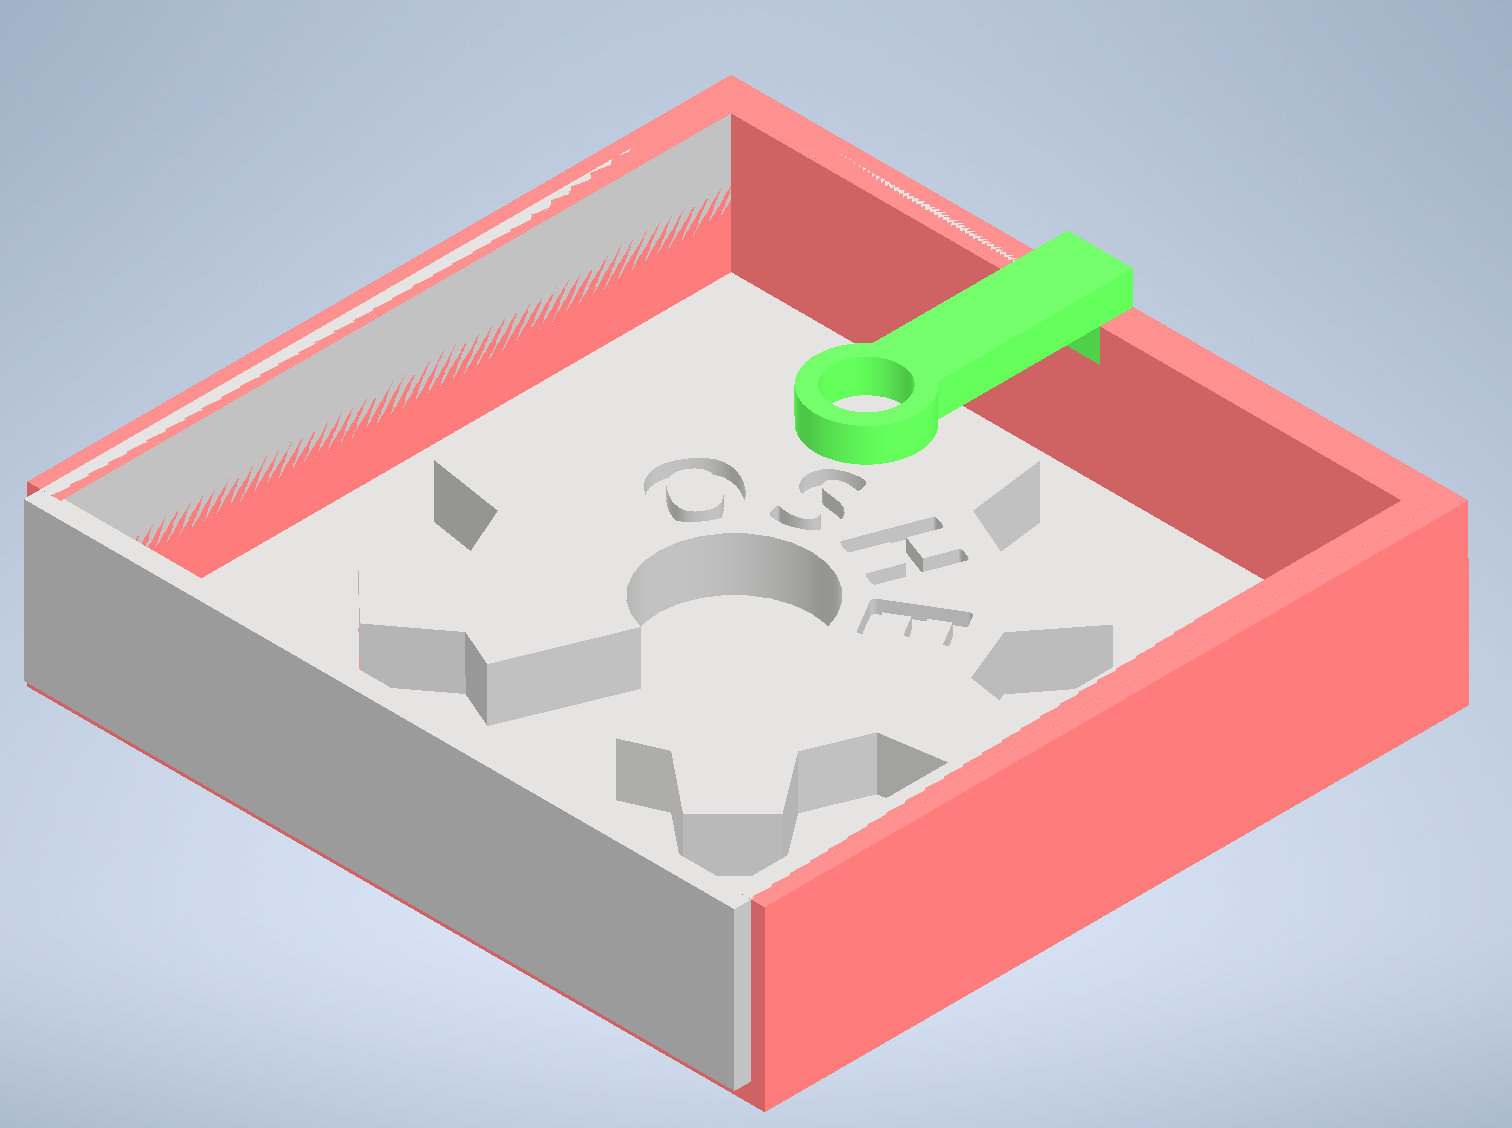
Since the last project update I modeled the first two molds for the chocolate, and made the STL files to print whenever they are needed. On the right we have the enterprise logo, and on the left our schools logo which I will mirror in the slicer so it faces the correct way. The molds are 6cm by 6cm which I thought would make a good small chocolate bar for giving out at events. Hopefully we get to add more flavors with time so you can try out a few at once! We have decided on using almond bark, which is a chocolate flavored coating that melts easily and consistently.
I have also done more research on components for melting, pumping, and dispensing the chocolate substance. Unfortunately, pumping the chocolate into the molds for cheap is turning out to be more of a pain then anticipated. Most good pumps are for commercial use and are hundreds of dollars. I have found a few high viscosity pumps amazon for 20-50 dollars, and we may just buy one to try sometime in the future. Thought, after doing some research I am concerned about how we would clean the pump after we are done using it. If the chocolate hardens inside it will most likely break. There are heated pumps available, but these are also expensive. Lots to still consider in the coming weeks, maybe even order a few parts!
Project Update 3 (10/28/2023)
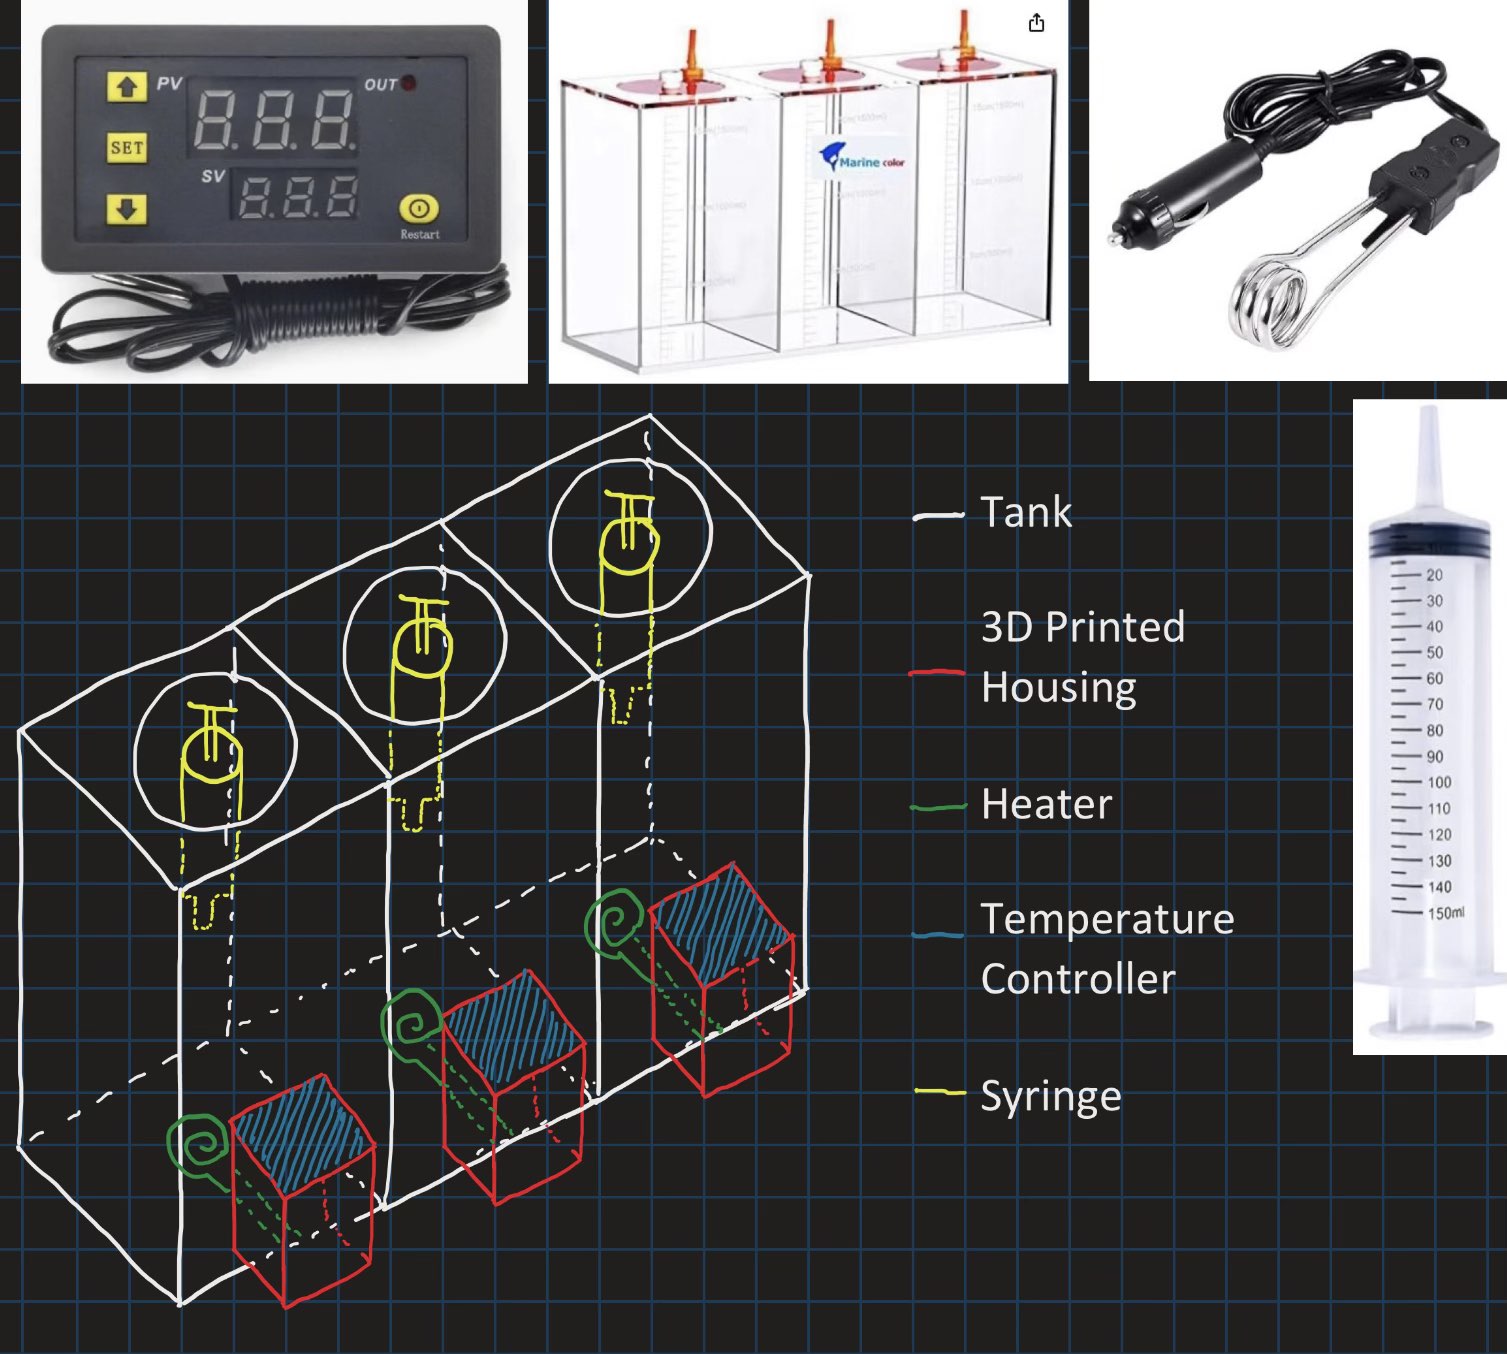
Since the last project update we have finalized a design we will prototyping and assembling for the duration of this semester. We have a three chamber tank for heating 3 different types of chocolates, but we will just be starting with one for now. Next, we have a temperate controller and heater for each tank so we can tune water temperatures for each chocolate if needed. On top there will be syringes for pumping the chocolate through a tube into the modes shown in the Project Update 3. These will eventually be automated with stepper motors to make a simple and cheap pump design. The syringes are better then a normal pump because they will not get clogged by chocolate, and are easy to take apart and clean. All of the food safe, positive displacement/ high viscosity pumps were hundred’s of dollars which is too much for our first prototype. Once the parts arrive we will begin the physical construction and testing of our very first prototype which is quite exciting! Big updates hopefully coming in the following weeks.
Project Update 4 (11/4/2023)
This week our parts arrived however we are still working out a time to build it together. Not much past the panning stage last week has been done, other then outlining some goals we have an an order of assembly. Our first step will be to assemble the heating element circuit and test it with a small volume of water in one of the three tanks. After that we can 3d print housings and attach it more robustly. Then we will start planning out the chocolate pump and mount the chocolate syringe in the tank. The goal after all of this is to successfully melt the chocolate so we can work on pumping it, and then 3D print the molds. After that we can work on attacking some of our value added goals the rest of the semester.
Spring 2024 Start
Project Update 1
The basic design changes I have come up with so far for this semester is to automate the chocolate pumping process, as it was plumped by hand last semester. In addition, I plan to circulate the water between 2 tanks rather then keep it static to help with even heating of the water. Finally, we want to make the silicon molds for the chocolate this semester rather then using not food safe 3d printed ninja flex like in testing. We have many other goals that will be posed to this worklog as we get the details hashed out.
To-do List Week 4
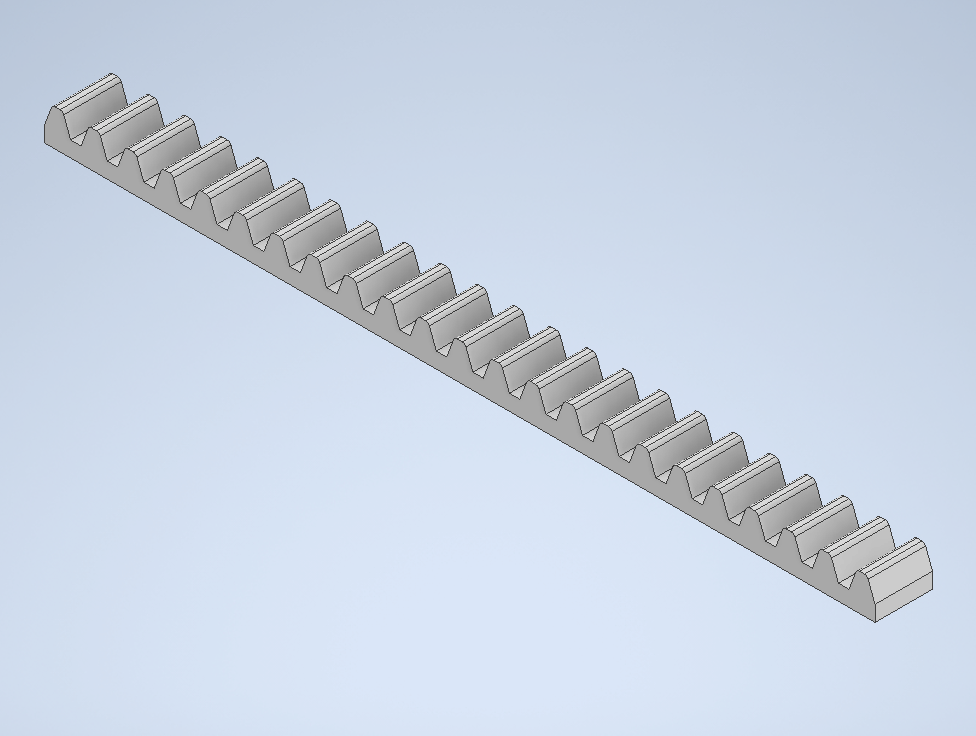
-Start stepper motor CAD. The goal here is to mount the stepper to a rack and pinion assembly which will plunge the syringe forcing chocolate through the tubes.
-Assemble electronics once they arrive and test.
-Set up water pump and secure in the tank.
Concerns For the Week;
The only real concern I have is weather or not the stepper motor will be strong enough to plunge the chocolate, and I am not quite sure how we will design the rack and pinion.
Project Update 2

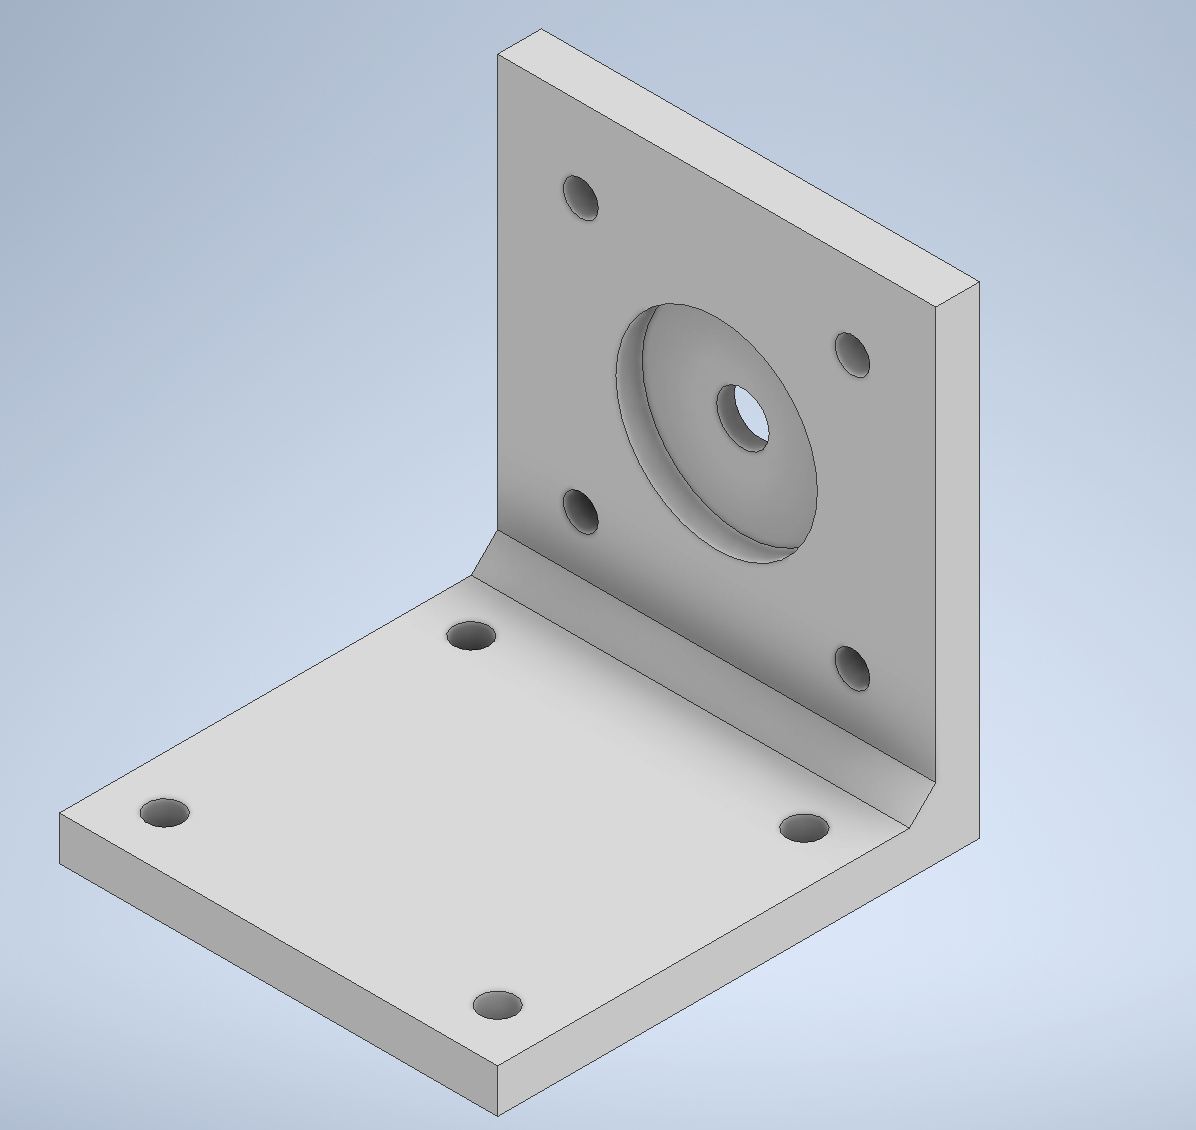
This week we had a meeting to make sure everyone knew their assignments to get us ready for the critical design review in a few weeks. I placed the parts order last week, however it still has yet to ship so I have been holding out on starting the CAD. I have sketched out some of my basic ideas above. For starters, I don’t know where exactly the syringe will sit in line with the motor and I am unsure of any of my dimensions till I can hold the stepper and make a guess. For convenience, I will be gluing 4 screws for each stepper threads up on the tank approximately 4 cm apart in a square. This will make all of the my 3d printed brackets in the future swappable so if they break or a dimension changes they can be removed. Next up I planned how the rack and pinion will sit in the syringe plunger so it interfaces with the motor well. I am hoping to cut some of the structure of the plunger away and add the track in.
To-do List Week 5
-Finish stepper motor CAD.
-Start rack and pinion CAD.
-Assemble electronics once they arrive and test.
-Set up water pump and secure in the tank.
Project Update 3
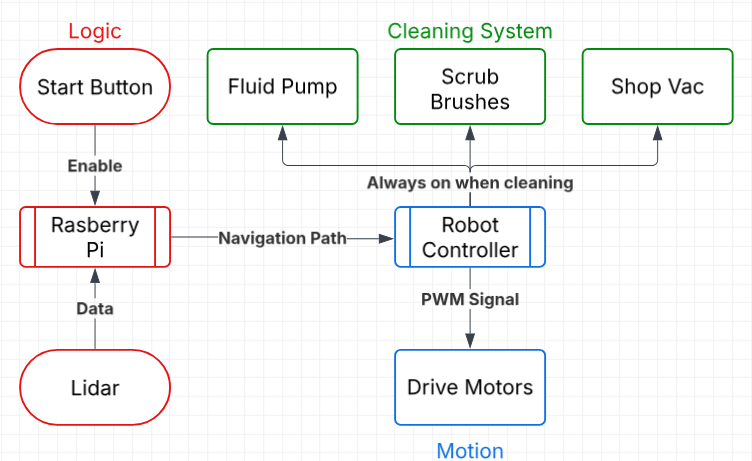
Referencing project update 1, the image above shows the general operation and design of our device. Initially it will start by just heating the water to melt the chocolate using the temperature controller and the 12 volt heater (red and green lines). Once the chocolate is around 60 Celsius we are ready to electronically pump it (orange and yellow lines). Using some code we will write in the next few weeks the stepper will rotate a gear on a rack and pinion plunging the syringe full of chocolate into the mold. It will then stop after a certain volume is pumped and we will repeat this process with the next bar.
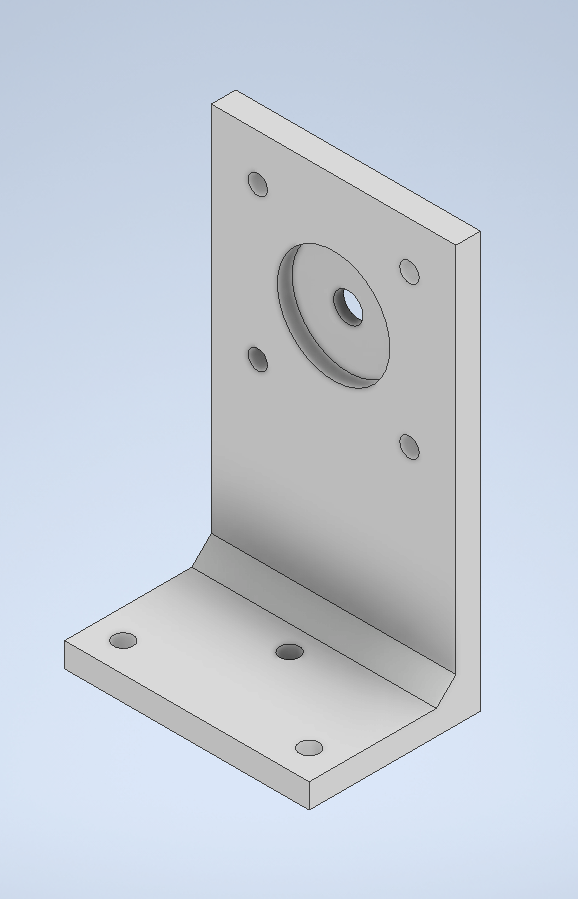
Past Week & To Do List
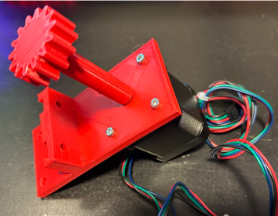
The image above of the stepper motor bracket is all I have really been able to do this week. We placed our order 3 weeks ago at this point and I was hoping to at least get the stepper motor so I could print the above bracket and test fit it on the top of the tank so I can design the other components like the gear and the rack and pinion. Unfortunately, without any physical parts I would pretty much just be guessing dimensions which is a waste of time for me to CAD or print. I am really hoping the parts are there Monday so I can start the to do list below
-Start rack and pinion CAD.
-Assemble electronics once they arrive and test.
-Set up water pump and secure in the tank.
-Run a dry test of stepper motor spinning.
Project Update 4
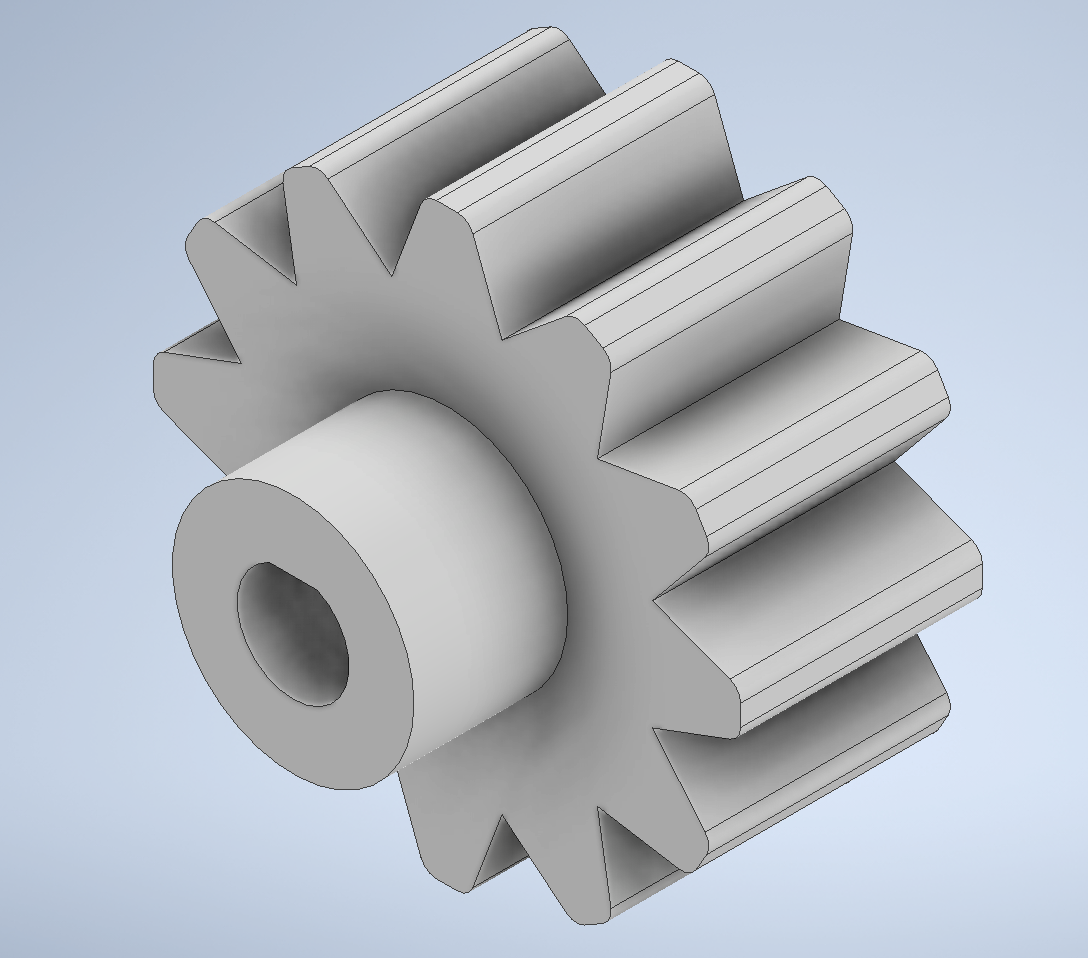
Over the course of last week I made the rack V1 and V2, Gear V1 and V2, and Stepper motor bracket V1 and V2. In addition, our parts order finally shipped so we can start 3d printing and assembling before the CDR coming up. I have also disassembled all of last semesters project so that I can attach all of the new components and design the new parts. I am currently waiting on the last print to finish so I can test all of the V2 parts together. All of the things on last weeks To-Do list got done besides the water pump assembly. I also spent some time debugging the printers in the OSHE while waiting on other prints.
To-Do List
-3d print remaining parts and assemble.
-Set up water pump and secure in tank.
-Make new chocolate mold brackets that also secure tube.
-Make CDR slides.
Project Update 5

During this last week I was pretty busy with exams, however I was still able to get a few things done for the project. I made a Version 3 of the stepper bracket and printed the stepper bracket, gear V2, rack V2, and assembled all of the parts I have printed so far. I can tell after assembling that some spacers are going to need to be 3D printed to keep the plunger stable or else the gear will un-mesh kind of like in the picture.
To-Do List
-Design water pump 2 way splitter
-Order smaller diameter tubes for the water circulation
-Come up with a good way to drain water out of tank instead of flipping it upside down link last semester
-3D print parts for holding pump
Project Update 6
This week I designed some fittings to allow for water to passively flow between the three tanks. I drilled the holes and 3d printed all of the fittings, then ordered some 5/8 tubing and hose clamps to assemble it later next week. The basic concept is the fittings get glued and pushed through the holes I drilled from the inside of the tank, then the tube will go over the fitting and get hose clamped. Then it will connect to the next tank using the same fitting. So the water will flow between the three tanks freely, and I will pump the water we heat up from the center to the top of each of the two side tanks. Then to drain the tanks like I mentioned last week, I can just undo one hose clamp and let the water out.
To-Do List
-Design water pump 2 way splitter
-Attach link tubes
-3D print parts for holding pump
-Make syringe spacers
Project Update 7
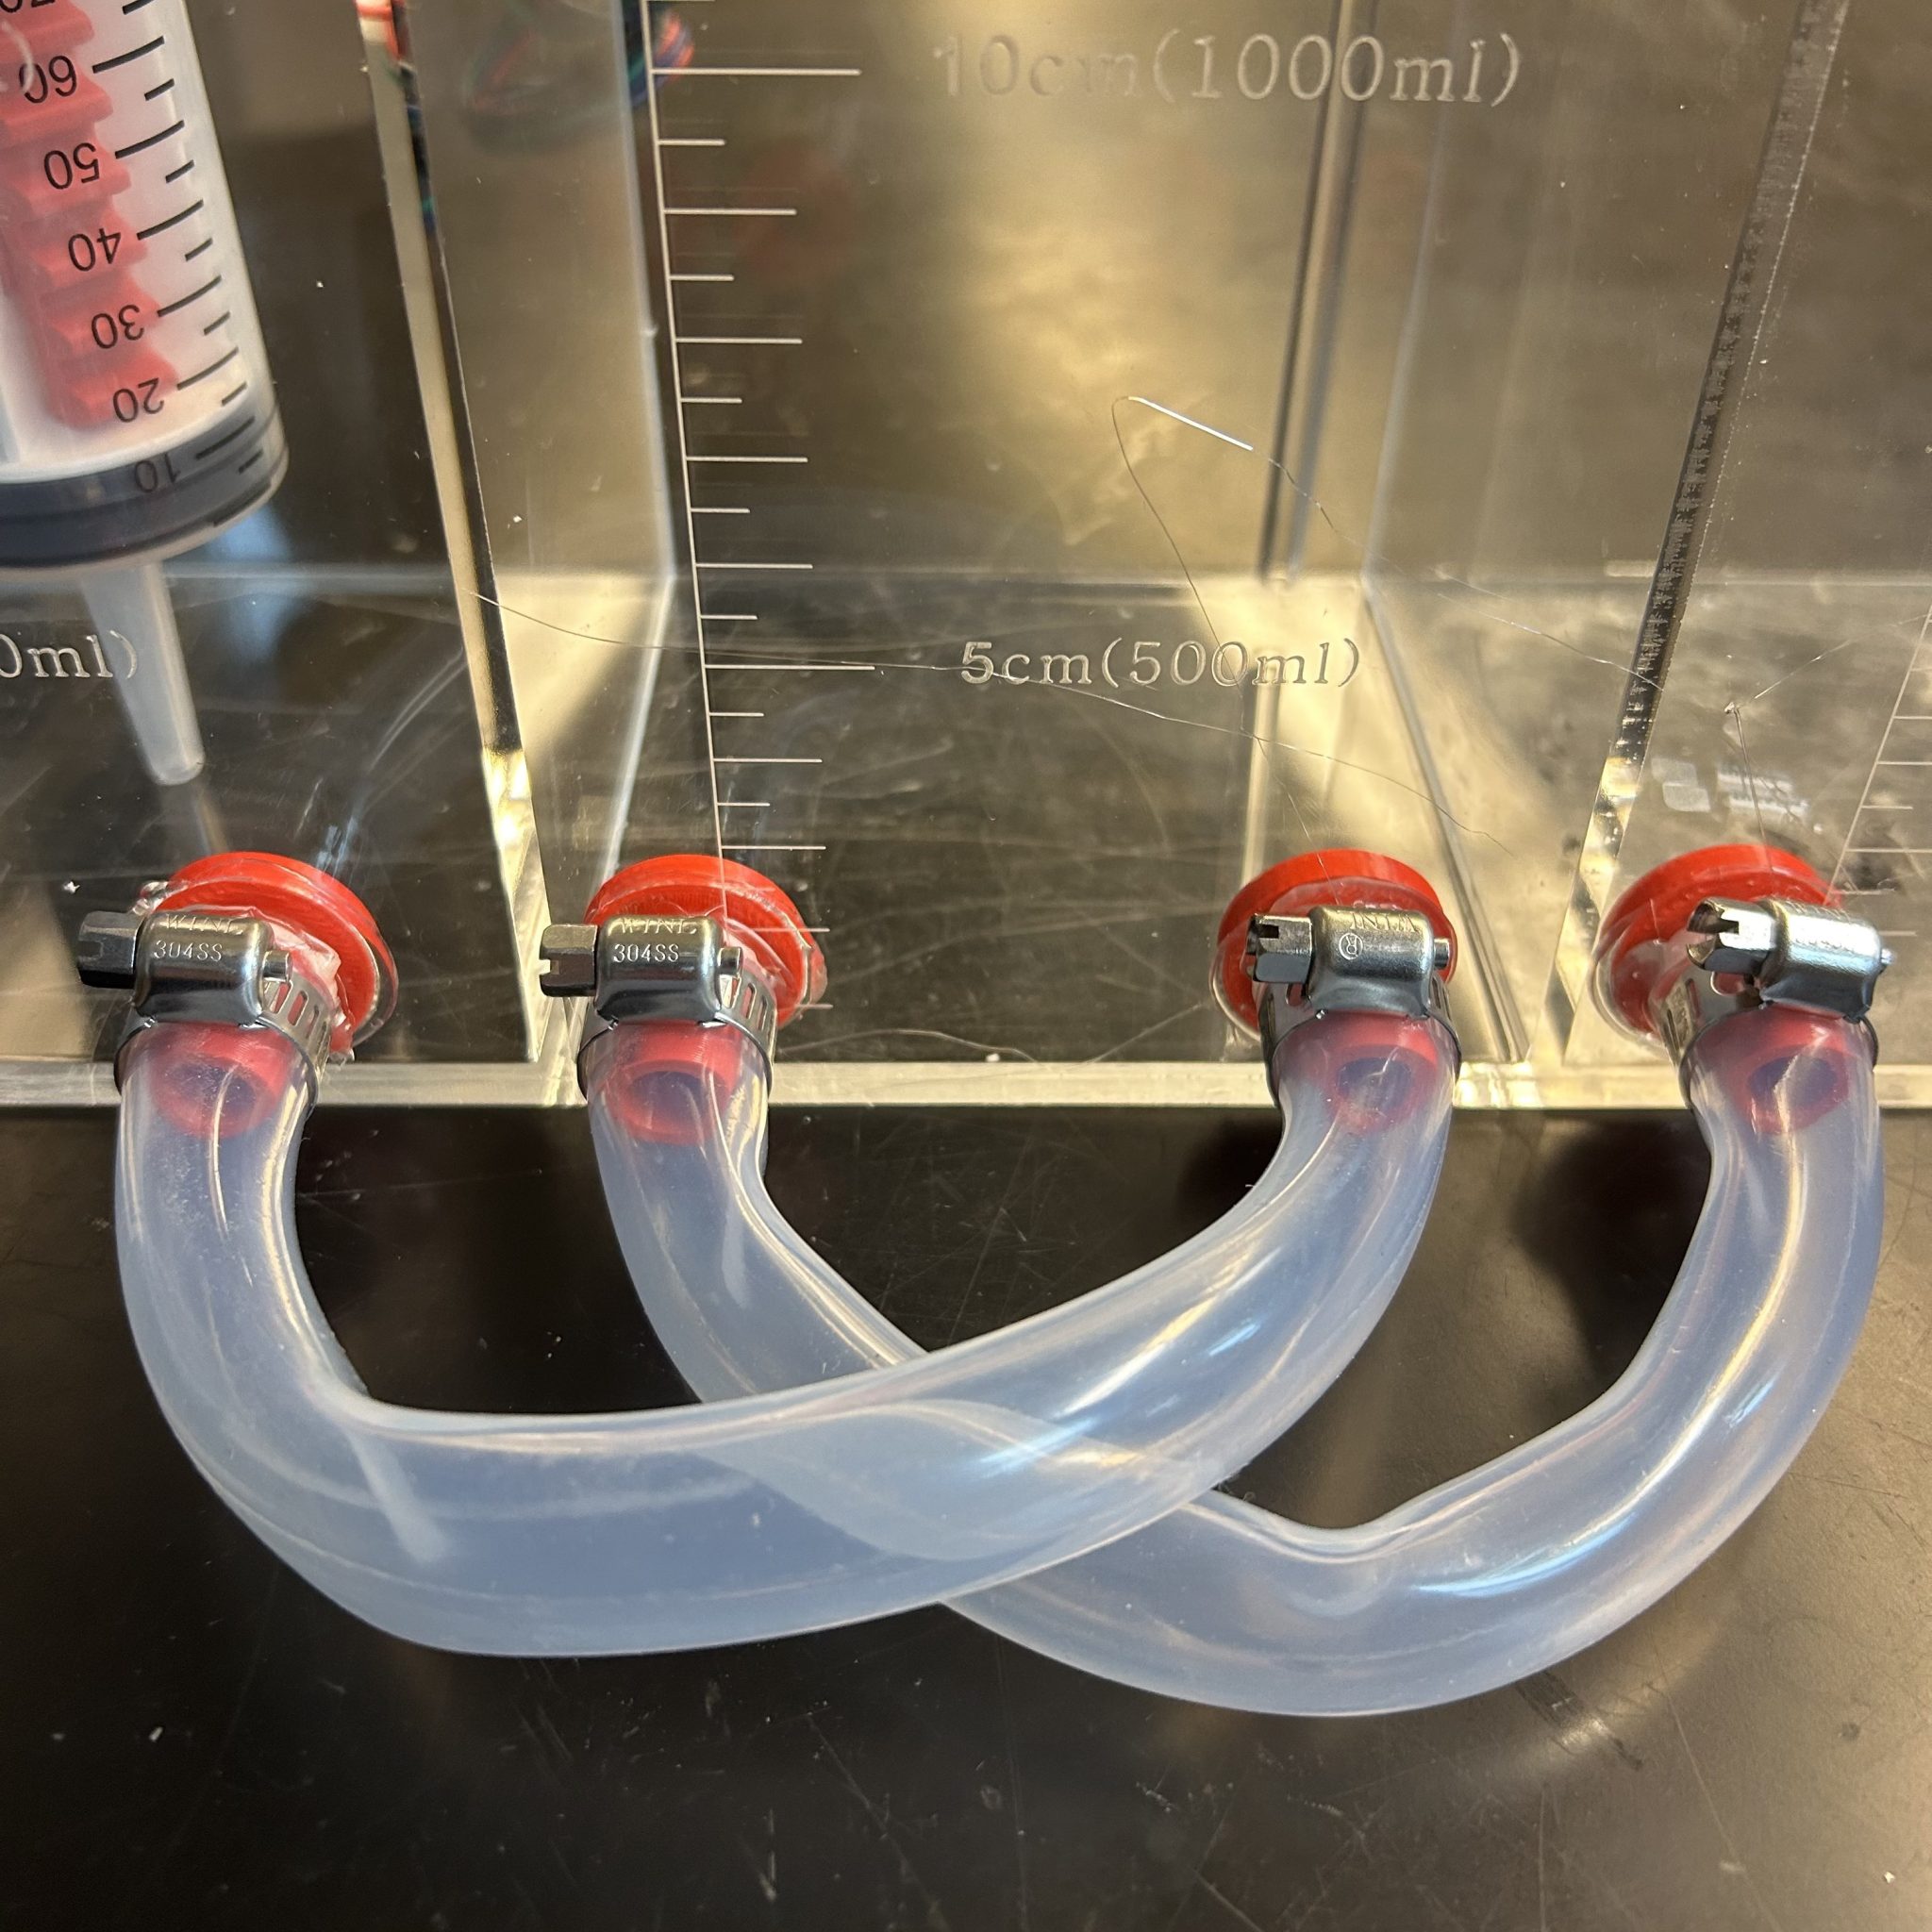
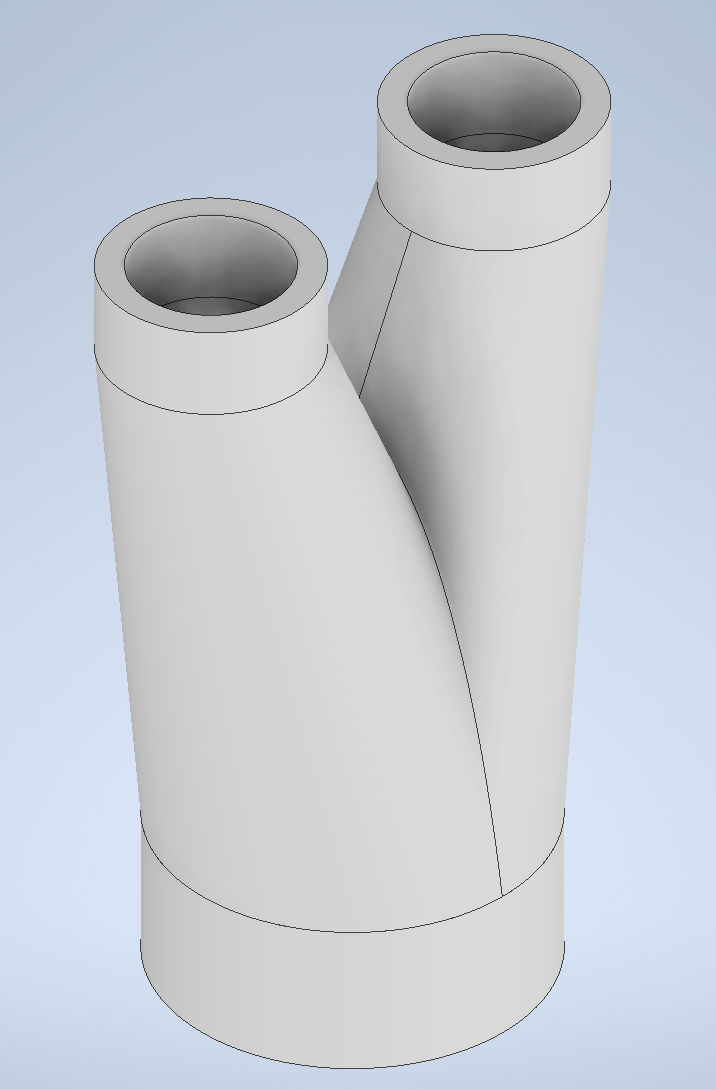
This week the parts I ordered came in and I decided to link the 3 tanks slightly different then the sketch from last week to prevent them from kinking as much. Since it is a soft tube and not a hard line, they want to just bend doing so tight of a turn, so rather then going 1 into 2 and 3 into 4, I went 1 into 3 and 2 into 4. I also came up with a quick model for the tube splitter, but I don’t think I want to double the volume so I may order another size of tube half as small so the pump can go from one 12 mm tube to two 6 mm tubes to keep a constant flow of hot water. This water will get pumped in the top from the center tank, then flow through the connectors shown on the left. My personal goal is to get the physical components all assembled again in the next two weeks or so in order to run a test with some chocolate in the system.
To-Do List
-3D print parts for holding pump
-Design new part for holding heater
-3D print part for holding heater
-Order more tube
-Make syringe spacers
-Test fill tank, check for leaks, run pump
Project Update 8
This week I designed the spacers for the syringe to help it mesh with the stepper motor, and I realized the syringe will need to be supported inside the tank most likely so I made the part on the far left to test. I also redid the top syringe holder to accommodate the bigger tube size. I still have some things to get done this next week as this week was very busy from me in other areas so I did not do much on the project. My personal goal is still to get the physical components all assembled again in the next week or so in order to run a tests with water in the system and run the stepper code.
To-Do List
-3D print parts for holding pump
-3D print syringe spacers
-3D print syringe holder
-Design new part for holding heater
-3D print part for holding heater
-Order more tube
Project Update 9
This week I printed the syringe spacers and glued them on, as well as redesigning a few of my parts. The syringe holder has been updated to hold the temperature probe, and I will be printing it later today. The top portion also had a hole added for fitting wires to the temperature probe. This weekend one of my groupmates got the Arduino code updated and the circuit finished so it is very important I get these last few parts printed and assembled so we can begin testing before the end of the semester.
To-Do List
-3D print parts for holding syringe
-Design new part for holding heater
-3D print part for holding heater
-Order more tube
-First assembly for testing
Project Update 10
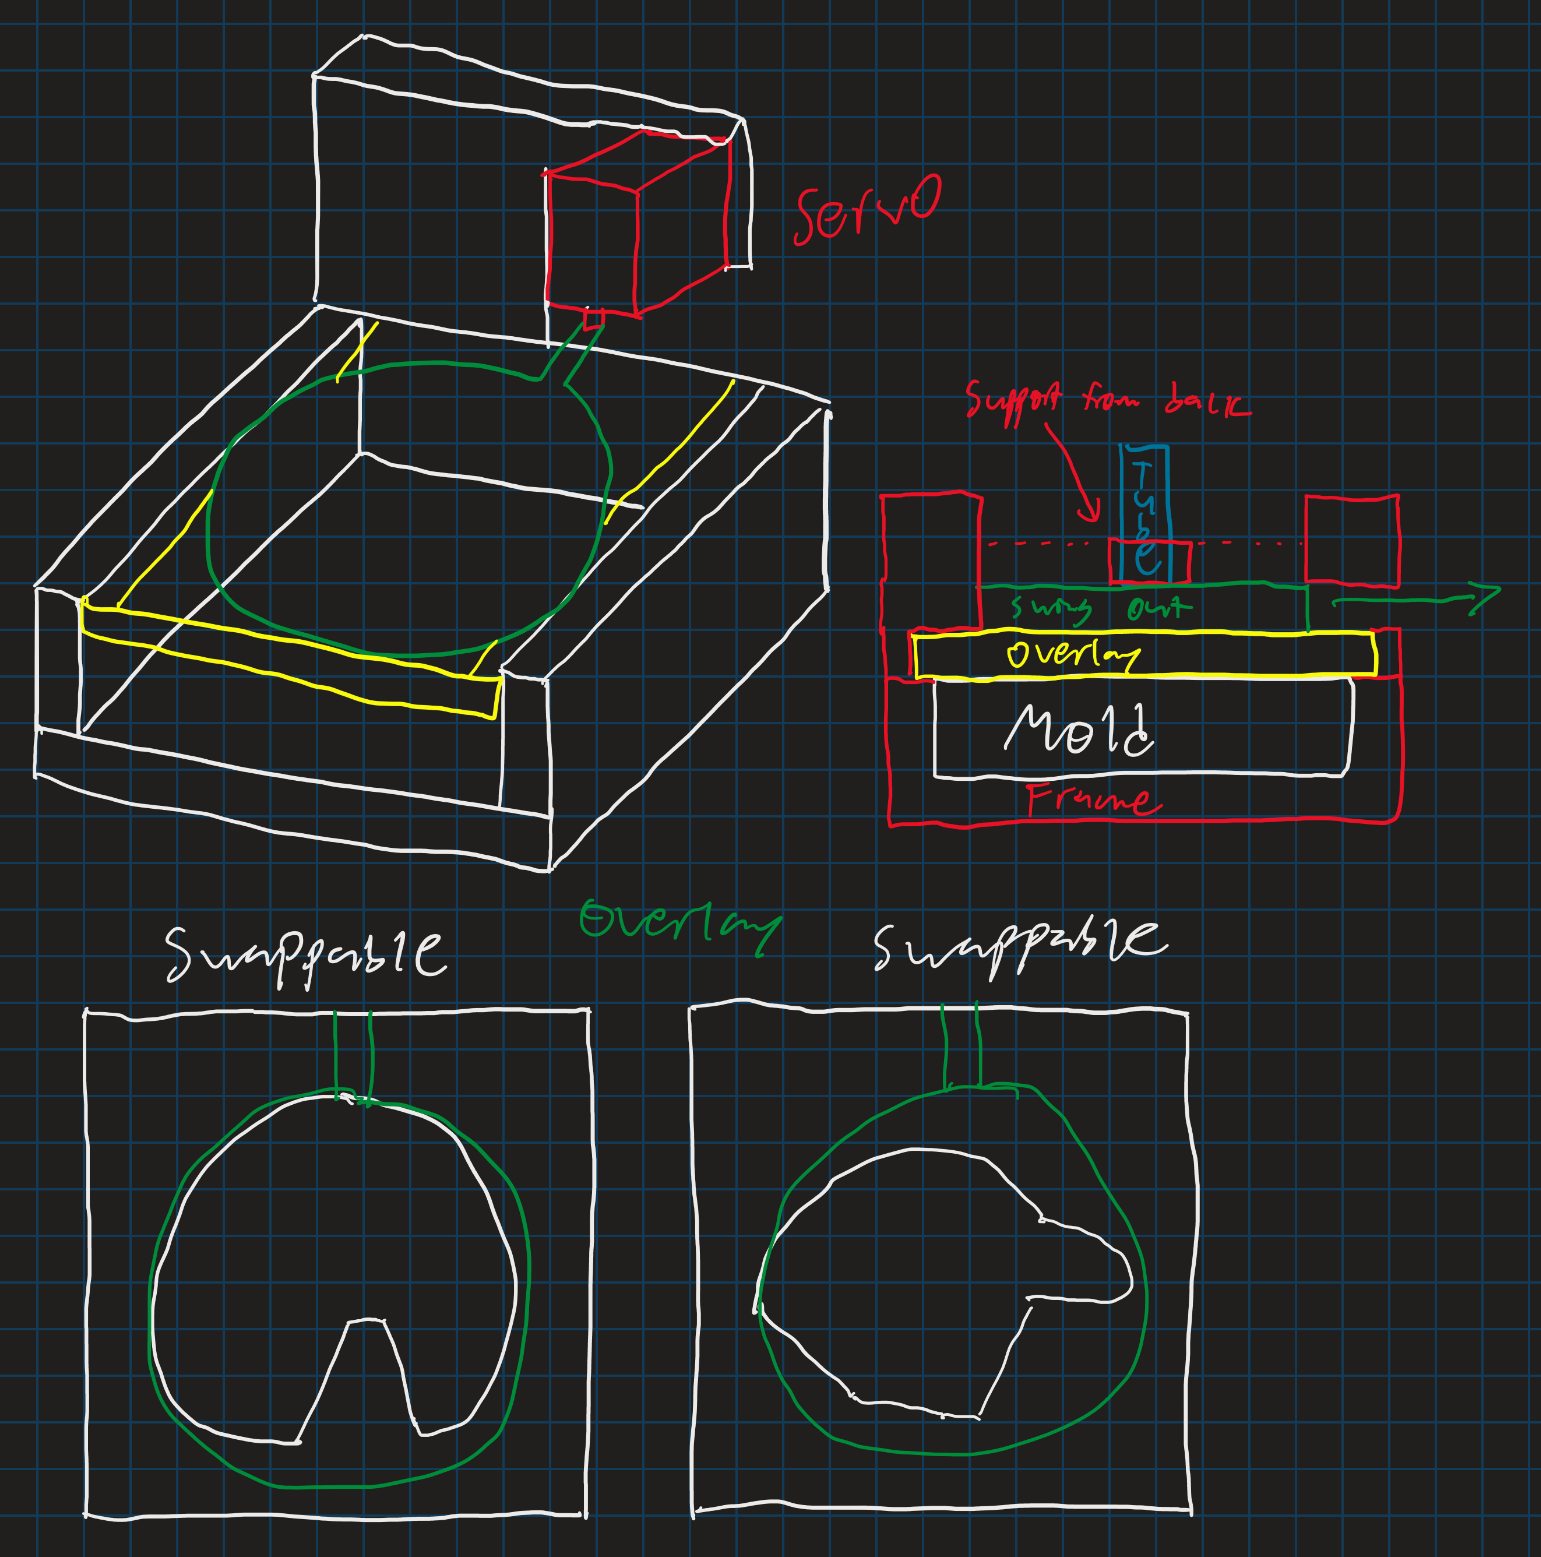
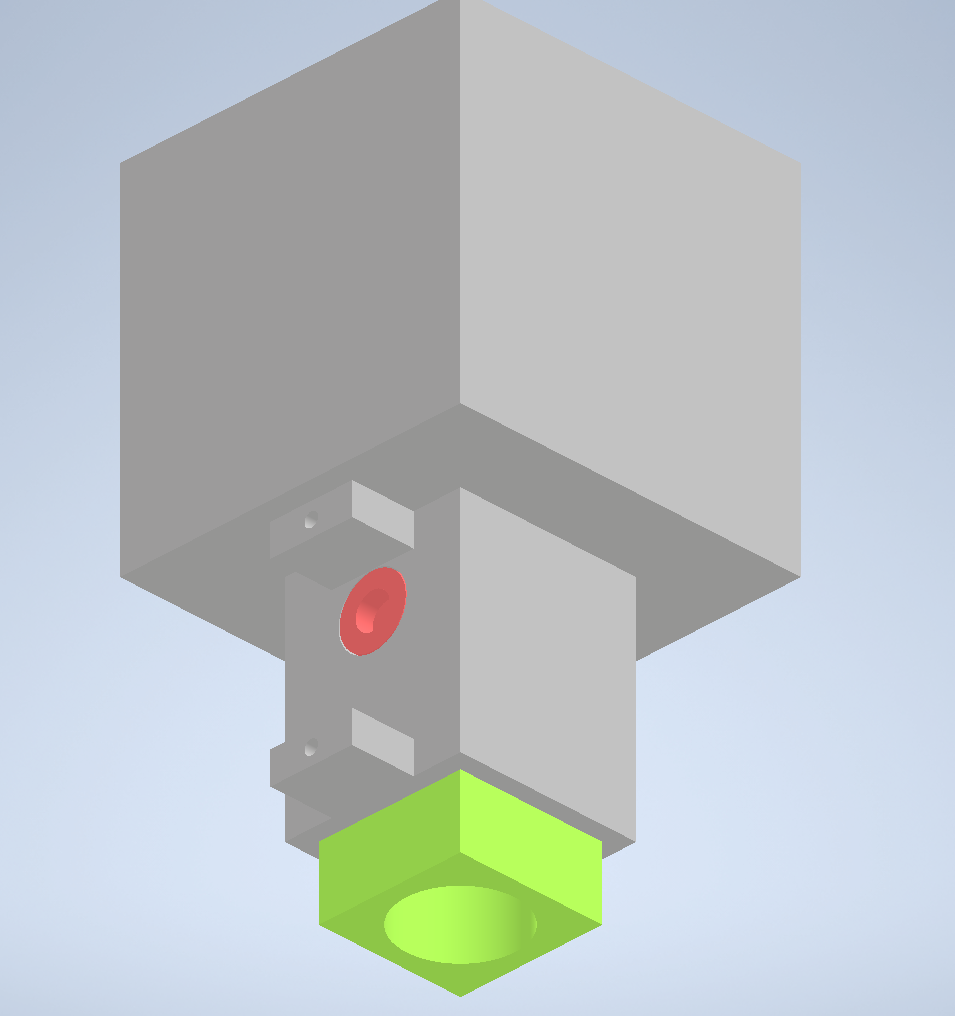
This week I have decided to ditch the rack and pinion design in pursuit of the lead screw idea I mentioned during week 7 of this semester. The rack and pinion design will stay for now as one of our chocolate extrusion methods, while the lead screw will become the design for the other side. If the lead screw works it will then replace the rack and pinion on the other side. The main problem with the rack and pinion is the teeth un-mesh underload and skip, and all my upgrades have failed to resolve the problem. While I wait for the lead screws to ship I made the final version of the pump splitter and ordered tube, as well as printing the part to hold the heater in place. I also have created a concept and started the CAD for the value added mix-in goal (far left image) which will also hold the mold in place while chocolate is pumped into it.
To-Do List
-Finish mix-in servo CAD
-3D print mold holder, and mix in CAD components
-Design lead screw components once parts ship
-3d print lead screw components
-3D print and assemble lead screw design
-Prepare for final assembly and begin testing
Project Update 11
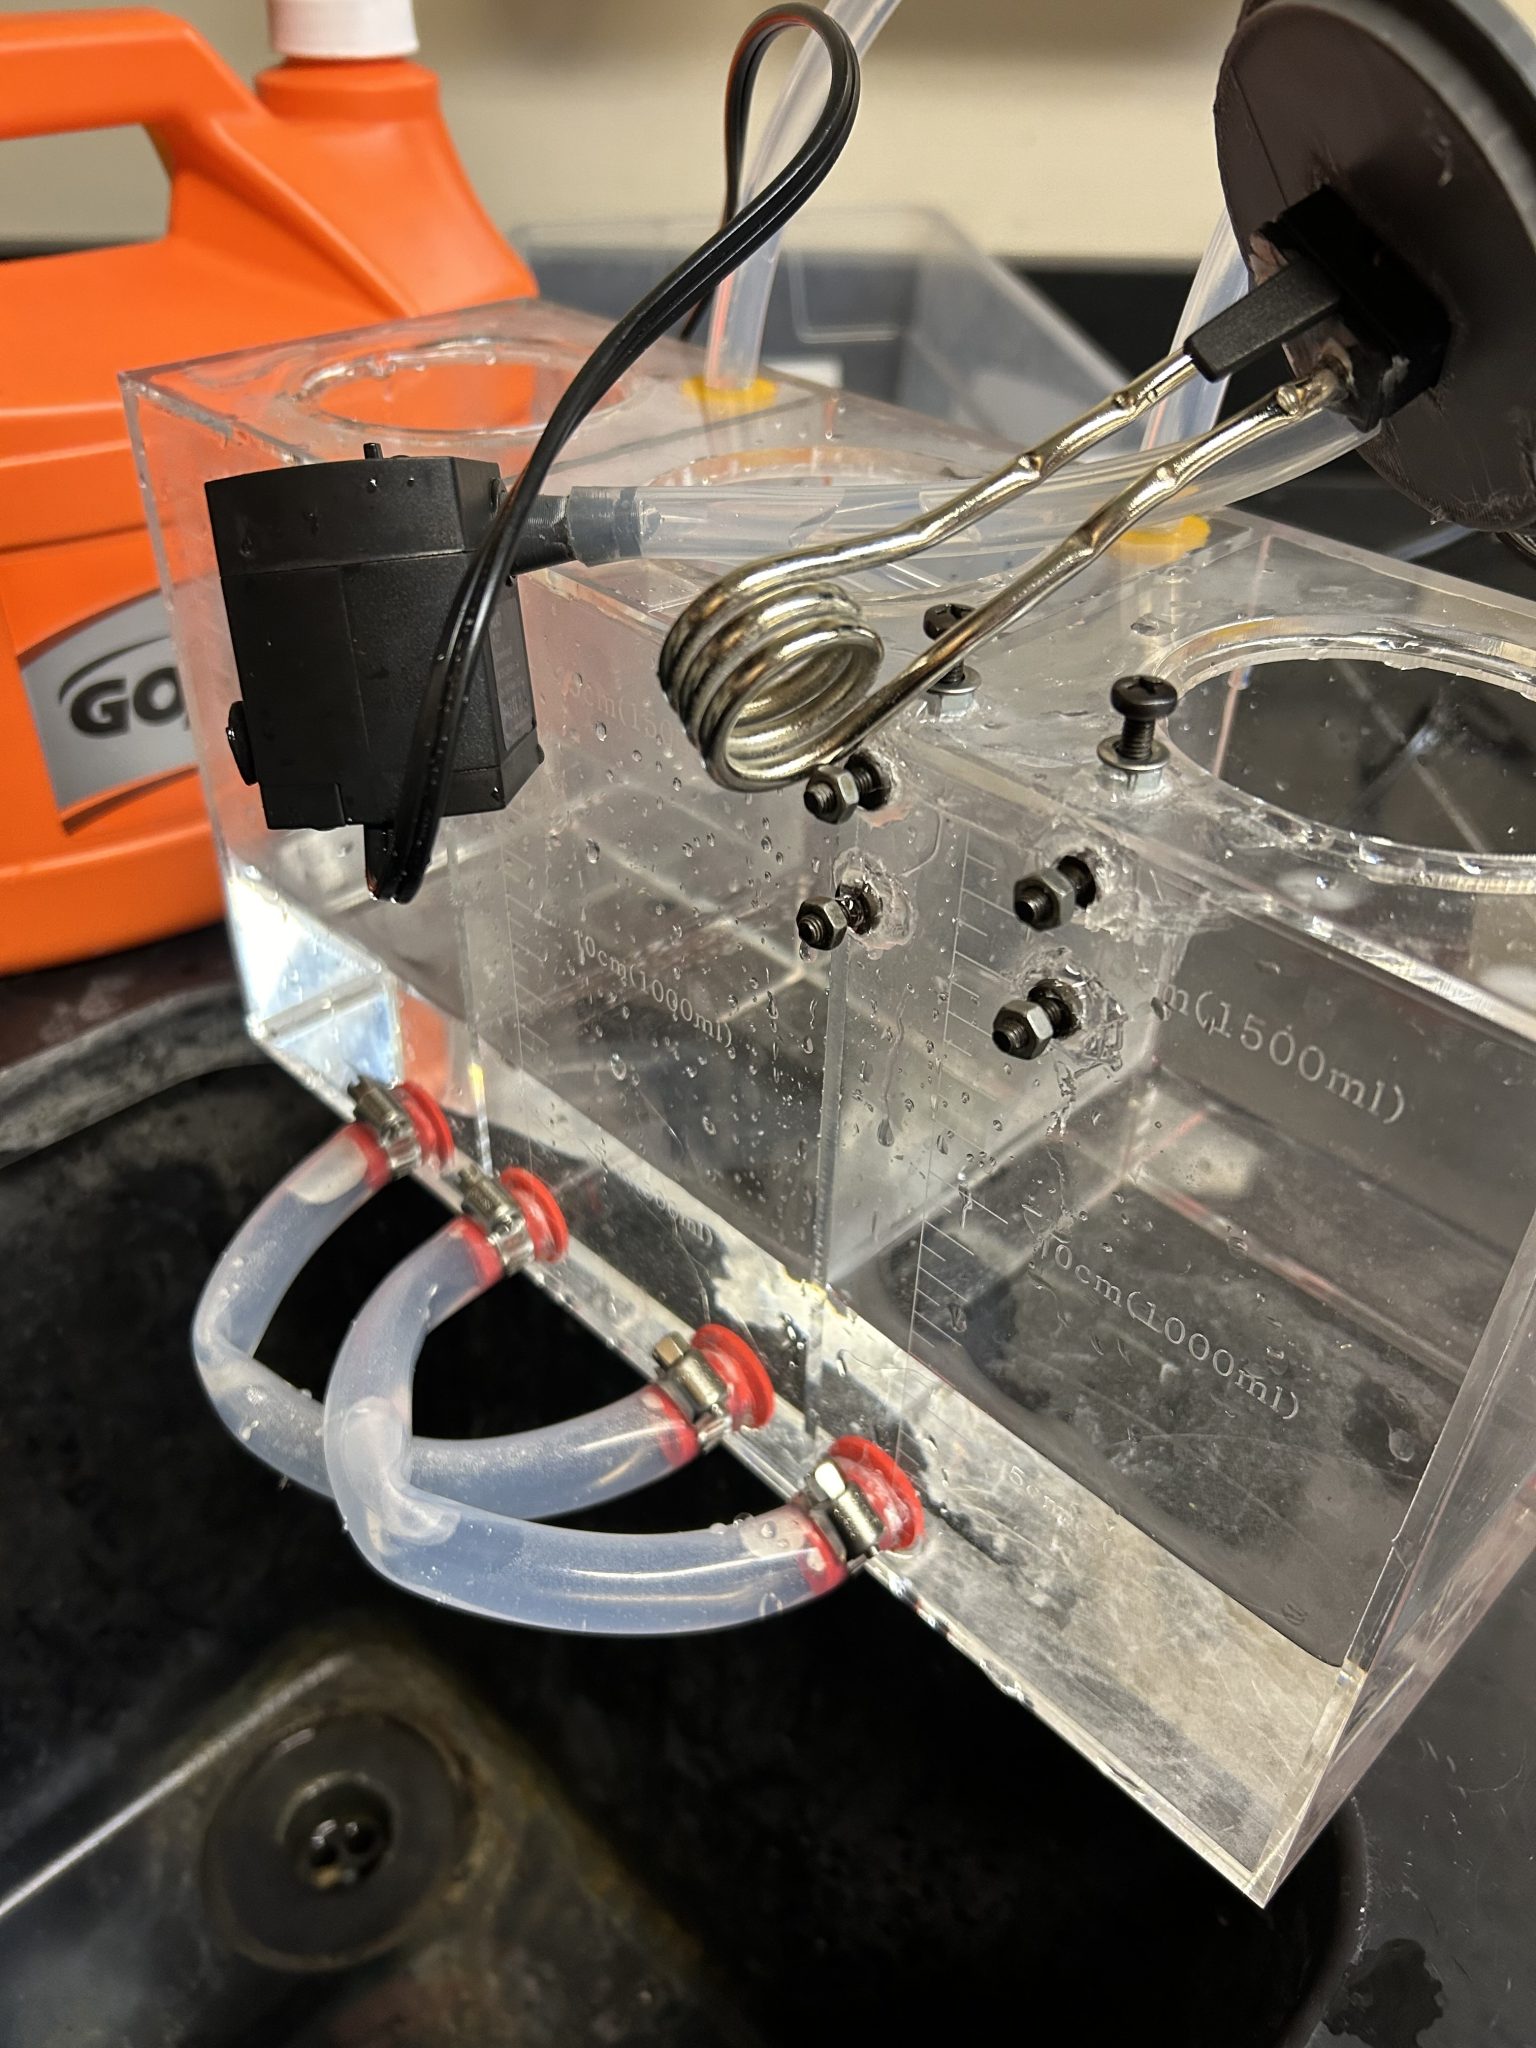
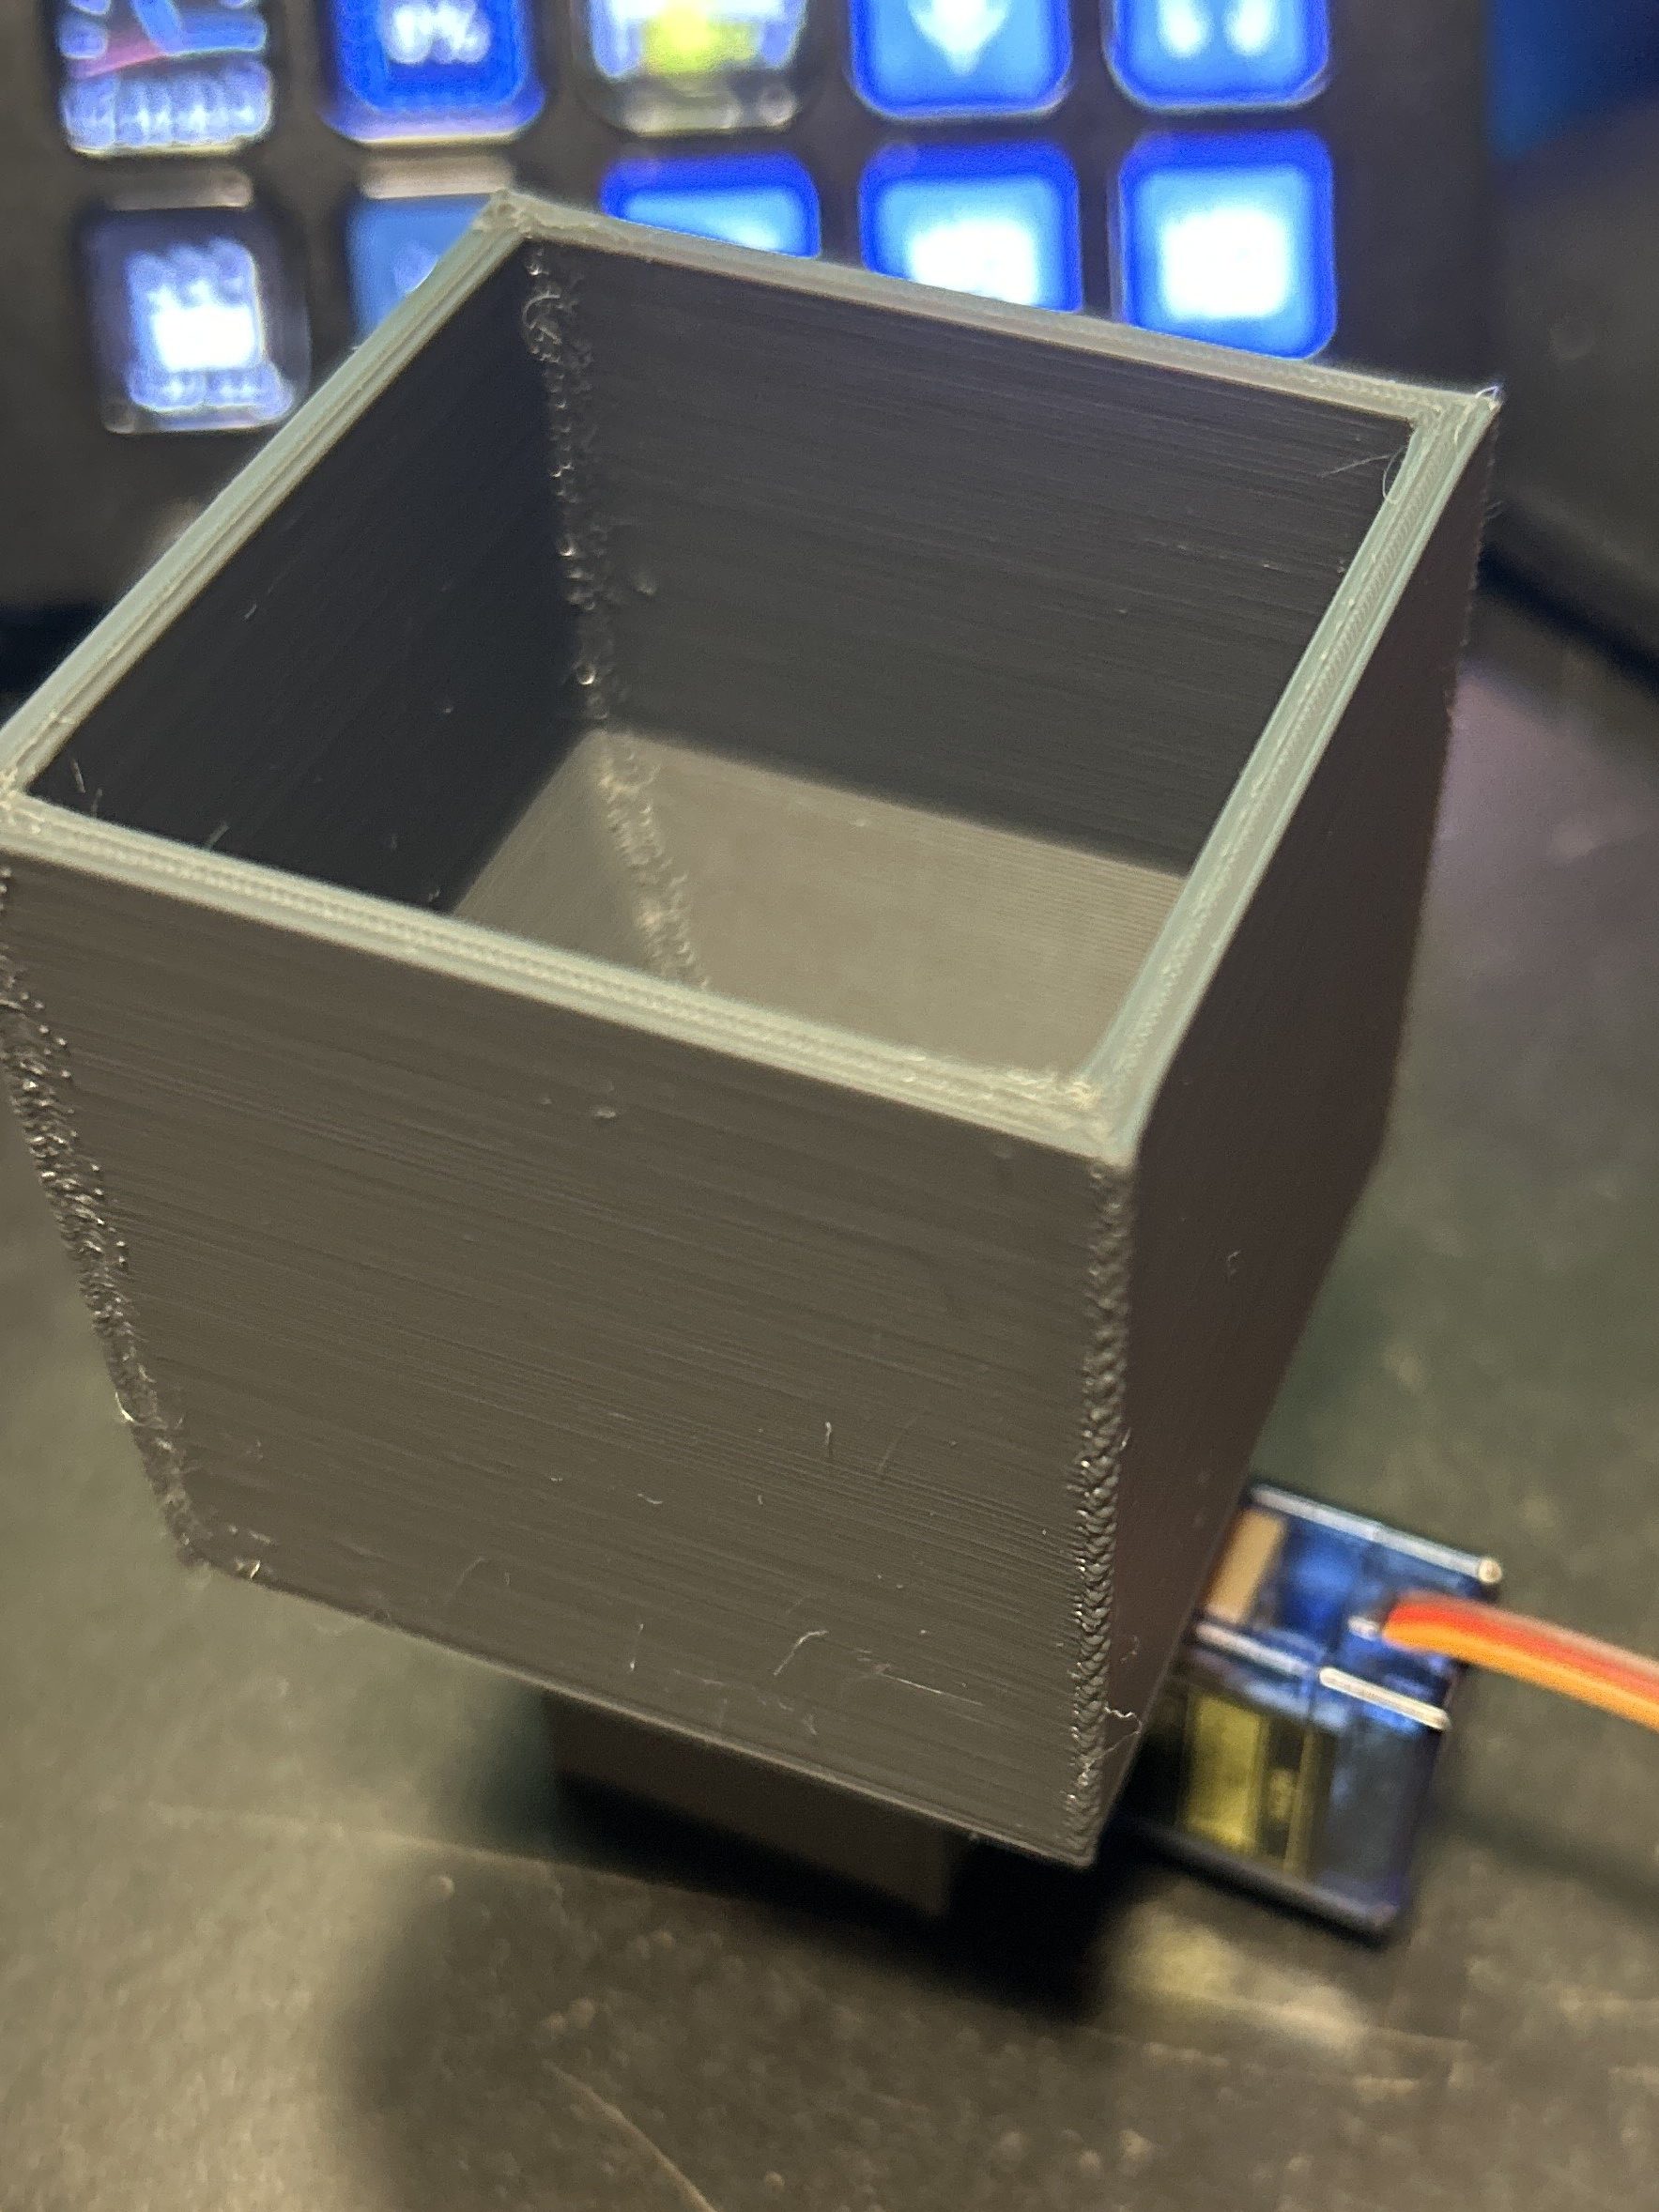
This week I got a lot of physical assembly done and did some testing of various components. I designed the value added goal of the mix ins for our chocolates (3d image) and 3d printed and assembled it (second image). This will allow us to add things like rice Krispie’s, salt, nuts, sprinkles, and other things in our chocolate bars. I also got the pump splitter and the center tube lid printed and they fit great. I test filled the tank with water and ran the pump which works well, however my red tube connectors leak a few drops of water a minute. Between the PLA not being water tight and the hot glue, there are just too many failure points. I knew it should have been O-rings or a thread on, not hot glue. However the hose clamps work great with the tubes and the tanks are easy to fill and drain. I will get the leaking issue solved this next week, as well as finishing the lead screw design as the parts shipped Thursday.
To-Do List
-3D print mold holder
-Fix leaks
-Finish designing lead screw components
-3d print lead screw components
-Prepare for final assembly and continue testing
Project Update 12
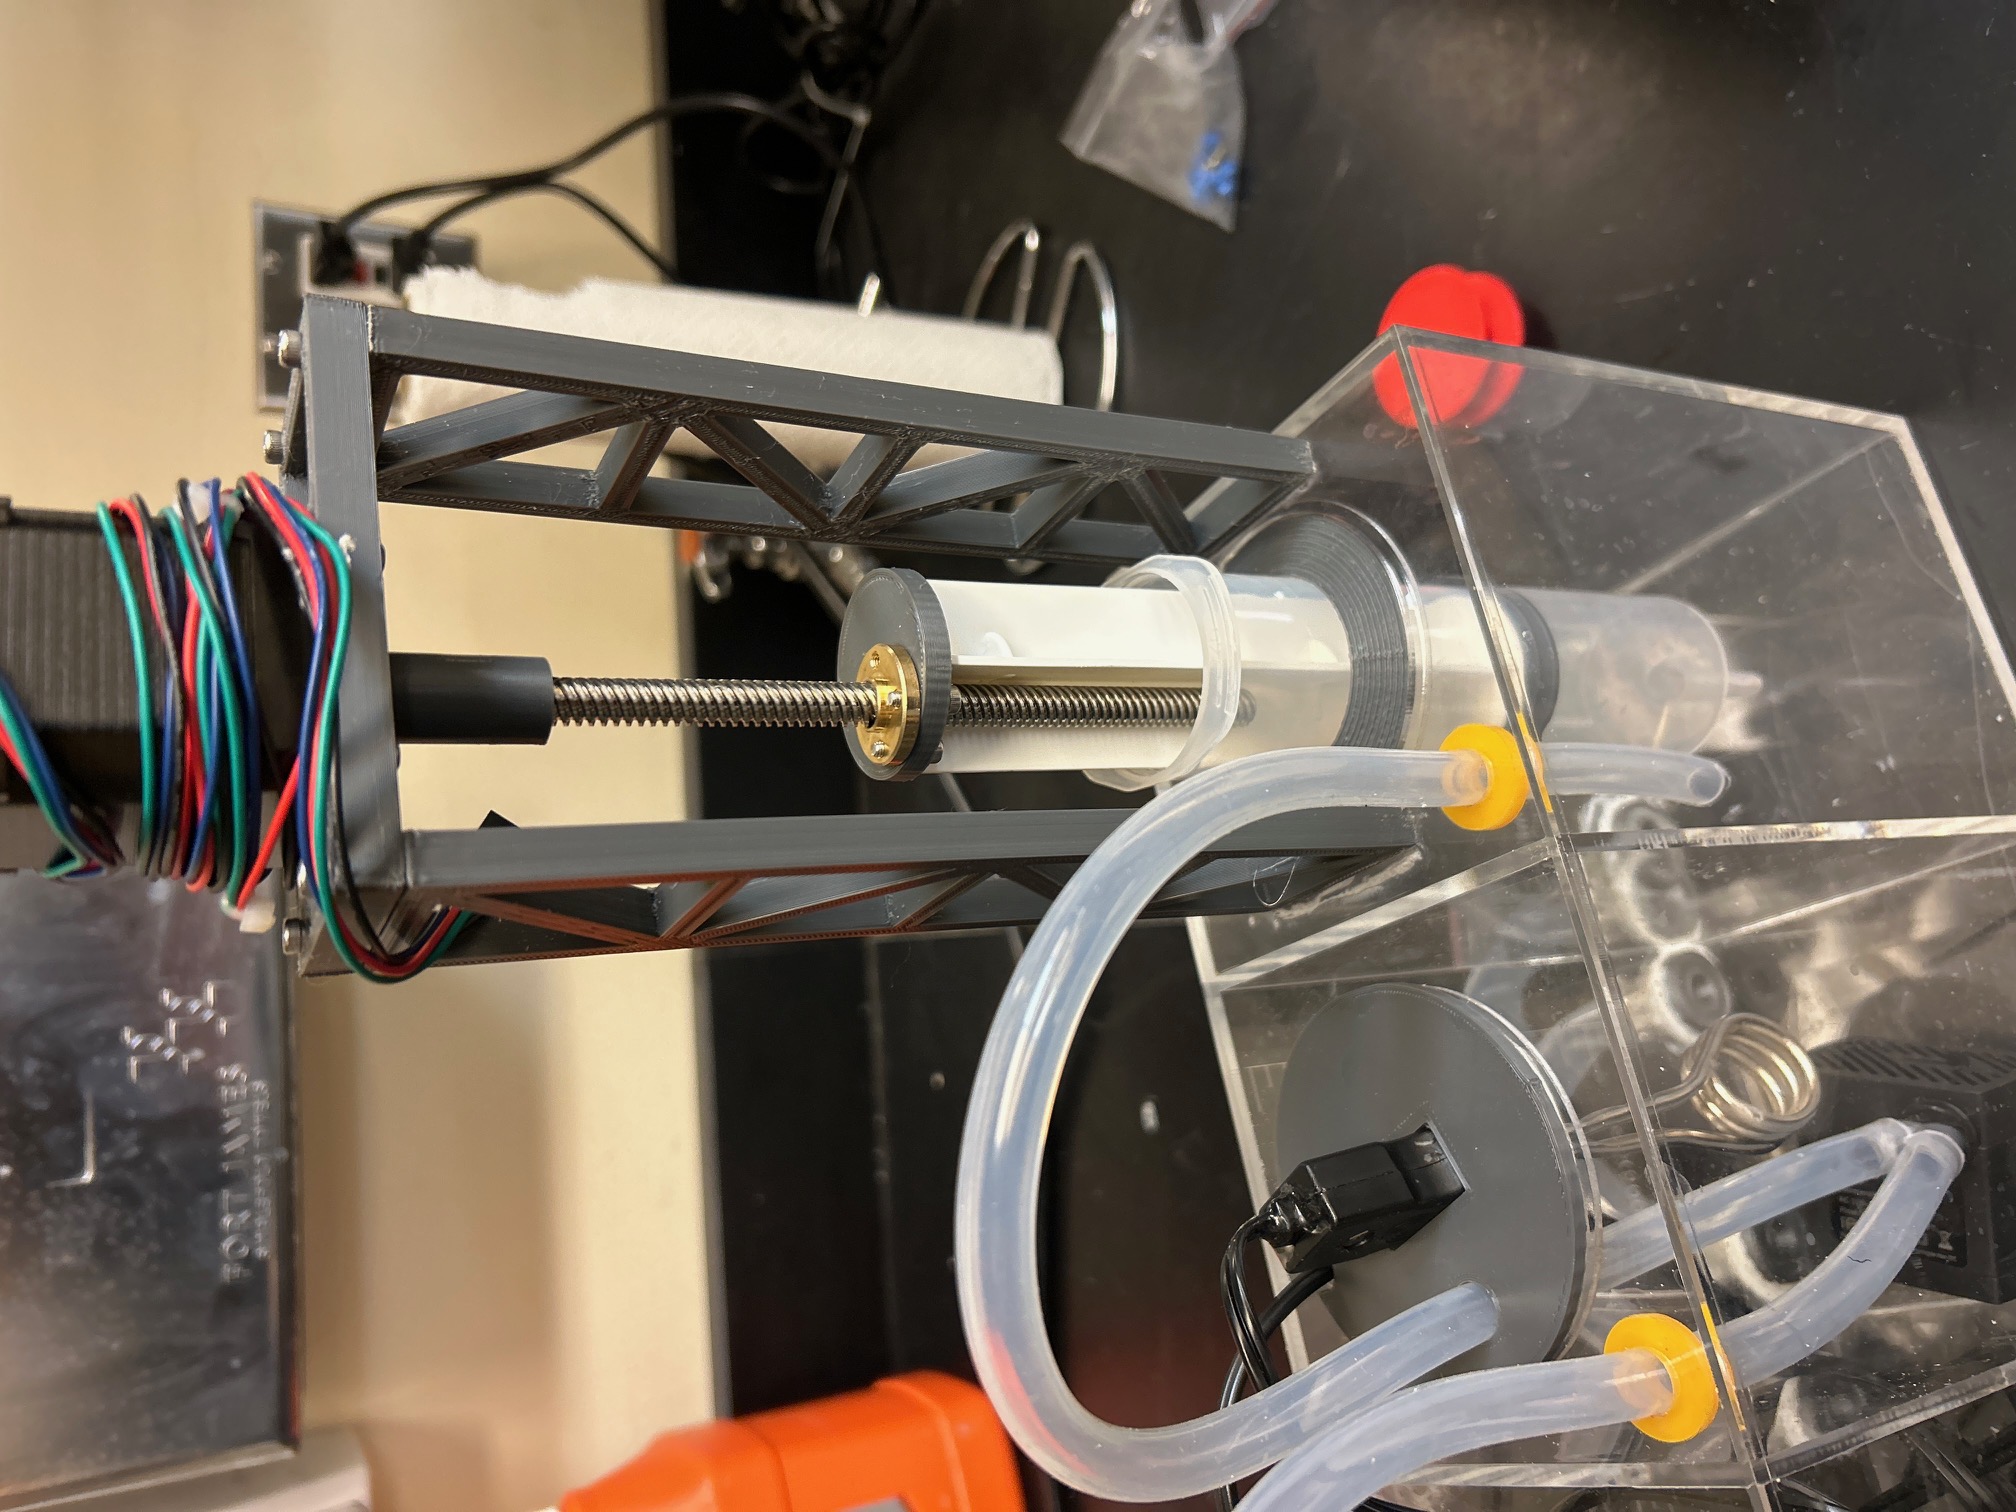
This week I disassembled the old rack and pinion design and removed the old fittings that leaked. I designed and 3d printed the entire lead screw design for the left and right tanks assuring we can make 2 flavors of chocolate at once. I then printed new fittings out of PETG instead of PLA which assures it is water tight, and I found some old bathtub caulk in the lab to use instead of glue. I then caulked in the four new fittings and attached the tubes as they were previously. Then I assembled the lead screw design shown in the image above and tested for leaks. Overall, I am nearing close to the finished design, more assembled and 3d printing is required but all designs should be hopefully finalized.
To-Do List
-Assembled left lead screw design
-Attached mold holders and mix in design
-Wire up electronics
-Test