Fall 2024
Project Update 1 (9/13/2024):
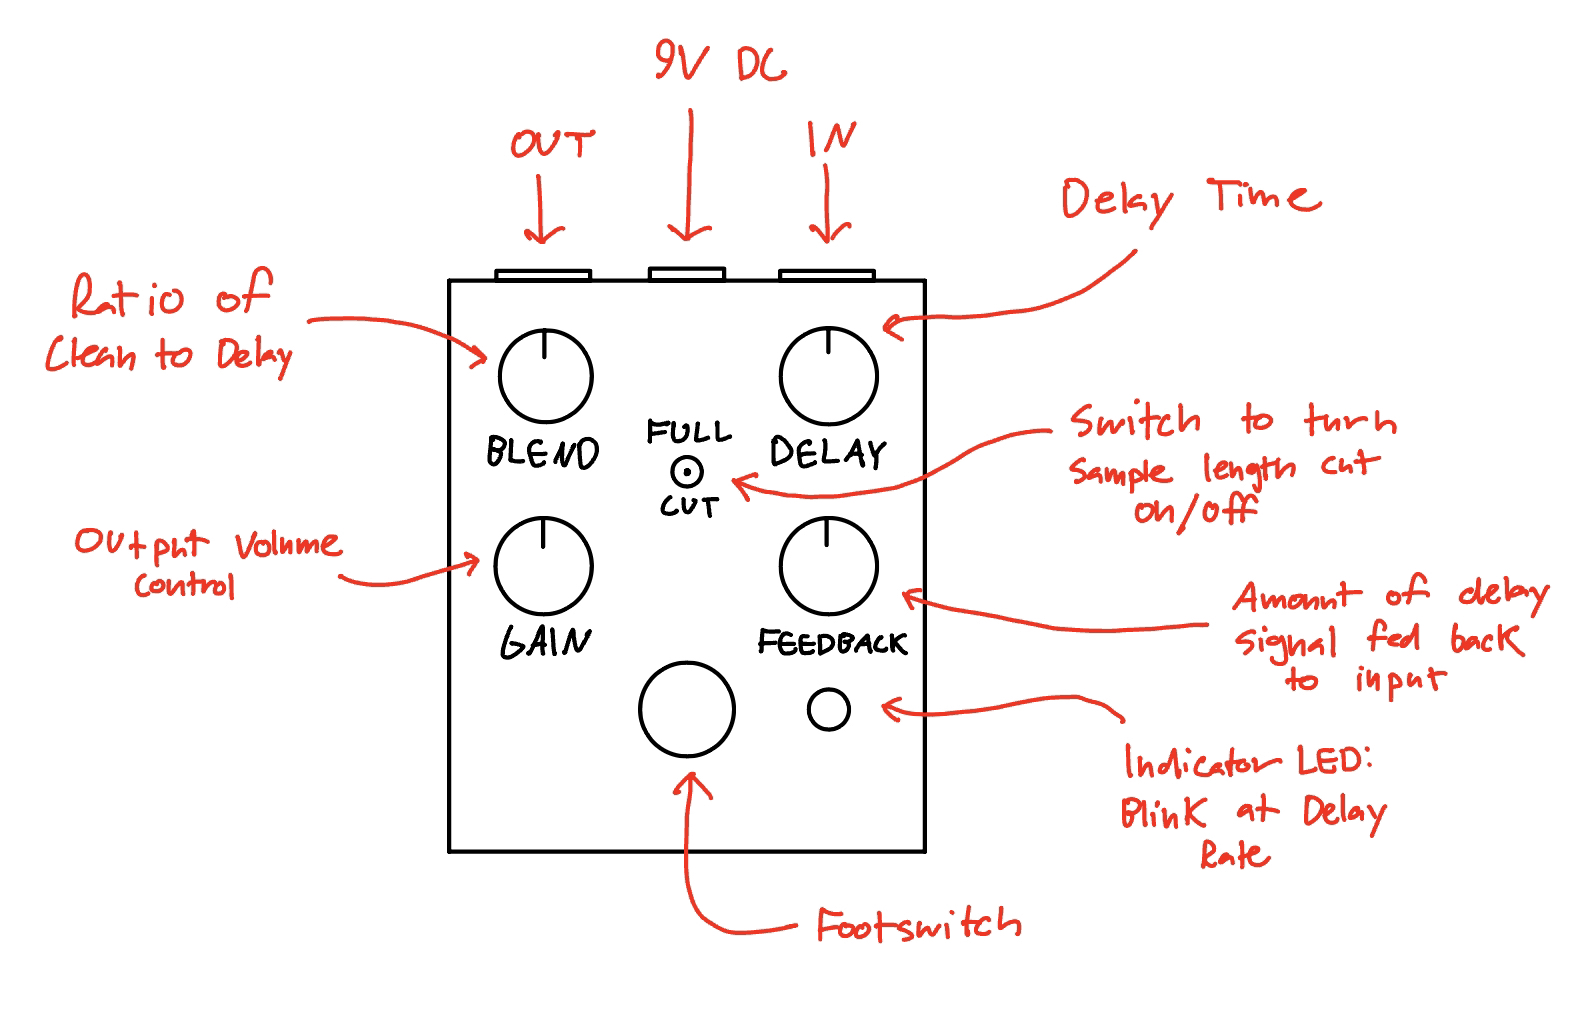
Attached below is a sketch of what the Delay pedal that me and Xavier will be contributing to the pedalboard might look like. Currently, we have two main ideas of alterations to the typical delay design to improve utility to Viola players: EQ on delay repeats, and delay sample length cutting. My drawing below shows a control configuration for a fairly typical delay pedal, with the notable addition of a switch for a delay sample length cut.

To Do List:
- Work with Georgia to record a Viola test track for preliminary testing of existing Delay/Reverb pedals.
- Meet with Dr. Pinar to assess what aspects of his multi-fx pedal project could be utilized for the Pedalboard.
- If a hardware platform is confirmed in meeting, begin coding the delay effect/making block diagram of how delay effect will work/interface with hardware.
- If a hardware platform unknown after meeting, research and decide on microcontroller platform and add-ons to use for pedal.
- Create presentation slides for Thursday meeting.
Concerns:
My primary concern going into next week is how much of Dr. Pinar’s project will be useful for our purposes. The meeting will be on Monday morning, so we will have a full workweek to apply what we learn from him, but the anticipation is killing me.
Project Update 2 (9/22/2024):
Last week was big for the project! Dr. Pinar met with us on Monday, and subsequently gave us the Raspberry Pi 4b with a HifiBerry ADC+DAC hat! Before we could get working on it, the team met again to write our project presentation for the weekly OSHE meeting. After our presentation, we then worked together to revisit and revise our project spec so that our goals and and evaluation criteria would better align with the new direction of our project: A Multi-FX pedal! Finally, we all met again over the weekend to get Elk OS booted and configured with our hardware and dig through documentation to see what we would have to do next to get our hardware usable with audio plugins. We also began brainstorming ideas for user input with the device, with the implementation of a combined LCD and potentiometer module being our main idea. My To Do list for last week was a bit too ambitious in scope, so I’ll be dialing it back a bit for this week to focus on more concise, actionable items. Our next big step with the hardware is to learn how to actually use it with a VST3 plugin, which will most likely be the plugin type we write for use the pedal in the future.
To Do List:
GOAL: Use a VST3 plugin with the Pi to apply an effect to a guitar signal.
- Choose a VST3 plugin to test the Pi with
- Identify how to configure plugins to run as analog in-analog out with the Pi
- Load plugin onto Pi
- Test the system with a guitar input and output to a guitar amplifier
Concerns:
I think that our user interface on the pedal is going to be very technically challenging to develop, likely moreso than designing our plugins. As we start to get a better grasp for how Elk OS works, we need to pay special attention to see how we need to approach the potentiometer control and LCD display.
Project Update 3 (9/29/2024):

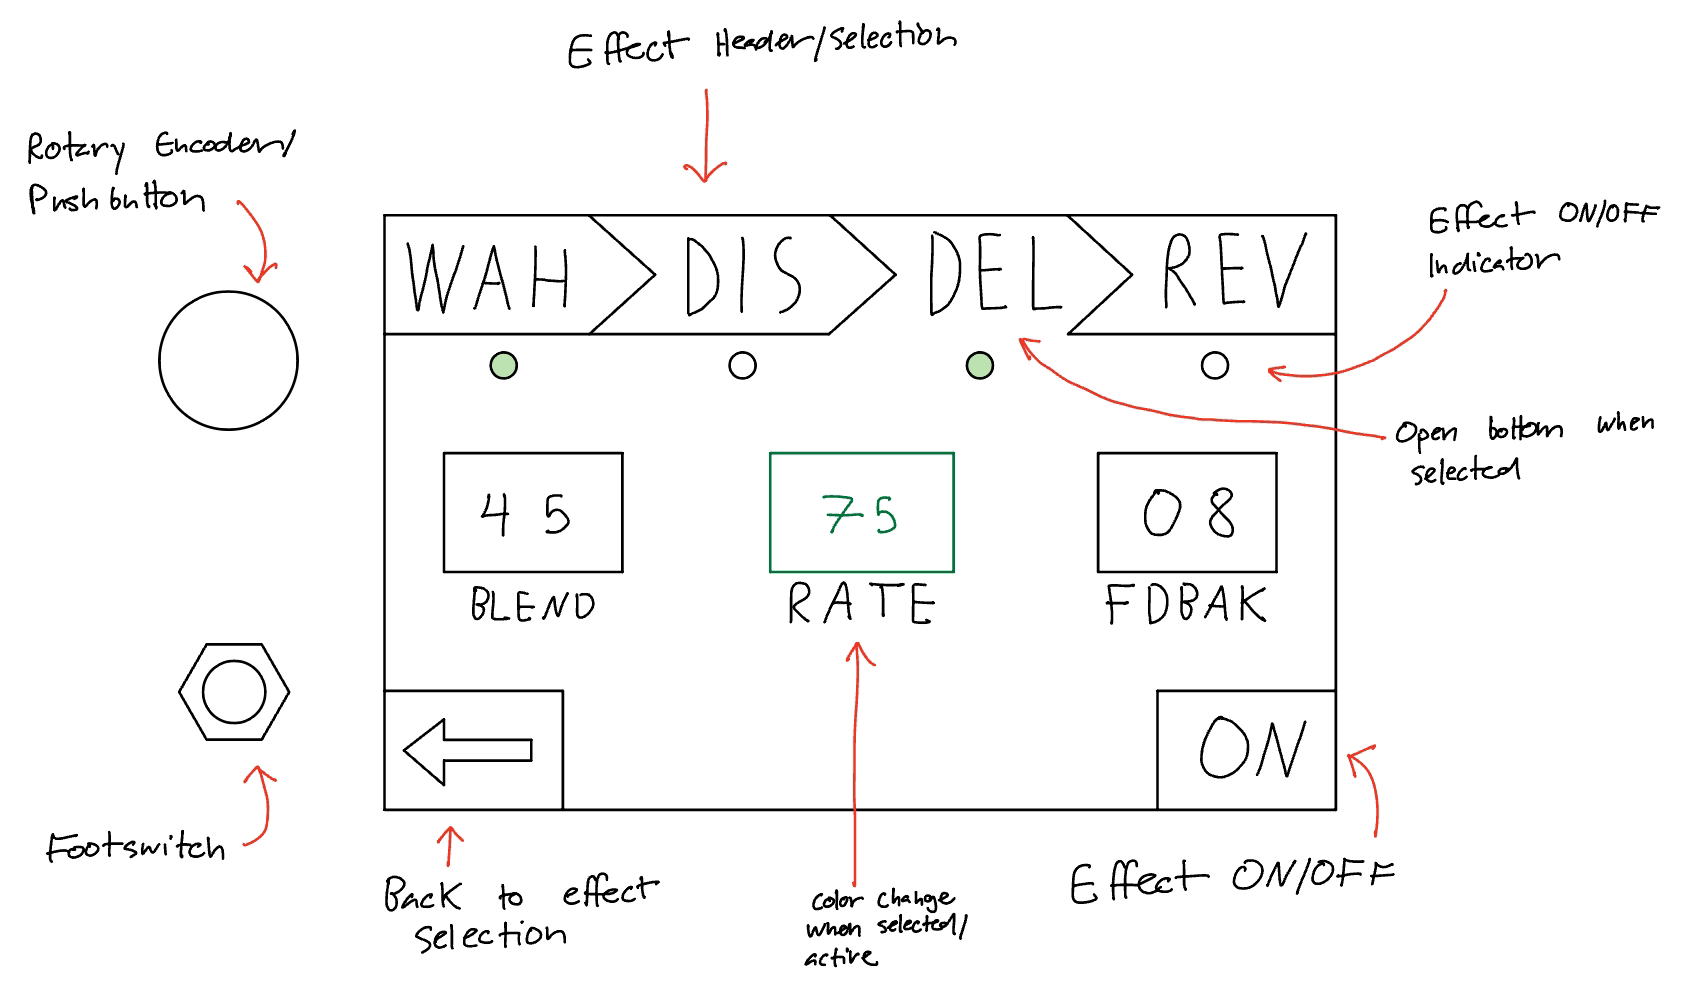
The operation of the bulk of the device will be done through the use of a rotary encoder/pushbutton. The user will be able to cycle through the effect parameters, back button, and on/off control by turning the rotary encoder, with a color change indicating what item is being targeted. The user can then press the button in the rotary encoder to select the item. If an effect parameter is selected, the user can adjust the parameter value between 0 and 99, and then press the button again to return to item selection. When selected, the on/off control will toggle the effect between on and off when the button is pressed. When the button is pressed while the back button is selected, the user will be able to select what effect to open controls for from the header. When an effect is selected from the header and the button is pressed, the line at the bottom of the header under the selected effect will disappear and the user will return to the selection of effect parameters, etc. The footswitch will toggle the pedal between actively effecting the guitar signal and bypassing the pedal effects.
This week, I helped in finding a screen and rotary encoder to use for the project and designed a GUI layout for the pedal’s screen. I succeeded in finding and learning how to load a VST3 plugin onto the Pi, but was unable to get the plugin to run properly by the end of the week. I have learned that we will need to write a config file for each plugin to set the device parameters while the plugin is active, and began writing a config file for the selected VST3 plugin. My main personal goals for next week will be centered around learning how to write config files for the VST3 plugins we will design, as well as creating step-by-step documentation and a template file for future use.
To Do List:
GOAL: Create VST3 config file, config file template, and config file documentation.
- Write config file for VST3 plugin
- Verify operation of plugin on hardware
- Create step-by-step instructions for config file setup
- Create config file template
Concerns:
We need to get parts ordered early this week to begin working on user controls, we got considerably hung up on finding an appropriate screen to use last week.
Spring 2025
Project Update 1 (1/23/2025)
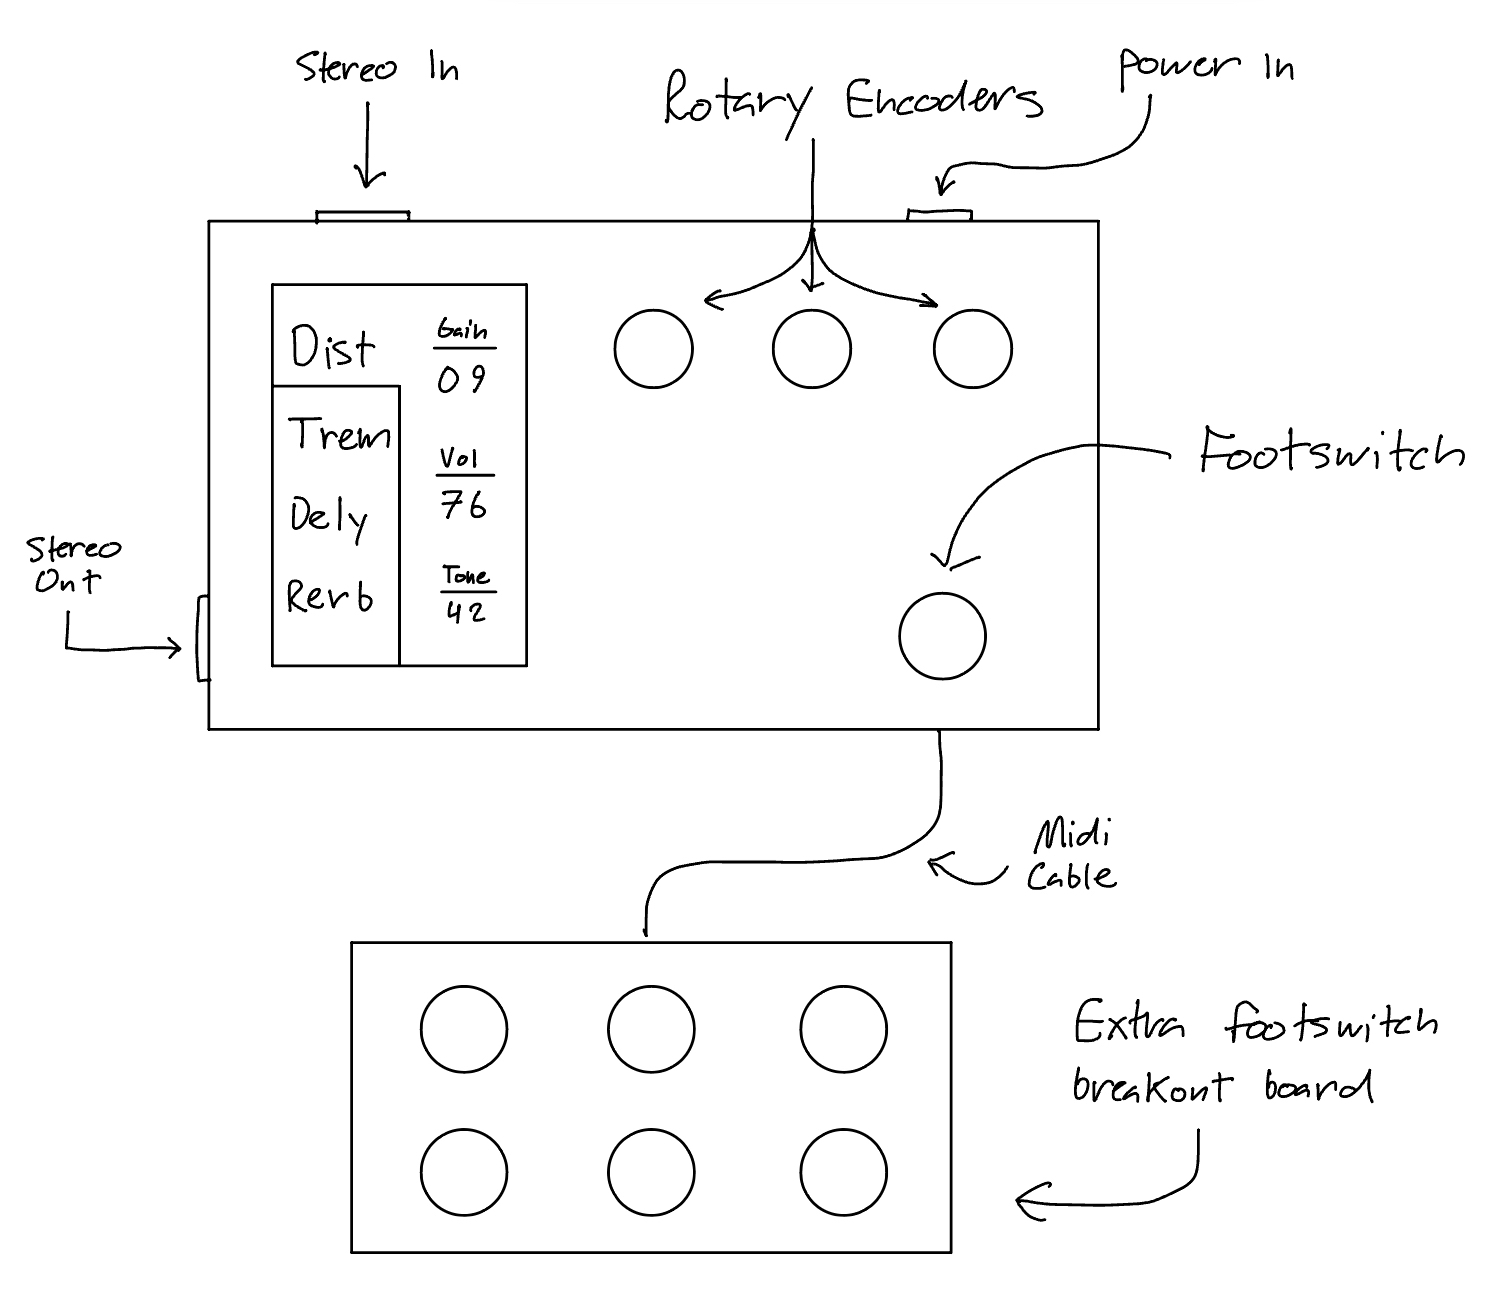
Shown below is a sketch of what I think our project will look like at the end of this semester. The screen, footswitch, and I/Os of the device are in the same position they were in at the end of last semester. We will be increasing the number of rotary encoders on the pedal to 3 for improved ease of use, as well as adding compatibility for a midi footswitch breakout board to allow for more footswitches to toggle individual effects.

To Do List:
- Finish jack configuration for Guitarix, record steps for jack patchbay configuration
- Experiment further with MOD Audio platform, try to get it running on Pi
- If MOD won’t work on the Pi, try to find a different jack compatible plugin host to connect our effect plugins
Concerns:
Jack is proving to be more complicated to configure than initially thought, though at this point I should know better to think that any Linux audio software setup will be easy on the Pi. Our MOD installation mostly worked, but failed to create a web server to modify the signal chain with. Hopefully we will be able to load and route plugins without the web server, but we may need to pivot to a different plugin host if I can’t get any results by the end of the week.
Project Update 2 (1/26/2025)
My last project update was only 3 days ago, so there isn’t too much more to talk about. I did some more work with Jack and should have a functional configuration for Guitarix all set, which I will be testing tomorrow when Xavier brings his amp and guitar to our meeting. That being said, my to do list has not really changed.
To Do List:
- Finish jack configuration for Guitarix, record steps for jack patchbay configuration
- Experiment further with MOD Audio platform, try to get it running on Pi
- If MOD won’t work on the Pi, try to find a different jack compatible plugin host to connect our effect plugins
Concerns:
MOD may require our plugins to be written in a specific way to be compatible, which would add pressure on Anna and Georgia to rework their plugins from last semester in addition to their new plugins. That being said, I have yet to successfully run MOD on the Pi, so it’s probably not worth worrying about until I know that MOD will work for our application.
Project Update 3 (2/9/2025)
Shown below is an illustration of the states and controls that the user will encounter when using the pedal. The footswitch breakout board is omitted from these sketches, but their state will always be set to toggle their respective effect number on or off.

Last week was a big breakthrough week, as me and Xavier were able to get Guitarix working and play guitar through the Pi with a proper audio server configuration. We were able to have over ten effects running simultaneously without noticeable delay between playing the guitar and hearing output, which was very relieving. We continued working on running MOD Host in a headless configuration as well, but have yet to get it functional. Working on getting MOD Host working will be the primary goal of my work in the coming week.
To Do List:
- Create running plugin instances in MOD Host from the command line.
- Investigate the possibility of Guitarix control from the command line.
- Prepare for presenting the project at CDR
Concerns:
At this time, I am still uncertain if we will be able to run MOD Host from the command line without using the MOD GUI, which would require the user to open a link connecting to the Pi on another device to control parameters. This situation would not work with our existing control scheme and would require major goal adjustments to facilitate. If this is true, we could instead pivot to having our plugins hosted within Guitarix and writing code to map our physical controls to manipulating Guitarix. This would require running our code and GUI with Guitarix and it’s GUI running, which would be suboptimal in terms of adding more computational strain to the Pi.
Project Update 5 (3/3/2025)

Presently, work on packet communication between MOD Host and our software is being spearheaded by Xavier. We were at a bit of a bottleneck in terms of software progress where I didn’t have a clear way to help with the software side until MOD Host communication got sorted. In the mean time, I’m working on the hardware side this week getting our rotary encoders and footswitch functional with the Pi.
To Do List:
- Finalize debouncing code for rotary encoder
- Add 2 more rotary encoders to the Seeed XIAO circuit and add appropriate code to use them
- Add footswitch to same circuit as rotary encoders if enough data lines are still available, write code to process footswitch input
Concerns:
MOD Host packet communication is a big hurdle for our progress right now, and I’m a little worried about taking my focus away from it for now.
Project Update 6 (3/12/2025)
Since my last update, I’ve gotten the software working for the three rotary encoders. Next, I need to add a footswitch to the circuit and put together the final control harness that will be installed into the enclosure. Speaking of, it’s probably about time to update the enclosure design to accommodate the new controls and footswitch breakout board.
To Do List:
- Add footswitch to pedal’s Seed XIAO user control system and write code for it’s implementation
- Design and assemble control system’s permanent configuration
- Update pedal enclosure design to accommodate new controls
Concerns:
The end of the semester is approaching fast, and with it I expect an end-of-project crunch.
Project Update 9 (4/1/2025)

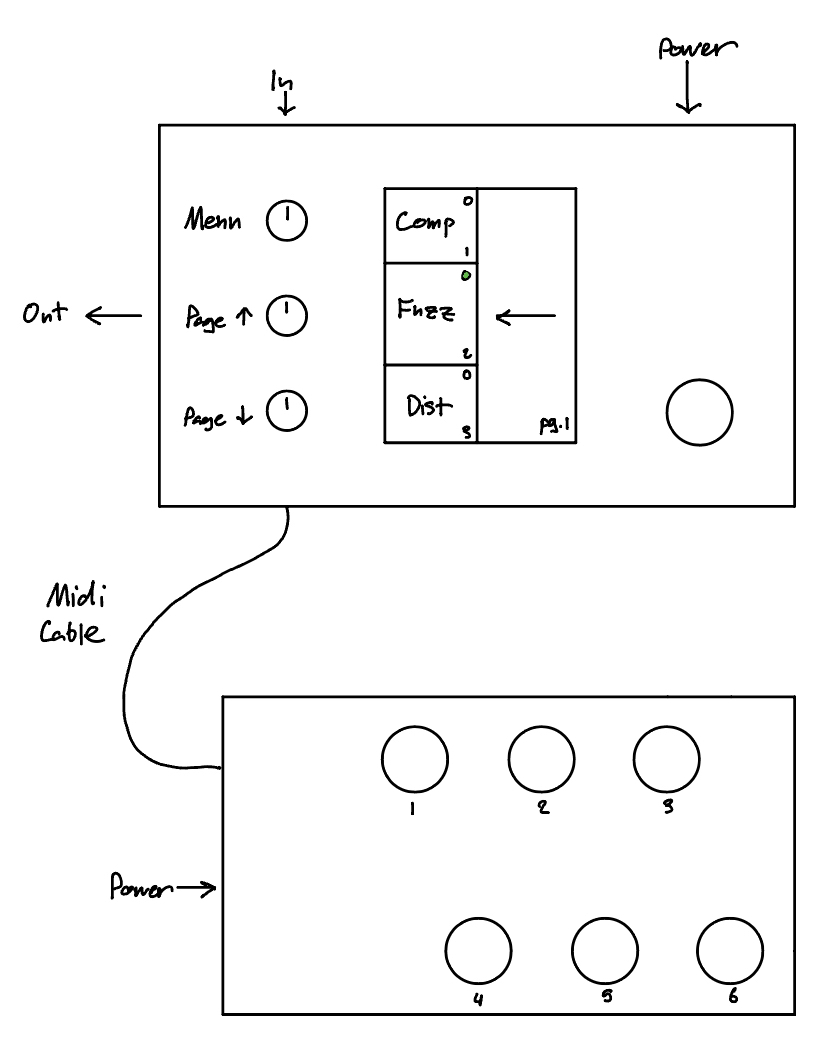
The image above shows what I think the layout of the final pedal design will be. Since the last time I’ve done a mockup sketch, the rotary encoders and screen have switched places on the main pedal. This was an alteration that was made within the last week, as we found that the rotary encoder position we previously using would block the screen connections. This design was the best alternative I could come up with, and is actually probably a slight design upgrade. With the screen in the middle, the footswitch and encoders are further apart and less likely to interfere with each other. The midi footswitch design we presented for our design checkoff had the footswitches too close together to be realistically operated with a foot due to last minute internal space issues. I am still an adamant supporter of the 2×3 footswitch implementation due to it’s space saving versus a 1×6 footswitch, I just think the distance between the switches needs to be increased more. The unused space on the left side of the midi footswitch is to accommodate the PCB for the Midi and USB-C jack.
It’s been a couple weeks since I wrote an update, but thankfully I have a lot of progress to show for it. I was able to add not only the footswitch to the input controller circuit, but also the Midi jack! This means that in the future, we will be able to have one PCB to connect the controllers, footswitch, and Midi jack. The current hardware implementation that I built has the microcontroller soldered to a stripboard with all the wiring to the footswitch, encoders, and the Midi PCB connected to that stripboard. I had to update the controller’s code to process Midi input data as well. I updated the enclosure design to accommodate the new hardware from this semester and got it printed, only to find that the new encoder positions wouldn’t work with our screen position and had to be moved along with the positions of all the bottom plate mounted components. One design update and enclosure print later, I was able to get everything to line up inside the enclosure and finally assemble the pedal.
To Do List:
- Present pedal to Dr. Pinar and get feedback for device improvement
- Write build documentation for pedal hardware
- Write project report draft
- Plan goals for next semester of project
Concerns:
I don’t have a super clear idea of what needs to be done to have the project ready to go for next semester, which I am a little bit stressed about. I think I need to just have a meeting with Shane to get a straight answer of everything I need to do.
Project Update 10 (4/9/2025)
Since my last update, I’ve laid out my tentative goals for the project next semester and presented the prototype pedal to Dr. Pinar. Based on feedback from Dr. Pinar, I have a pretty good idea of what direction to take the project in to turn the pedal into something that will be more intuitive to use and musically useful. I also got the project description written up for team assignments so anyone who joins the project next semester knows what they’ll be working on.
To Do List:
- Write project report draft
- Write full build documentation for pedal hardware
- Find good use for remaining project budget
Concerns:
Honestly, I feel pretty confident about finishing the project out strong. However, I should try to find time before the end of the semester to sit down with Xavier and go over his GUI code with him. A lot of what I plan to work on next semester is revisions and upgrades to the GUI and the Modhost controller, so I should try to have him explain as much of his code to me as he can before he leaves the project.
Project Update 11 (4/19/2025)
The report draft got submitted, and I got most of the hardware build documentation completed along with updates to the bill of materials. At this point, I just need to get the build documentation finalized and help the other group members revise and finish their sections.
To Do List:
- Finish enclosure build documentation
- Finalize project report
Concerns:
I should be in the clear to get everything else done, the only complications I might run into are related to managing the deadlines and end of semester work for my other classes.
